Scuba Kayak
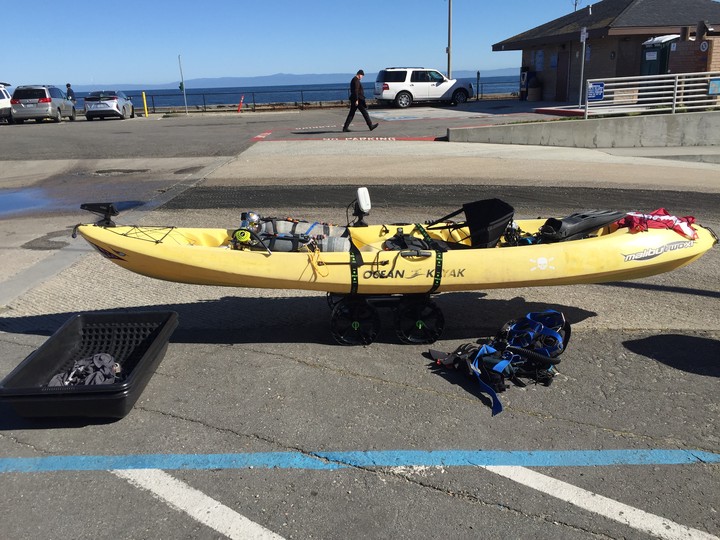
Table of Contents
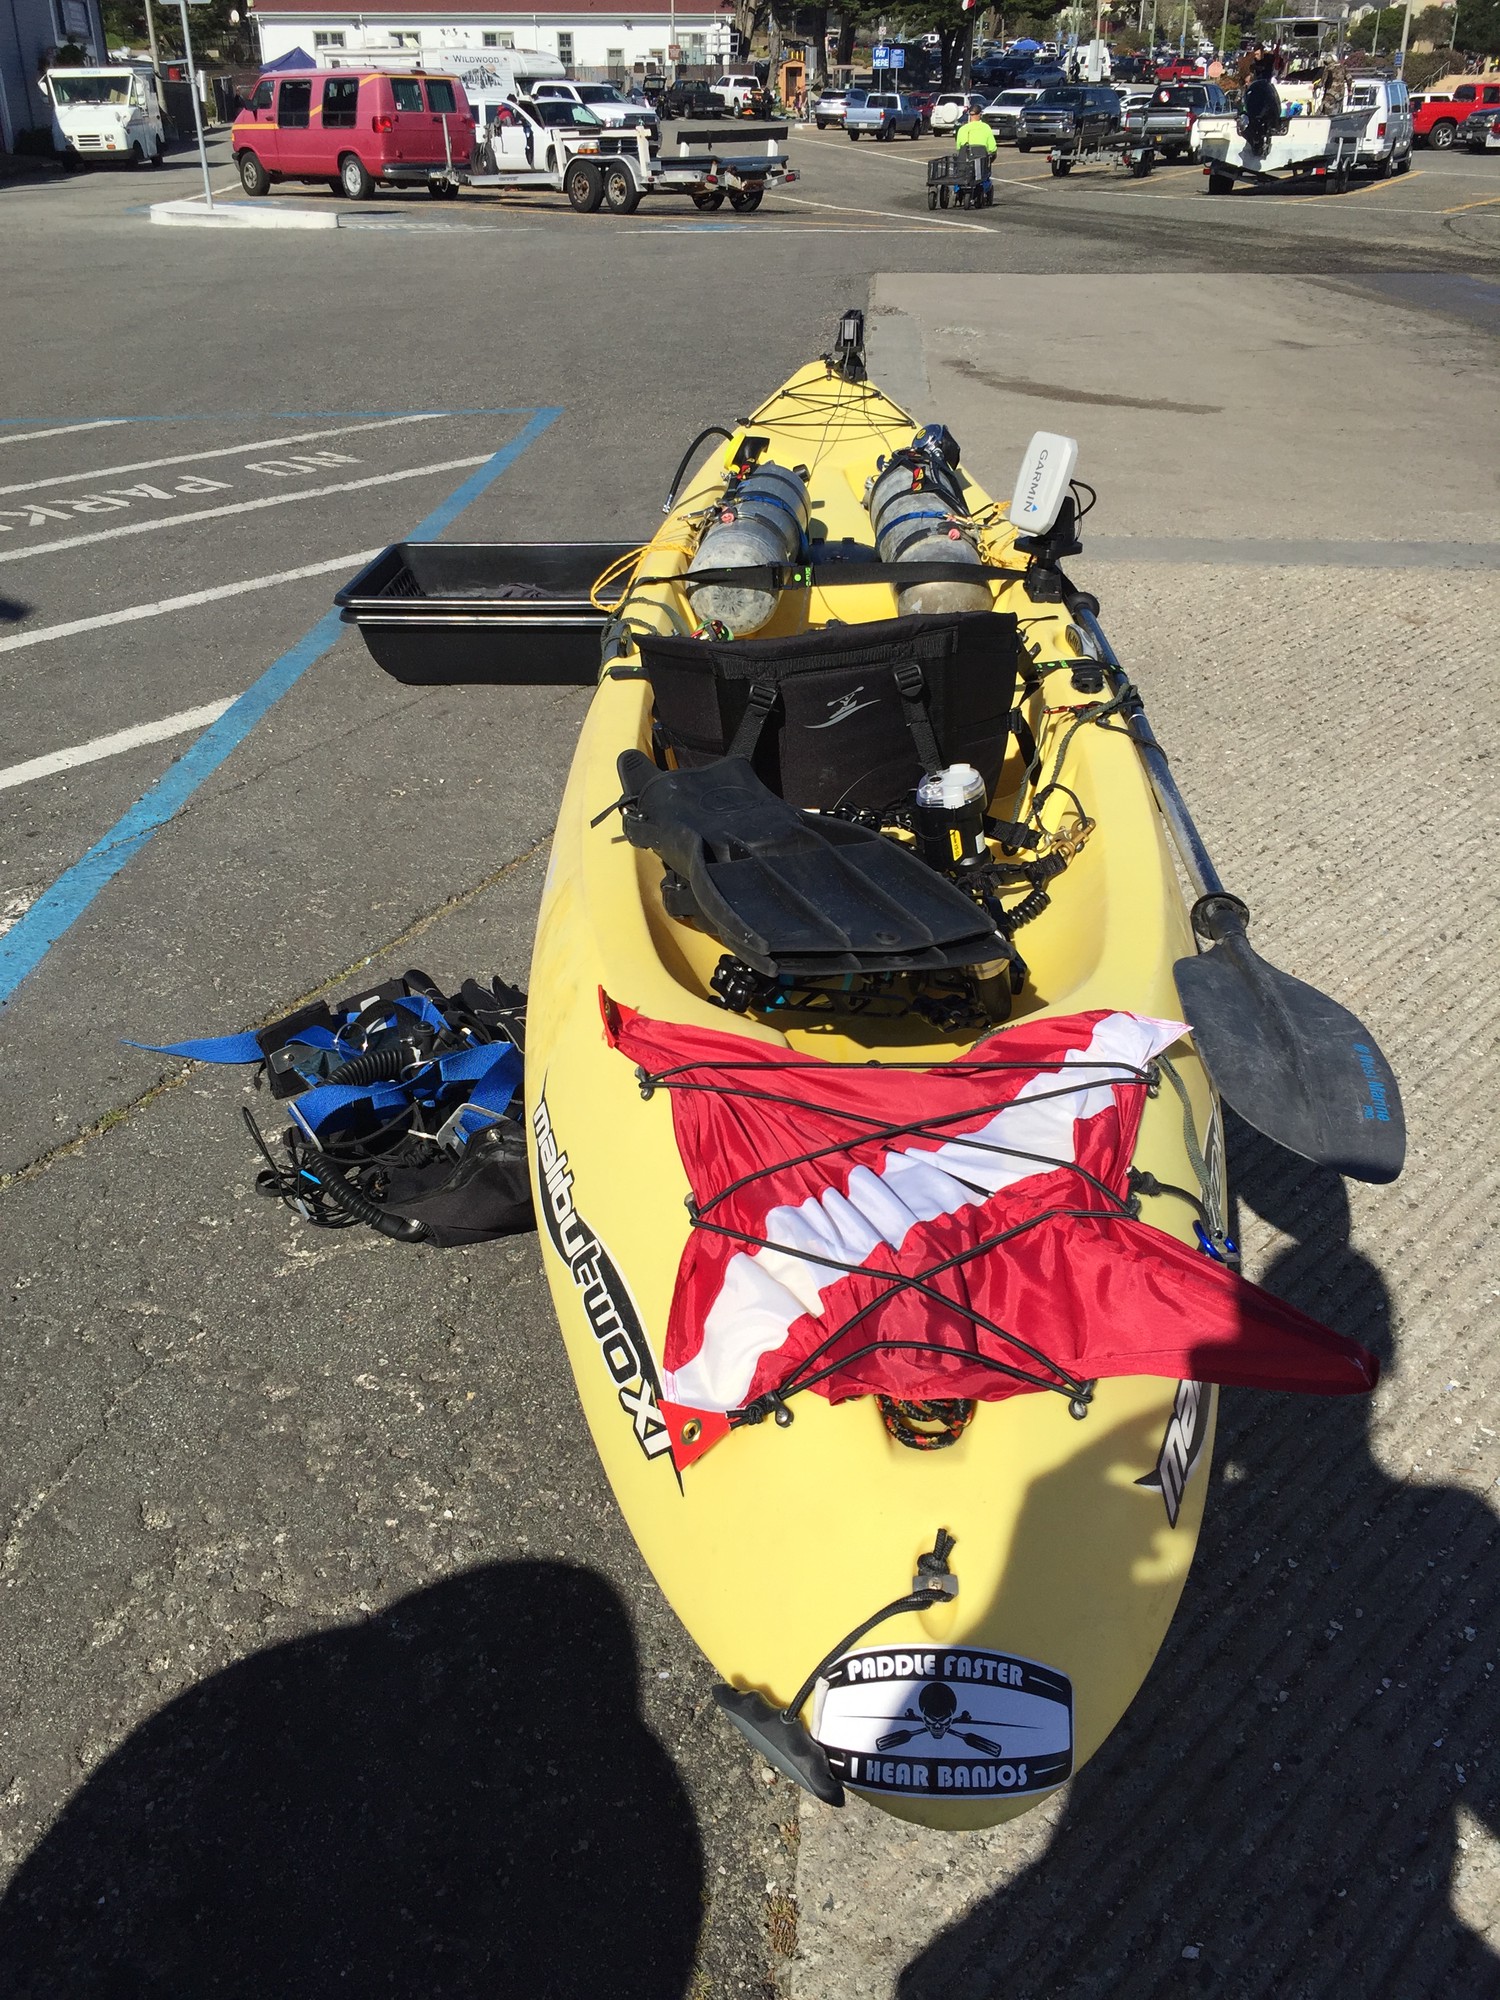
Overview
This is my first kayak! Let’s first cover the basics:
- Start: September 2017
- End: March 30, 2019
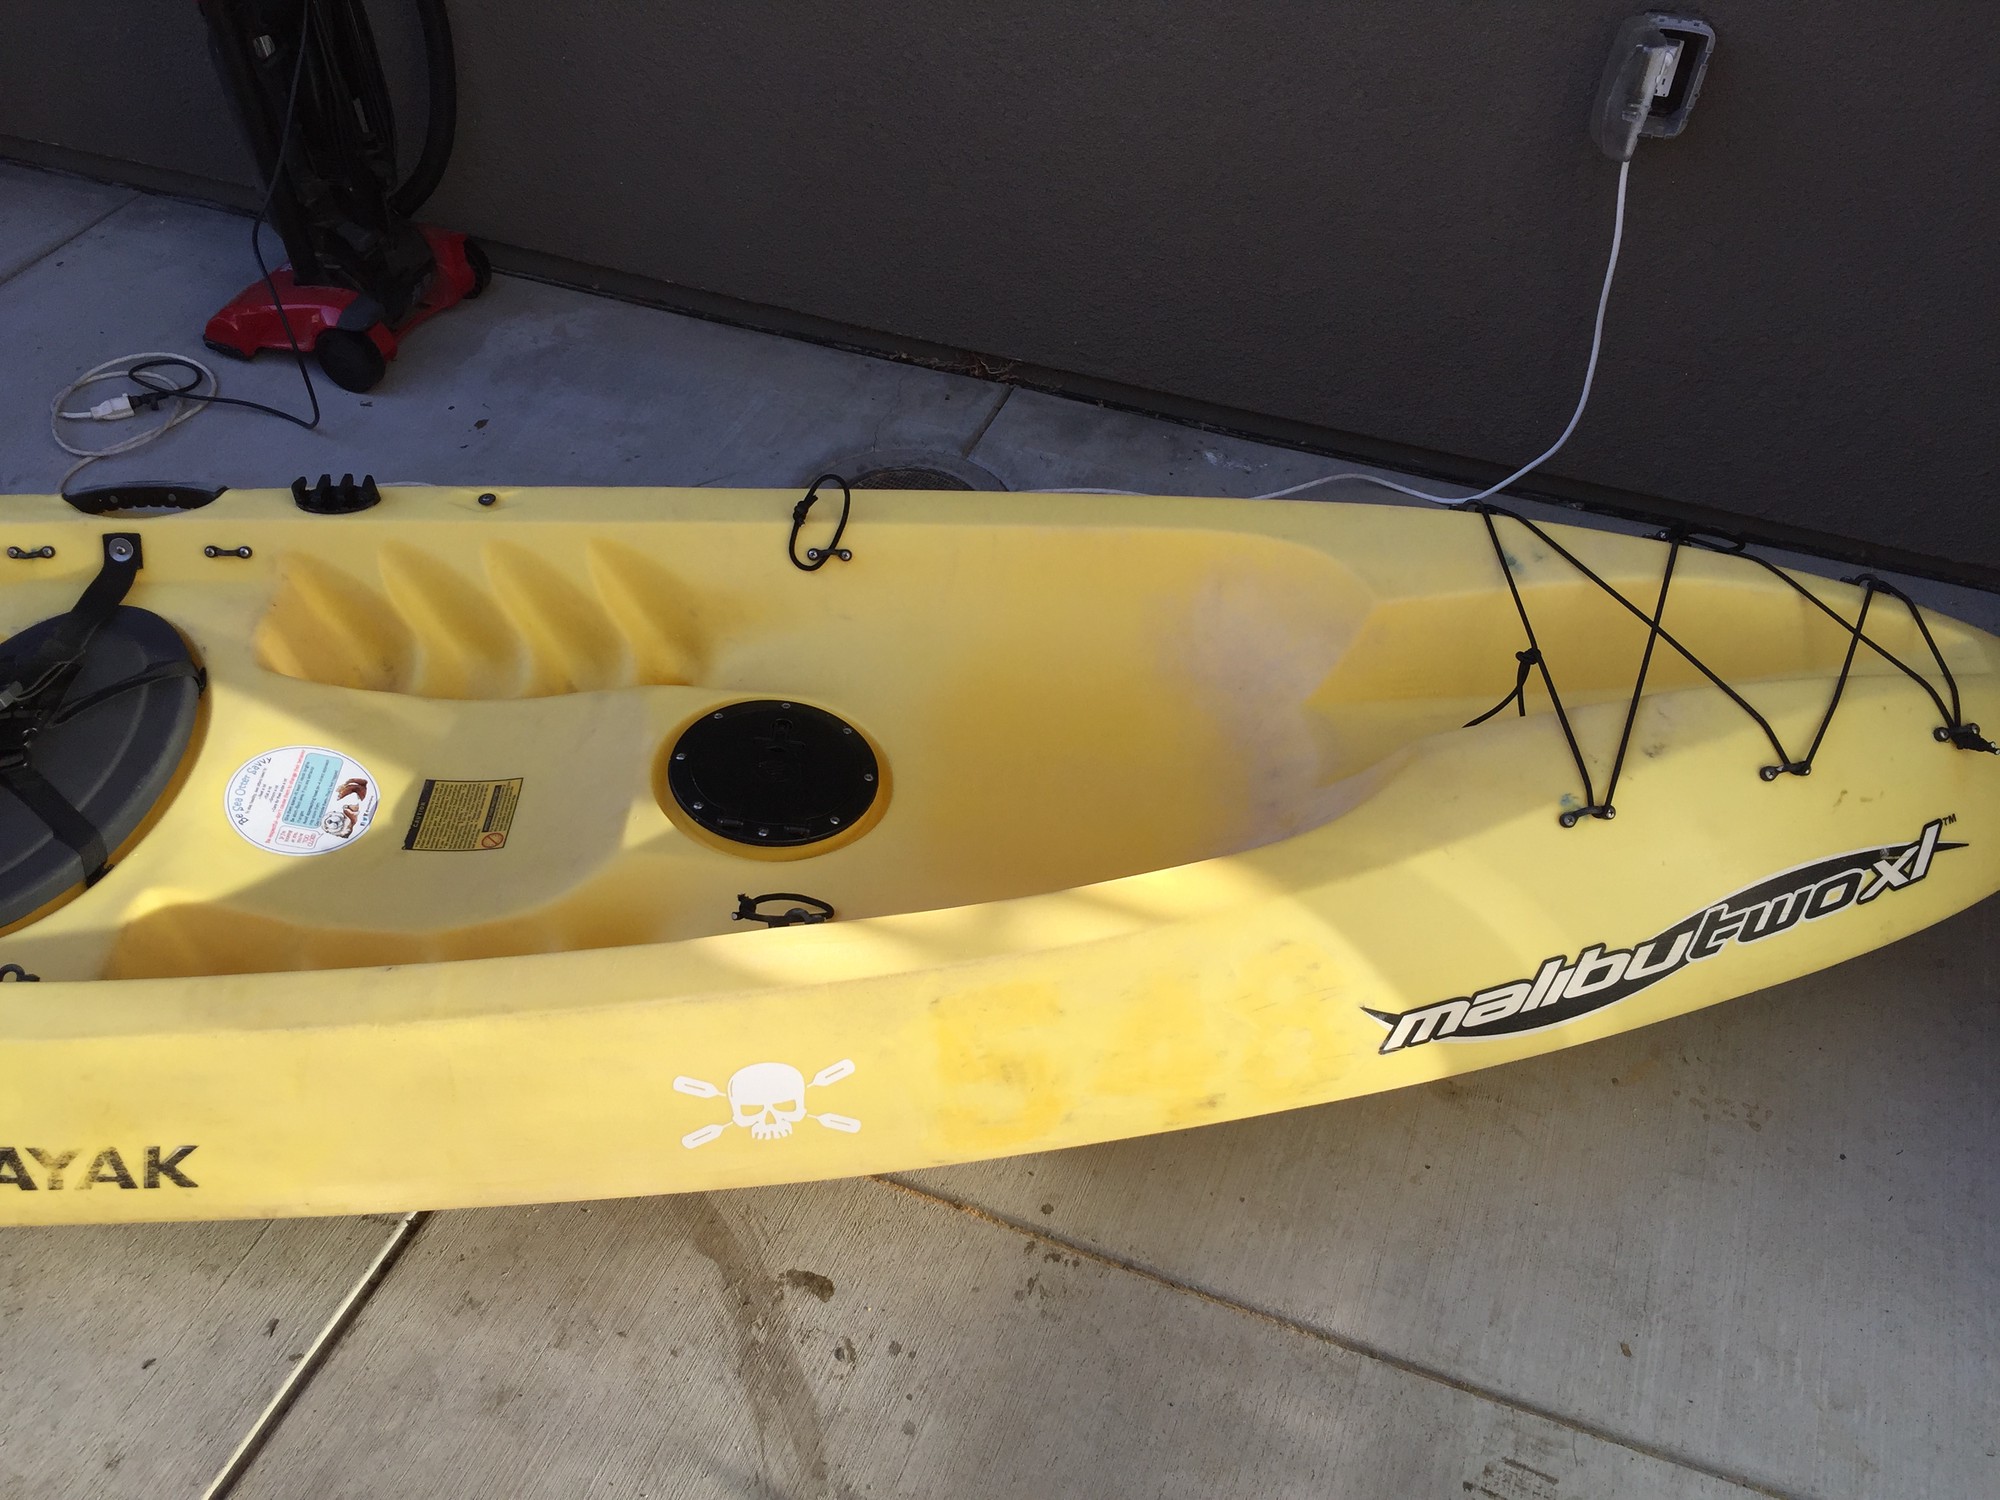
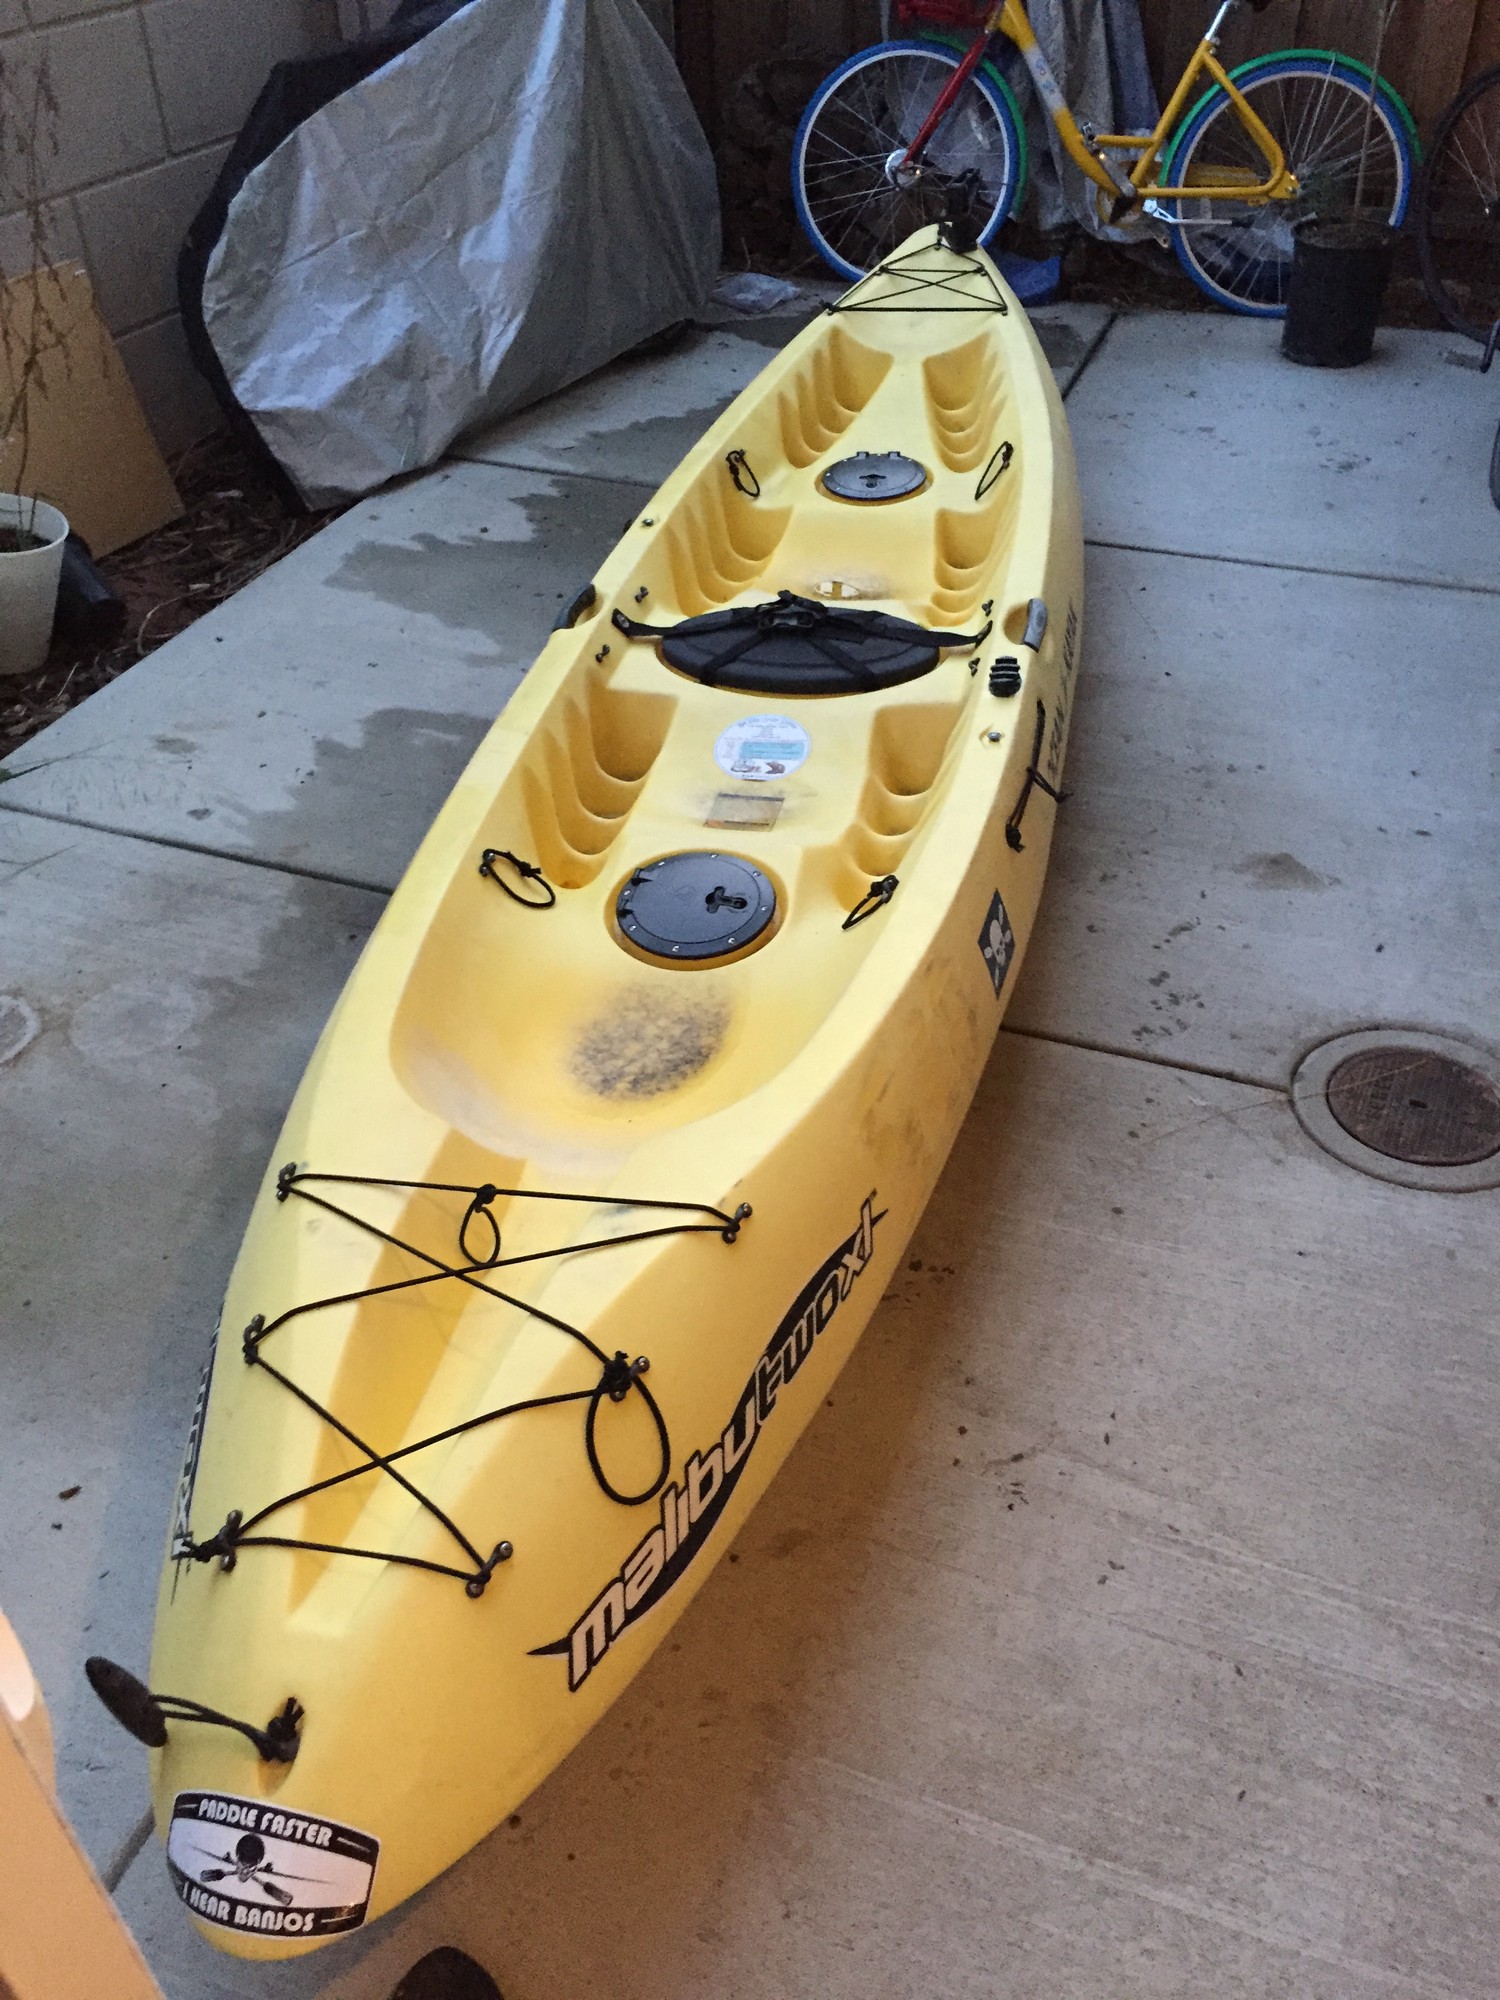
- Kayak Brand/Model: Malibu 2XL
- Base Kayak Purchased From: Monterey Bay Kayaks1
As is evident from this site, I love scuba diving and generally speaking, the water. Once a scuba buddy introduced me to kayak scuba diving on the ocean using their kayak, I was hooked on the idea and began looking around for a kayak of my own. With some great guidance from the same scuba buddy, I was able to purchase a used Malibu 2XL kayak for only $425 (typically around $900 new) from Monterey Bay Kayaks1. These kayaks are great for diving because they afford great buoyancy, consideriable storage volume and a durable 1 piece, rotomolded polyethylene hull. They also provide an open deck layout which is necessary for equipment management during scuba diving.
While the kayak was technically usable right away for scuba diving, I wanted to make some modifications and perform general repairs. The used kayaks from Monterey Bay Kayaks1 are from their existing rental fleet. As such, they are taken care of but see signficant wear and tear.
Shock Cord Replacement
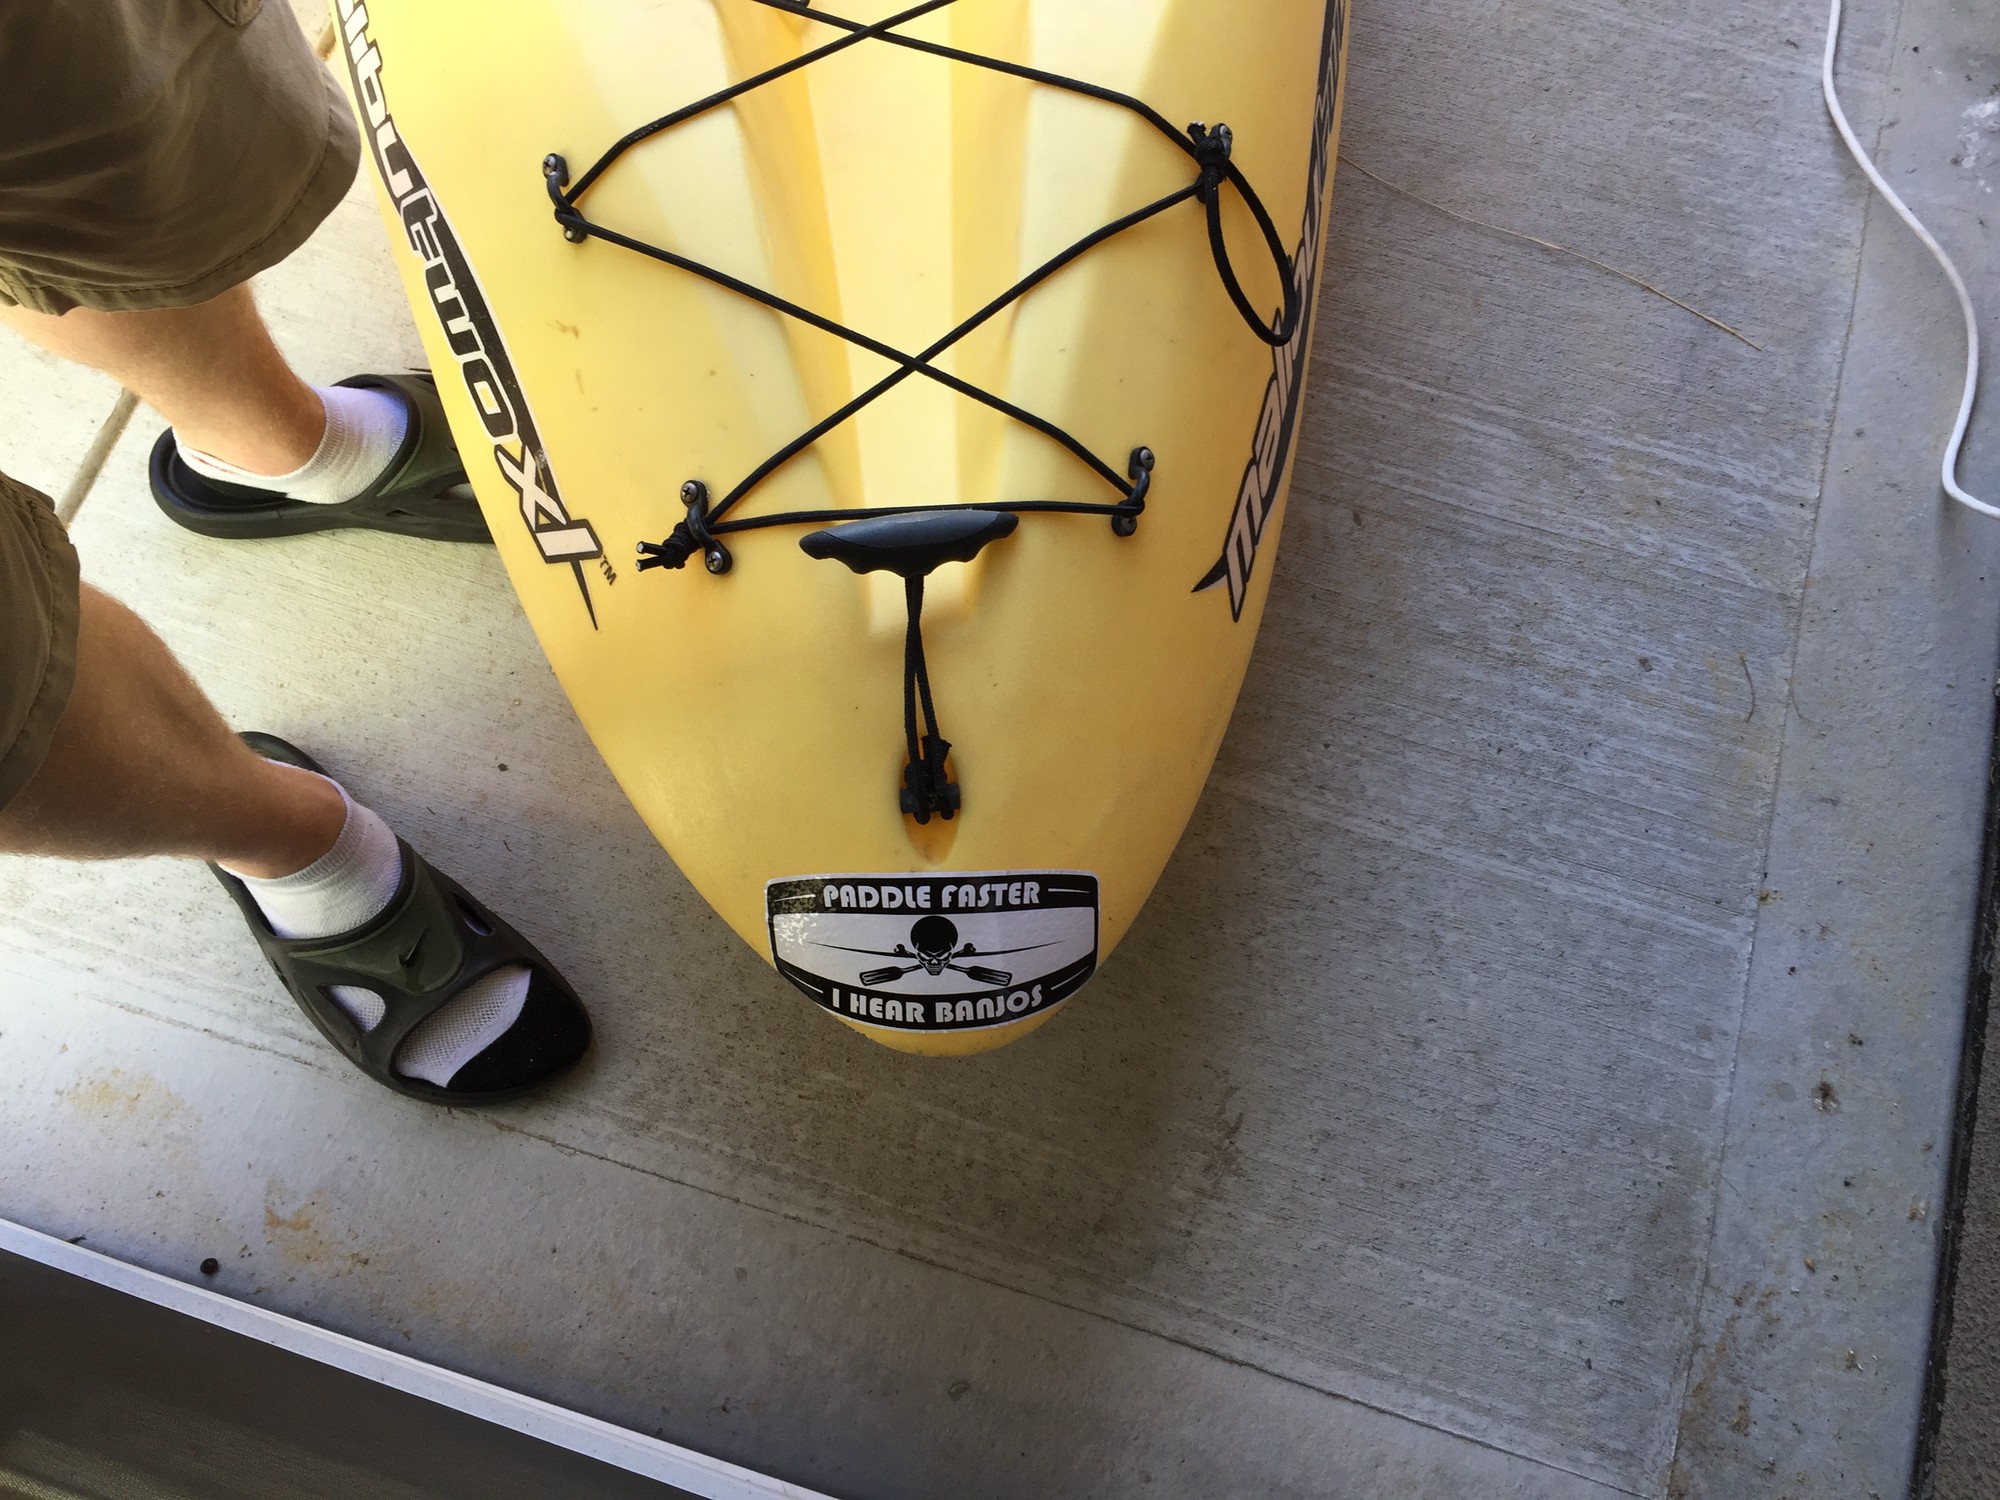
My first step was to replace the shock cord used as netting on the front and back of the kayak. I simply ordered a 25ft spool of 3/16" marine grade shock cord from Amazon2. I routed the new shock cord paying attention to how the existing shock cord was configured and tensioned.
Hatch Installs
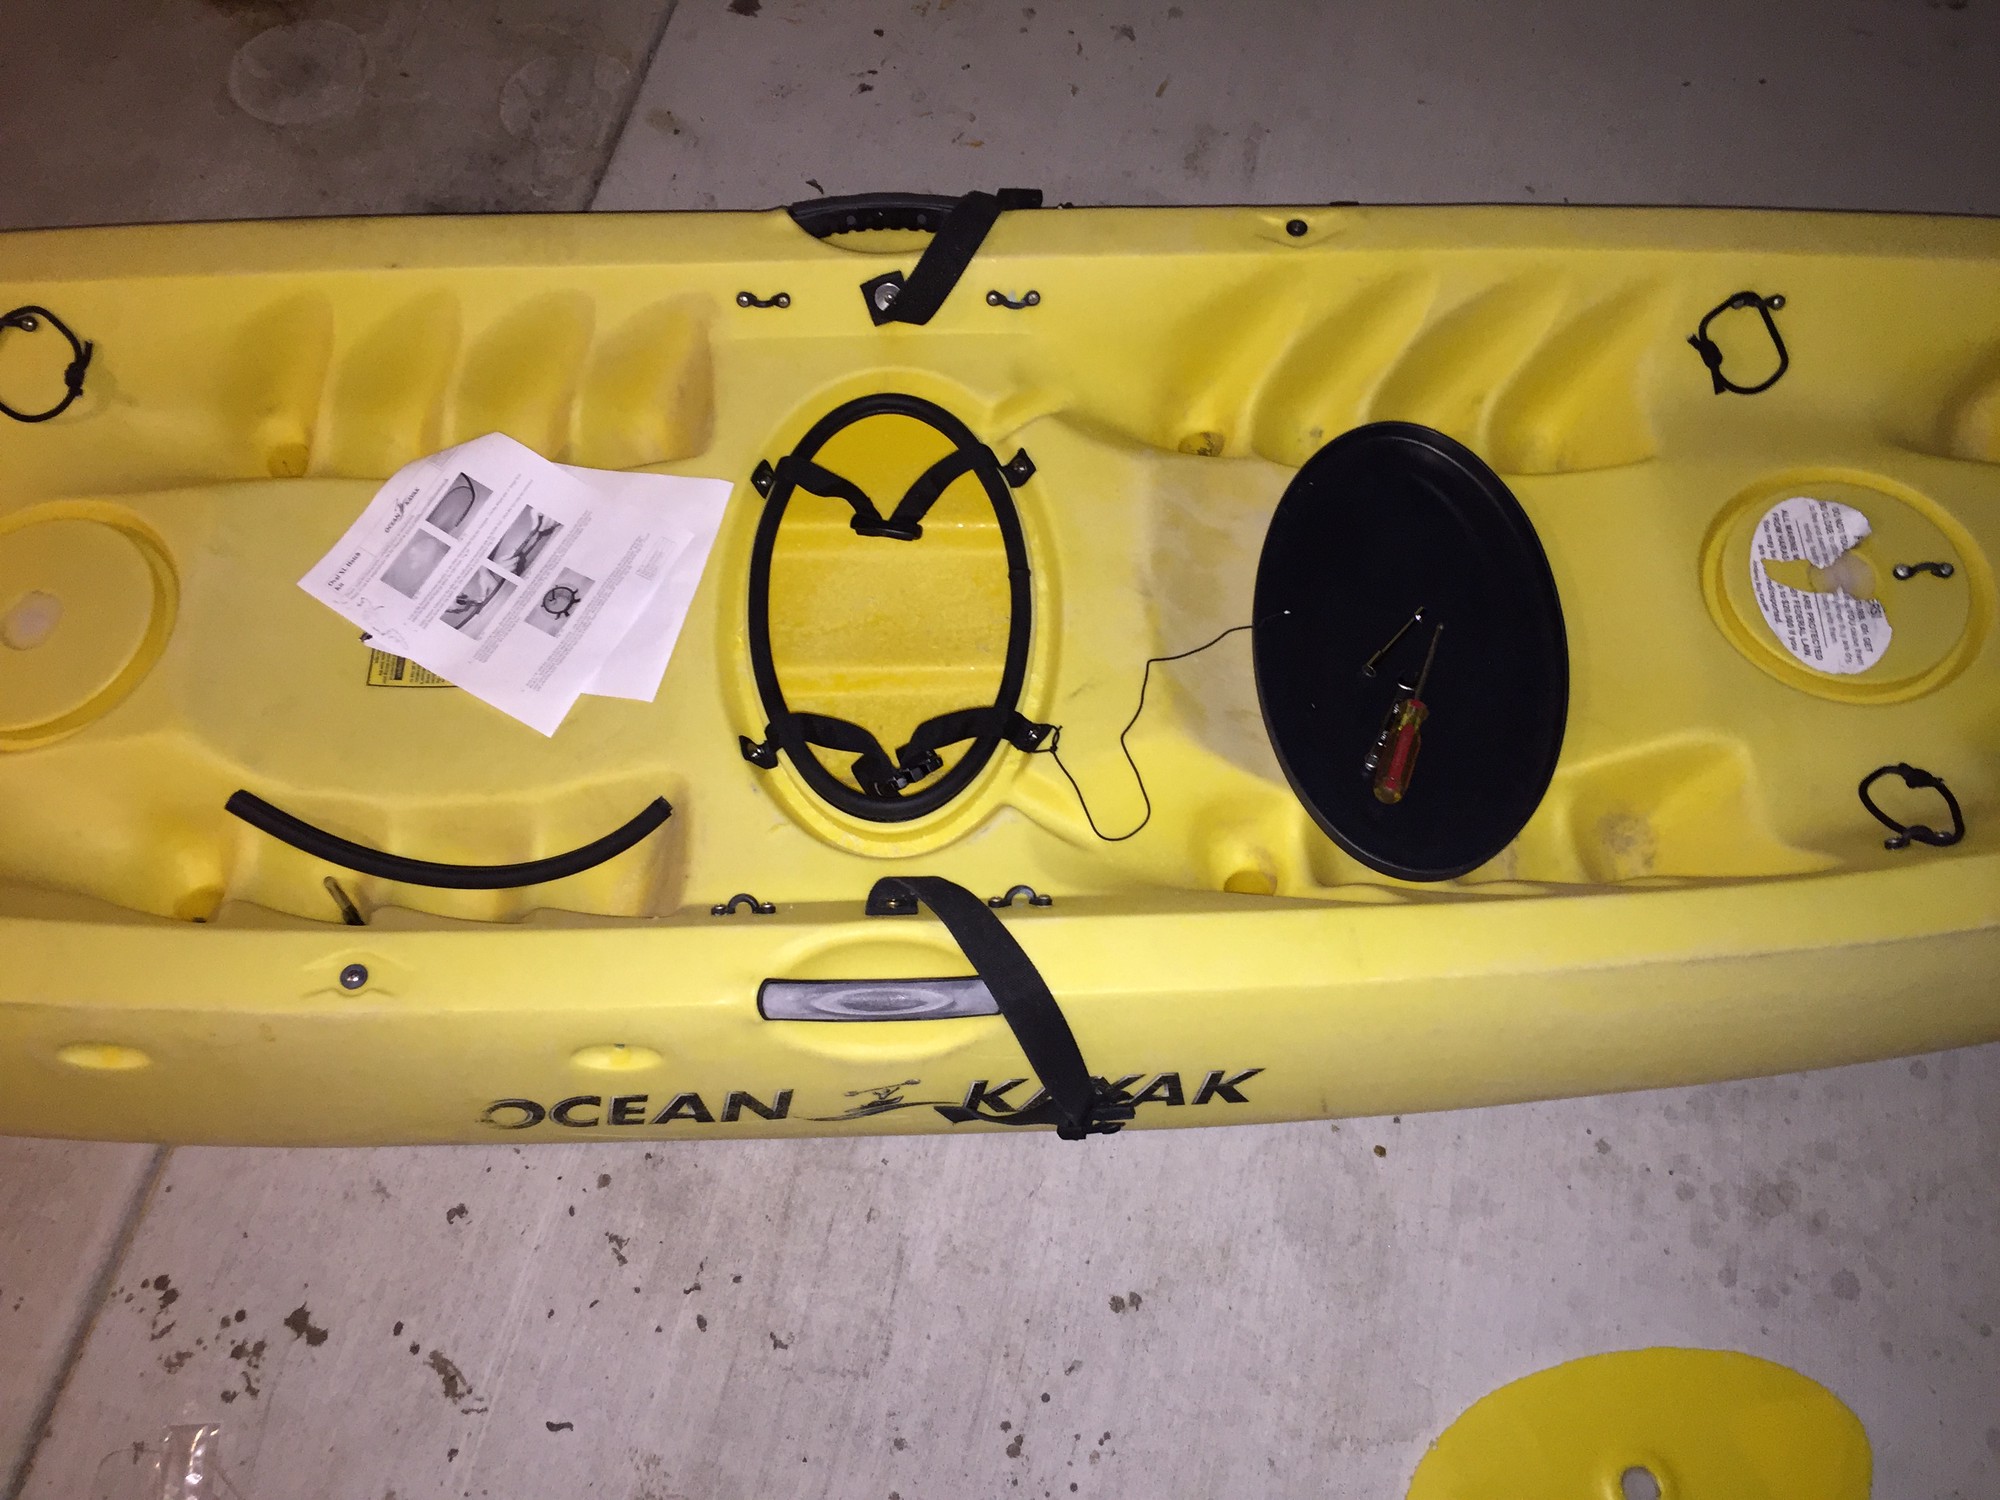
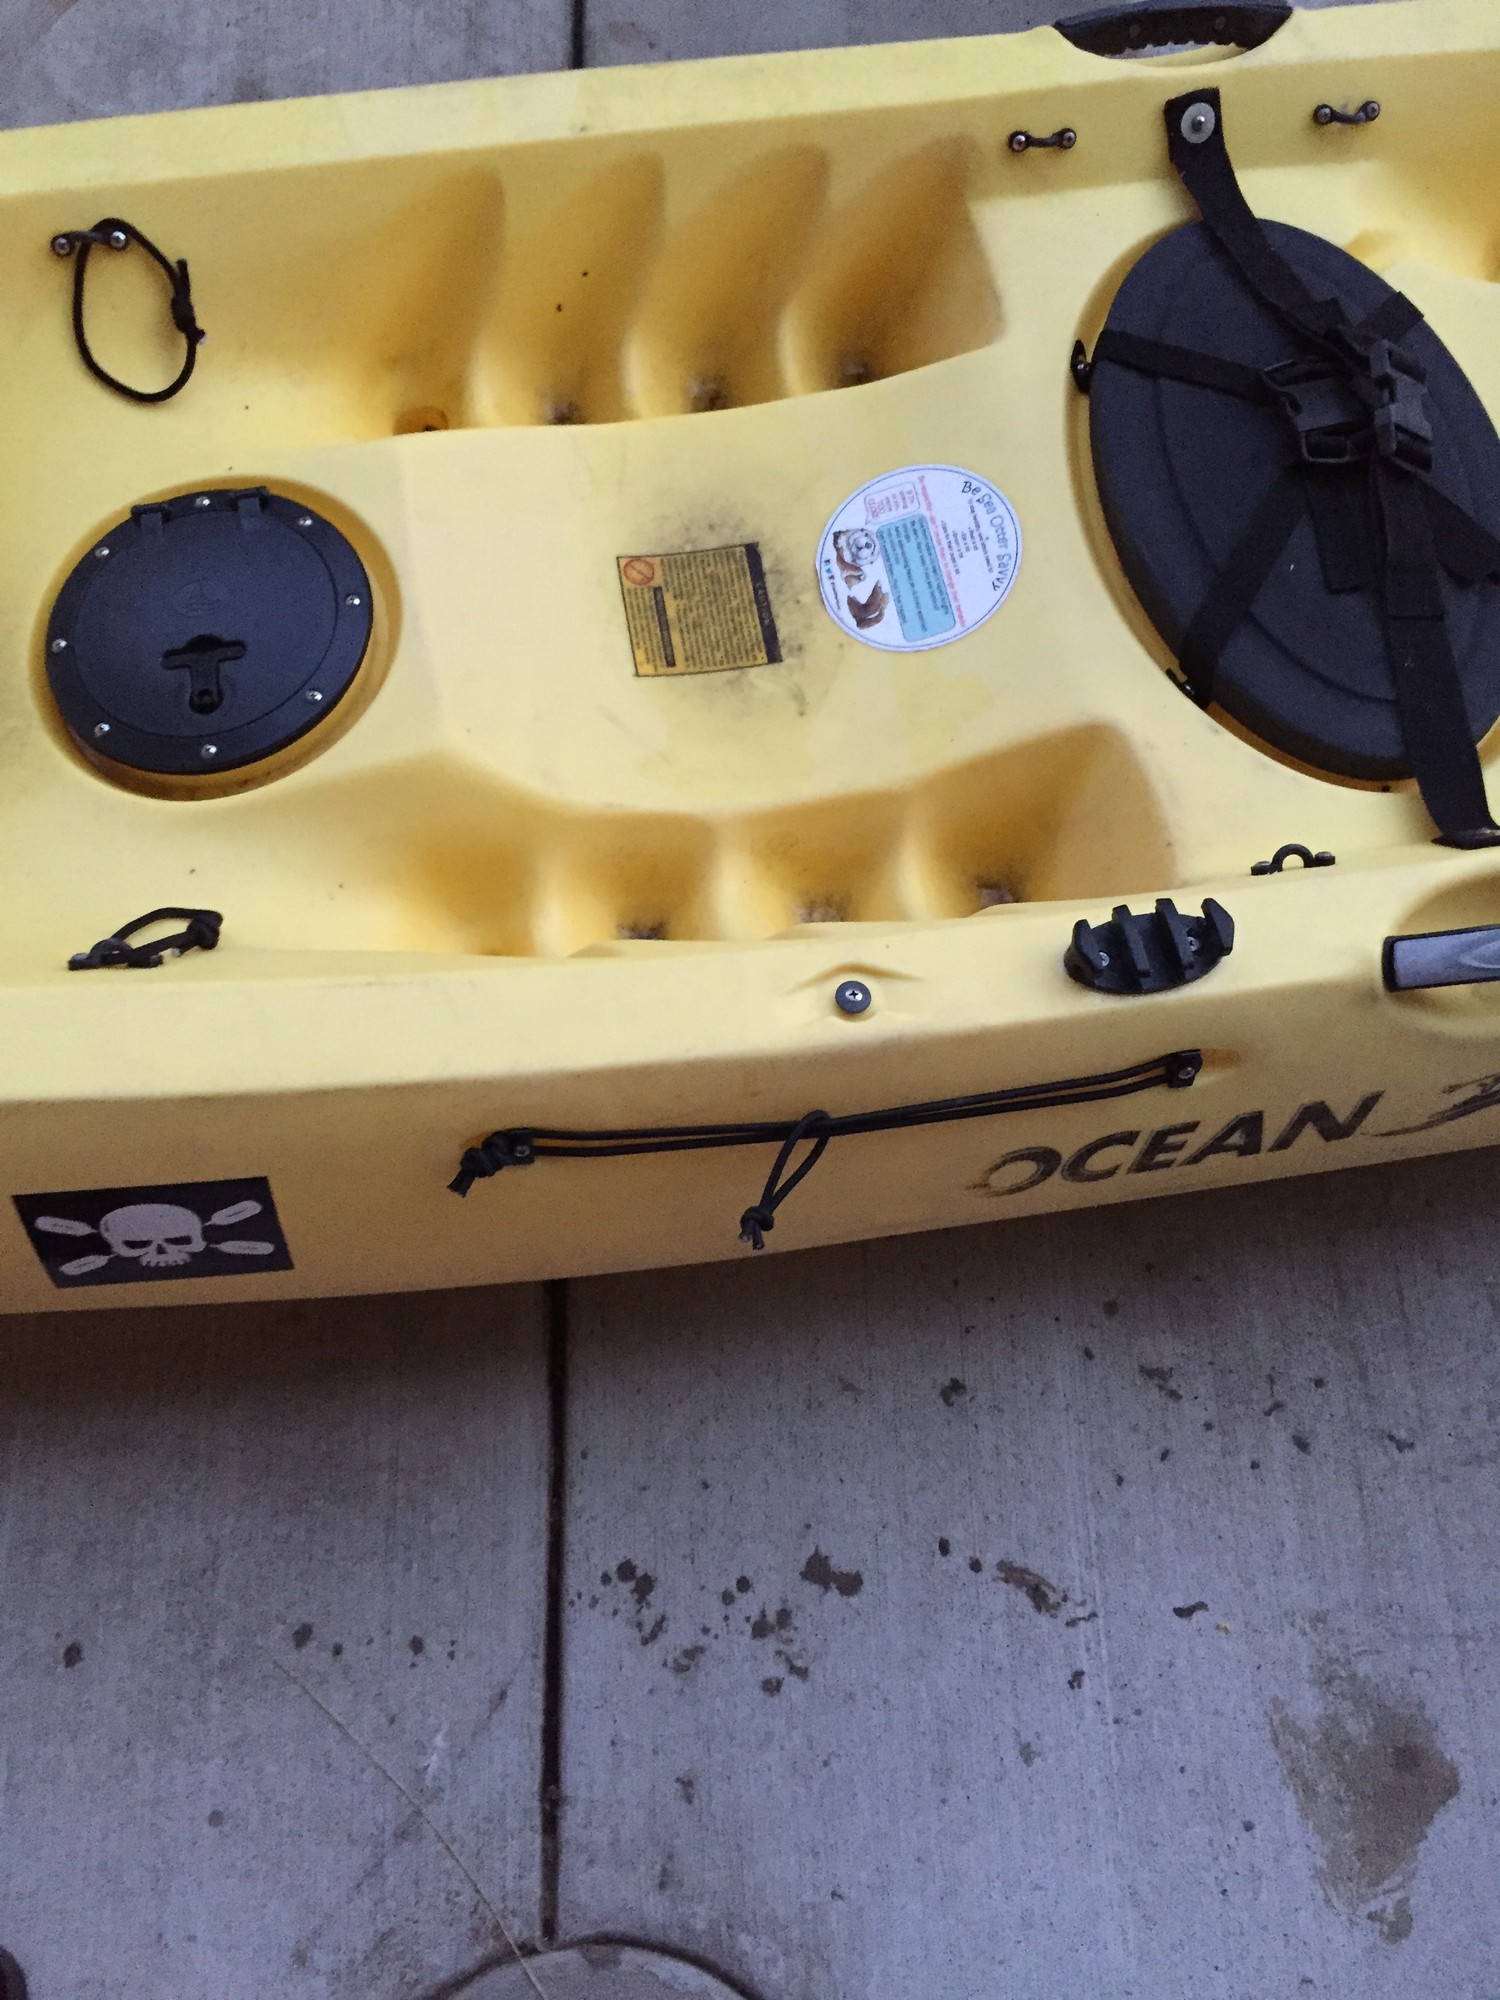
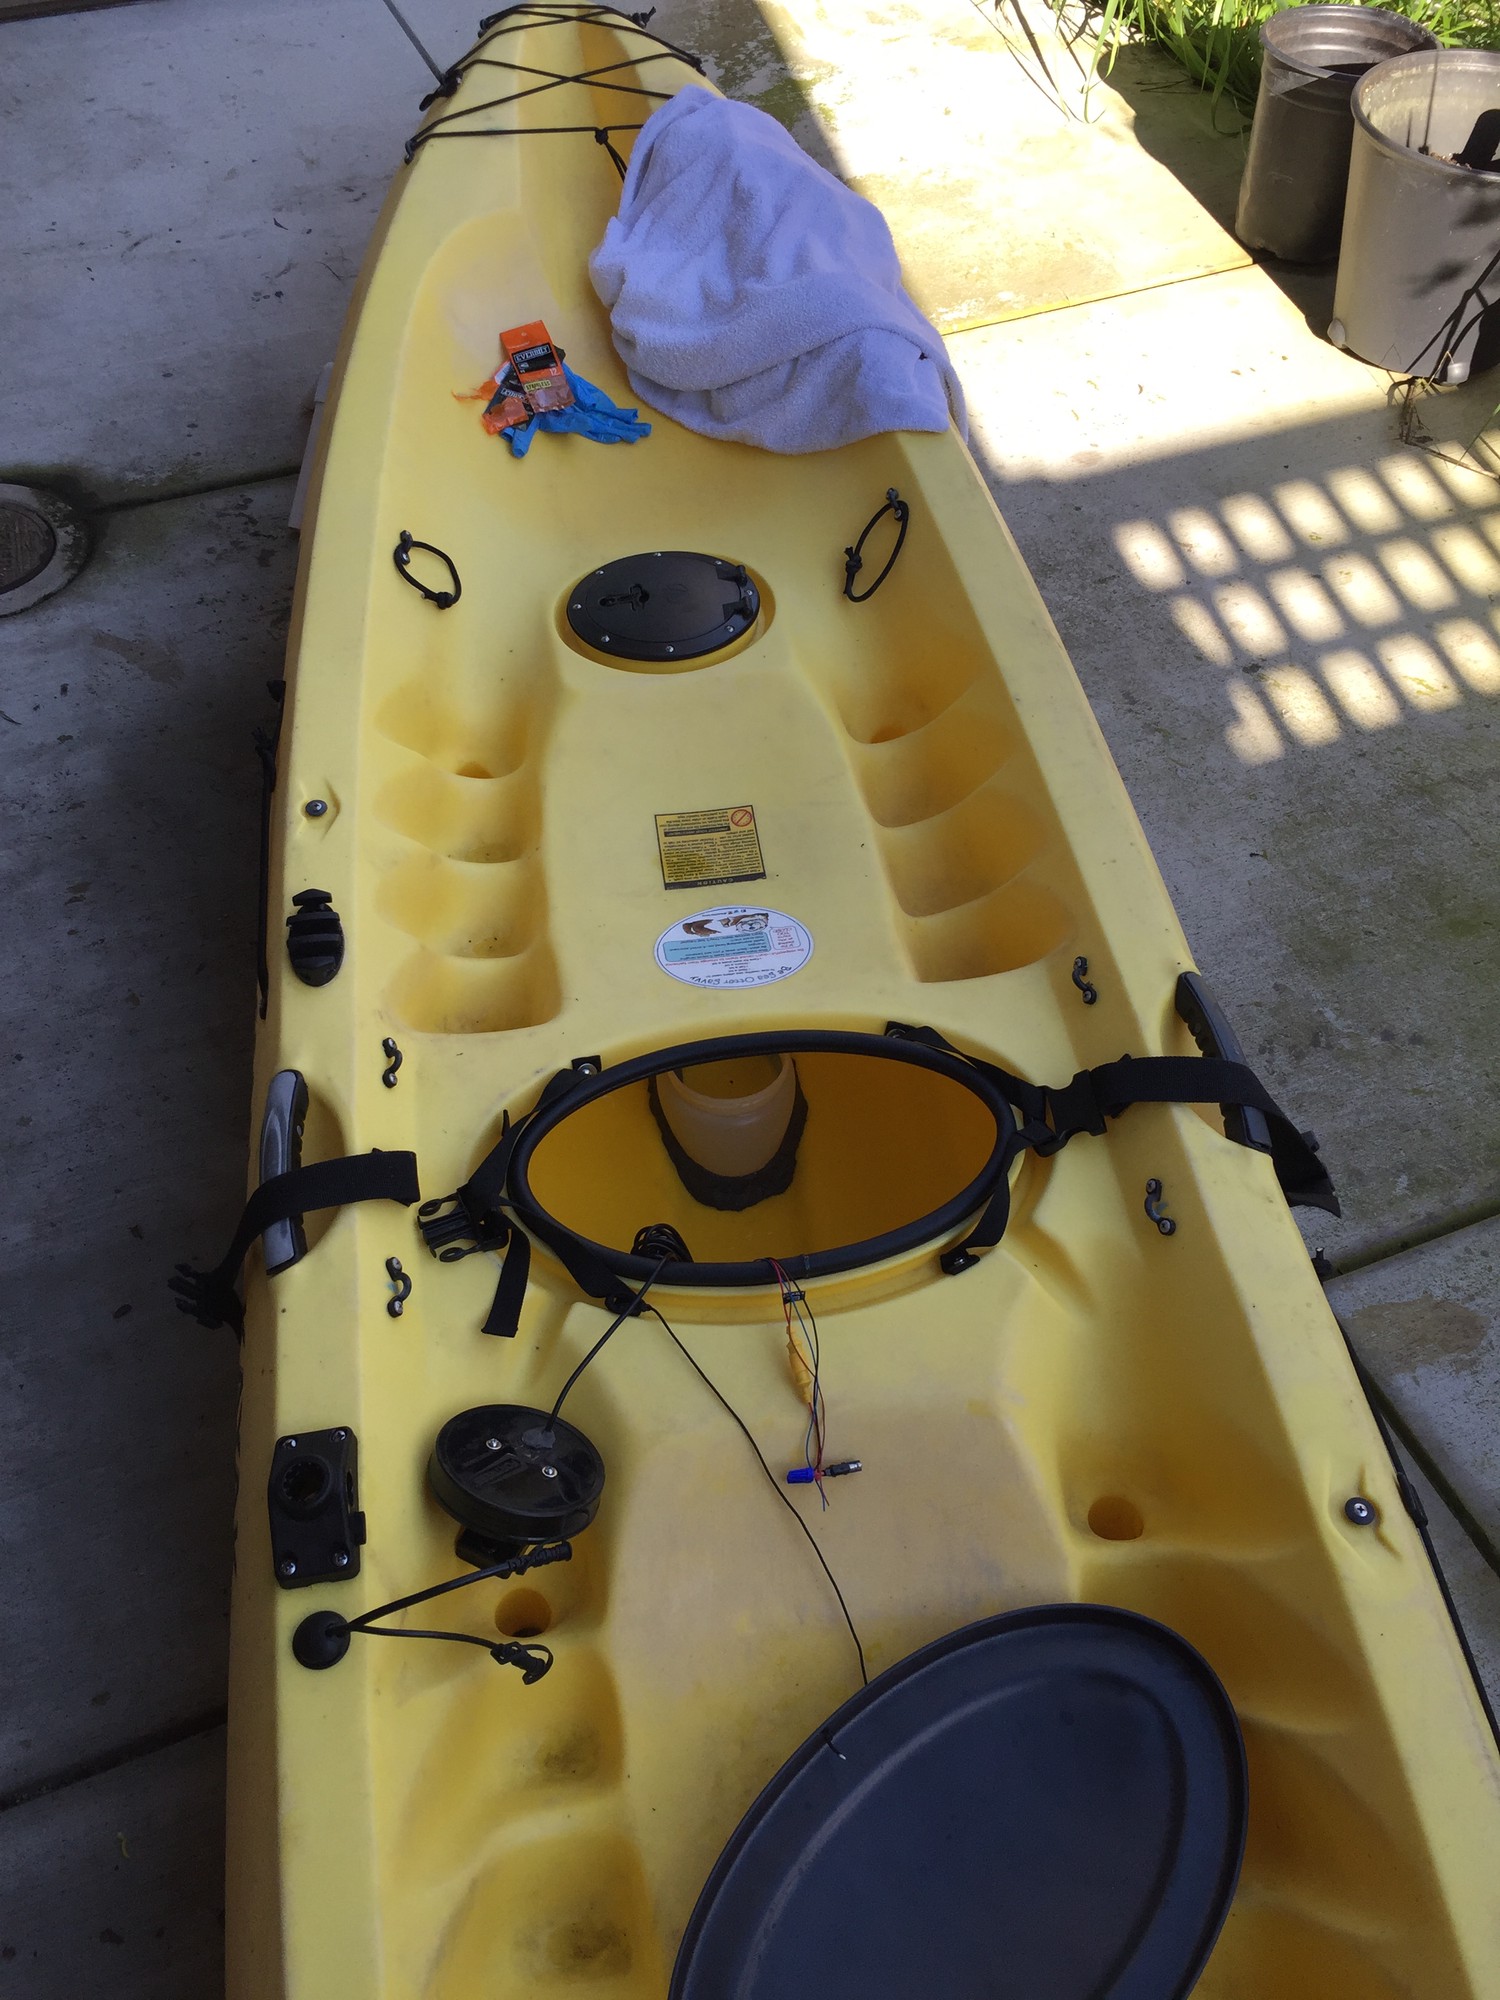
Next, I wanted to place hatches in the hull for storage and access to the bow and stern for future, externally mounted hardware. I purchased two 6" hatches3 and one large oval hatch cover4 after making sure that they fit the predefined cutouts on the hull of the kayak. I chose to go with the cheapest available hatch covers that still received good ratings on Amazon as the name-brand options were considerably more expensive with little added utility. These hatches come with well written installation manuals so I won’t cover their installation in depth. To cut out the hatch openings I simply used a dremel with cutting bit and then cleaned up any sharp edges with a dremel sanding wheel. Any bolt holes were sealed with Marine Grade GOOP5.
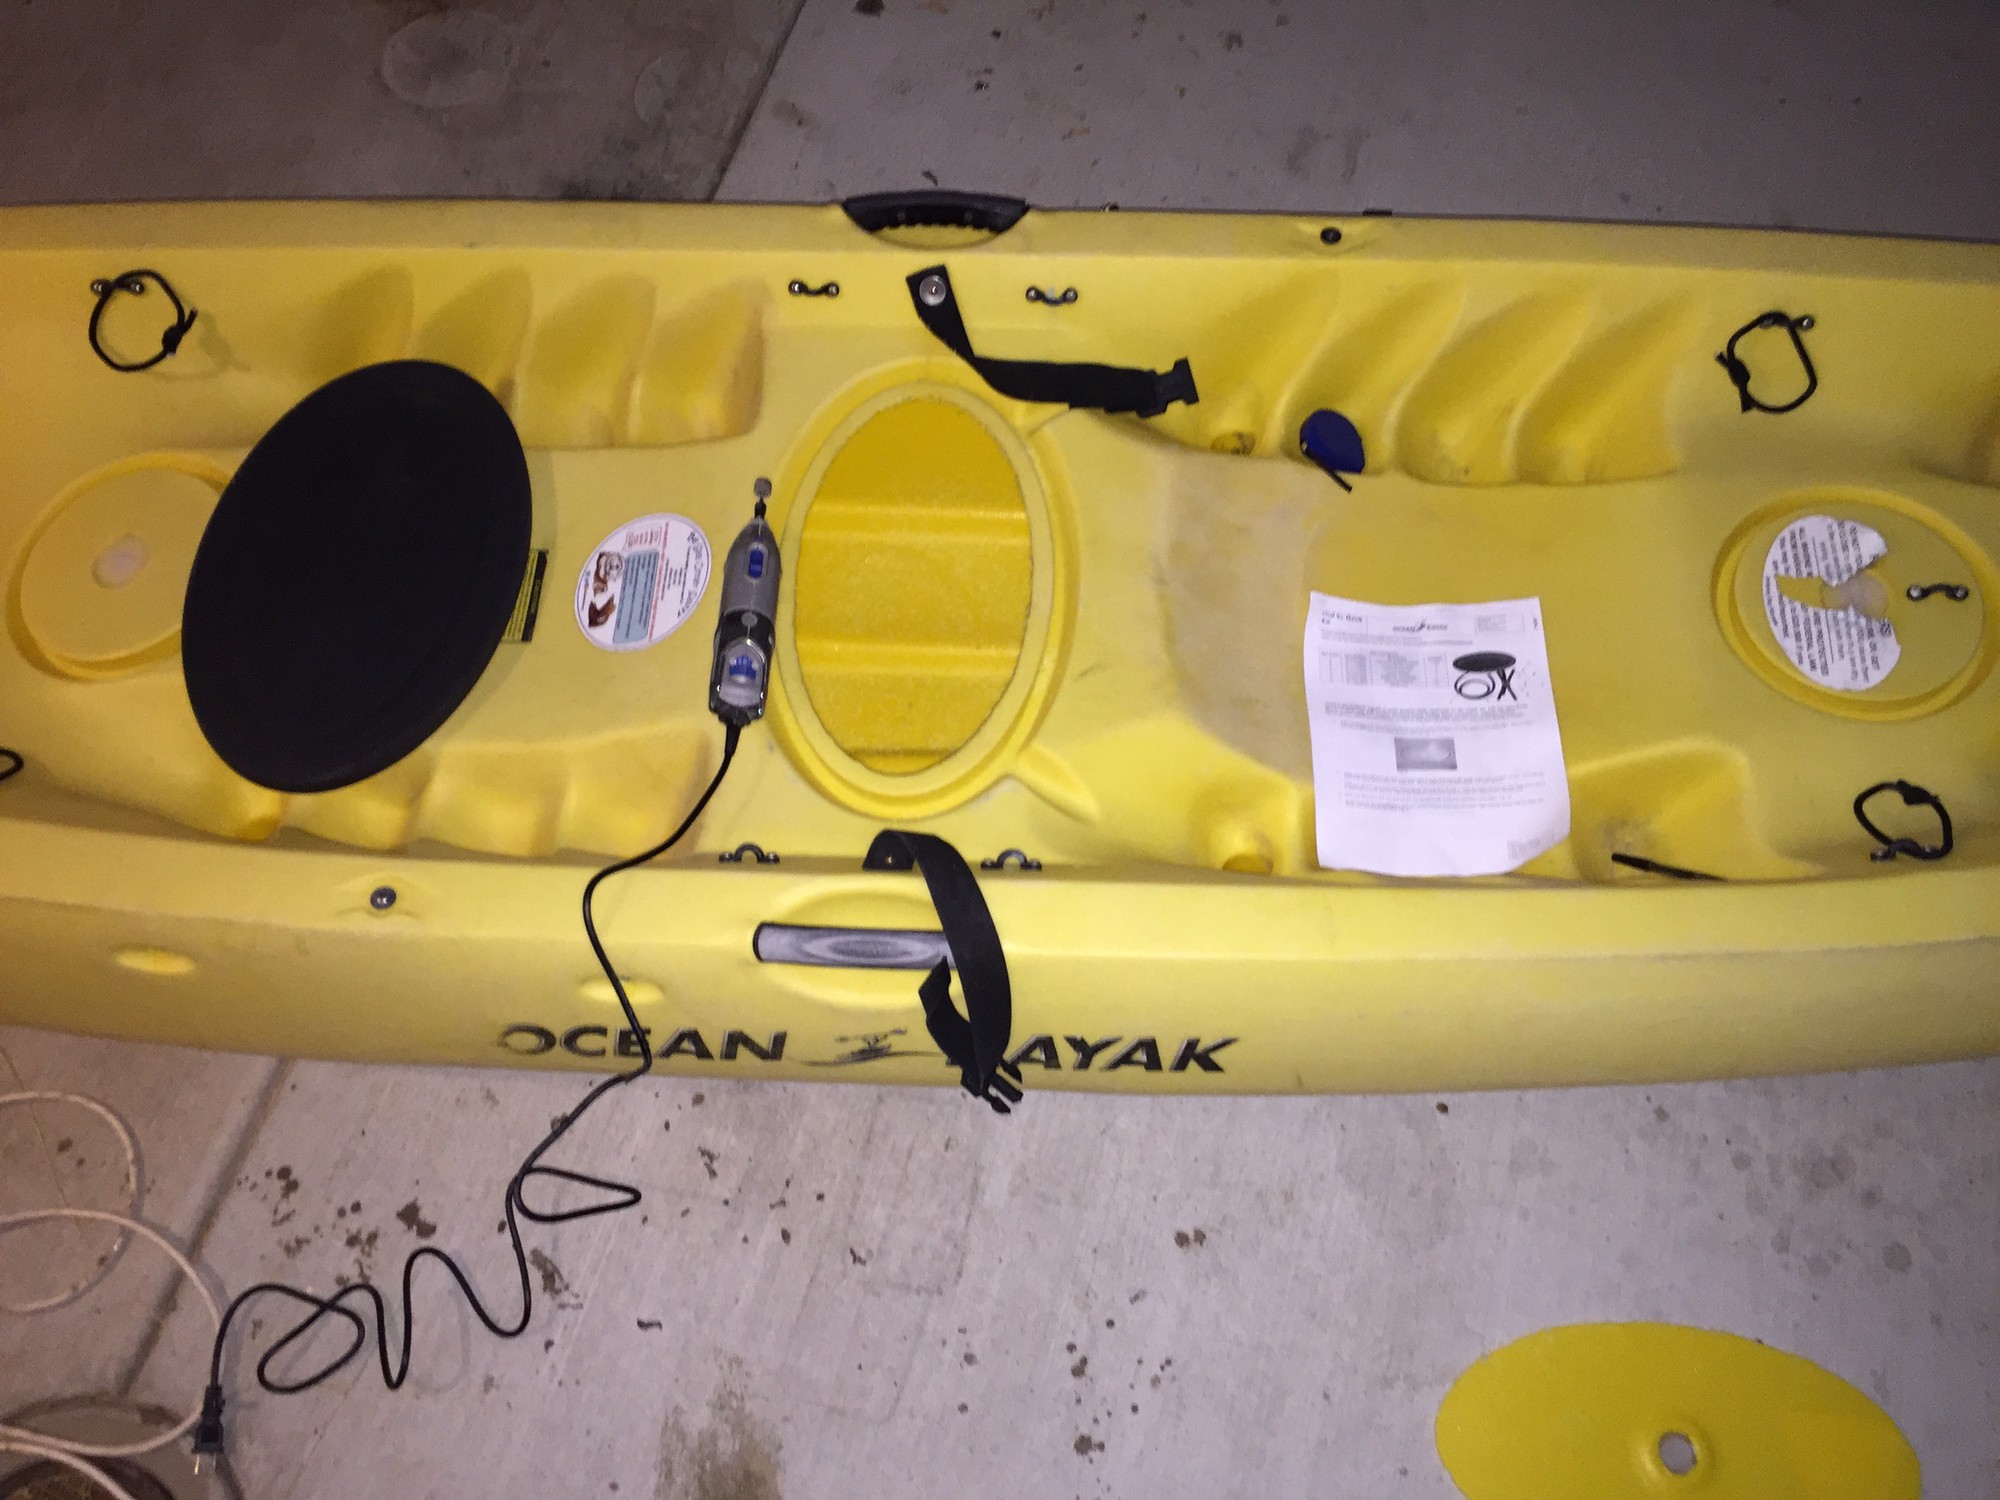

You may notice that the stern hatch is installed with the lid opening to the side. I’m anticipating paddling from the seat situated behind it, meaning this hatch would be between my legs. Thus, my current guess is that operation of the hatch will be easiest if it opens left or right.
Anchor System
Next, I wanted to build an anchor system that was easy to operate while scuba diving and that minimized equipment and clutter. The system needed to allow for operation from a seated position in the stern while providing a hull mount point on the bow so that the kayak could handle swells/waves when stationary. If you’re new to the basic anchor systems typically used in the kayaking world, I suggest you check out one of the many great resources available on the web6 7 8.
Scotty Anchor Lock
Simply tieing the anchor off on a well positioned cleat (bow/stern) can be challenging due to this lack of mobility while seated in the kayak filled with diving gear. An anchor trolly would provide my basic needs but come at the price of complication and equipment fatigue. After some research, I discovered the Scotty #276 Anchor Lock9. My sytem would then consist of the scotty anchor lock mounted on the bow and rope cleat mounted at stern next to operator’s seat to tie off to. The scotty anchor lock gives added rope management due to its ability to guide the rope from the stern cleat to the bow allowing the kayak to manage swells while stationary. It also provides the quick release clamp that helps fight fatigue while hauling and positioning the anchor. I purchased a complimentary backing plate10 for the anchor lock’s base mount to reinforce the hull where the anchor lock would be mounted (this is after all where the anchor will be exerting considerable force on the hull). Some avid DIYers improvise their own backing plates, but for the price, purchasing one couldn’t be beat.
Installation
Installation of the backing plate proved very tricky and by far the hardest part in the entire overhaul of the kayak. This was due to needing to reach nearly inaccessible points within the kayak hull to properly install the back plate to the underside of the anchor lock. Following a great tutorial11 on youtube of how to route backing plates in hard-to-reach areas within a kayak, I was able to forge ahead. The installation of the backing plate took several attempts. Two mistakes I made causing several attempts:
- Not greasing the bolts that come with the backing plate. The nylock nuts provided are prone to binding. Because the backing plate has built-in nylock nuts, the binding action required excess force to tighten them. This excess rotational force was enough to pop the nylock nuts from their molded seats in the plastic backing plate.
- Not tieing good knots on the routing lines used to guide the backing plate to mount point within the hull (show below).
Poor knots caused the guide line to snag on the bolt.
To grease the bolts, I used butter and once I tied better knots, the routing came along nicely. Below, we can see what proper installation looks like of the backing plate.
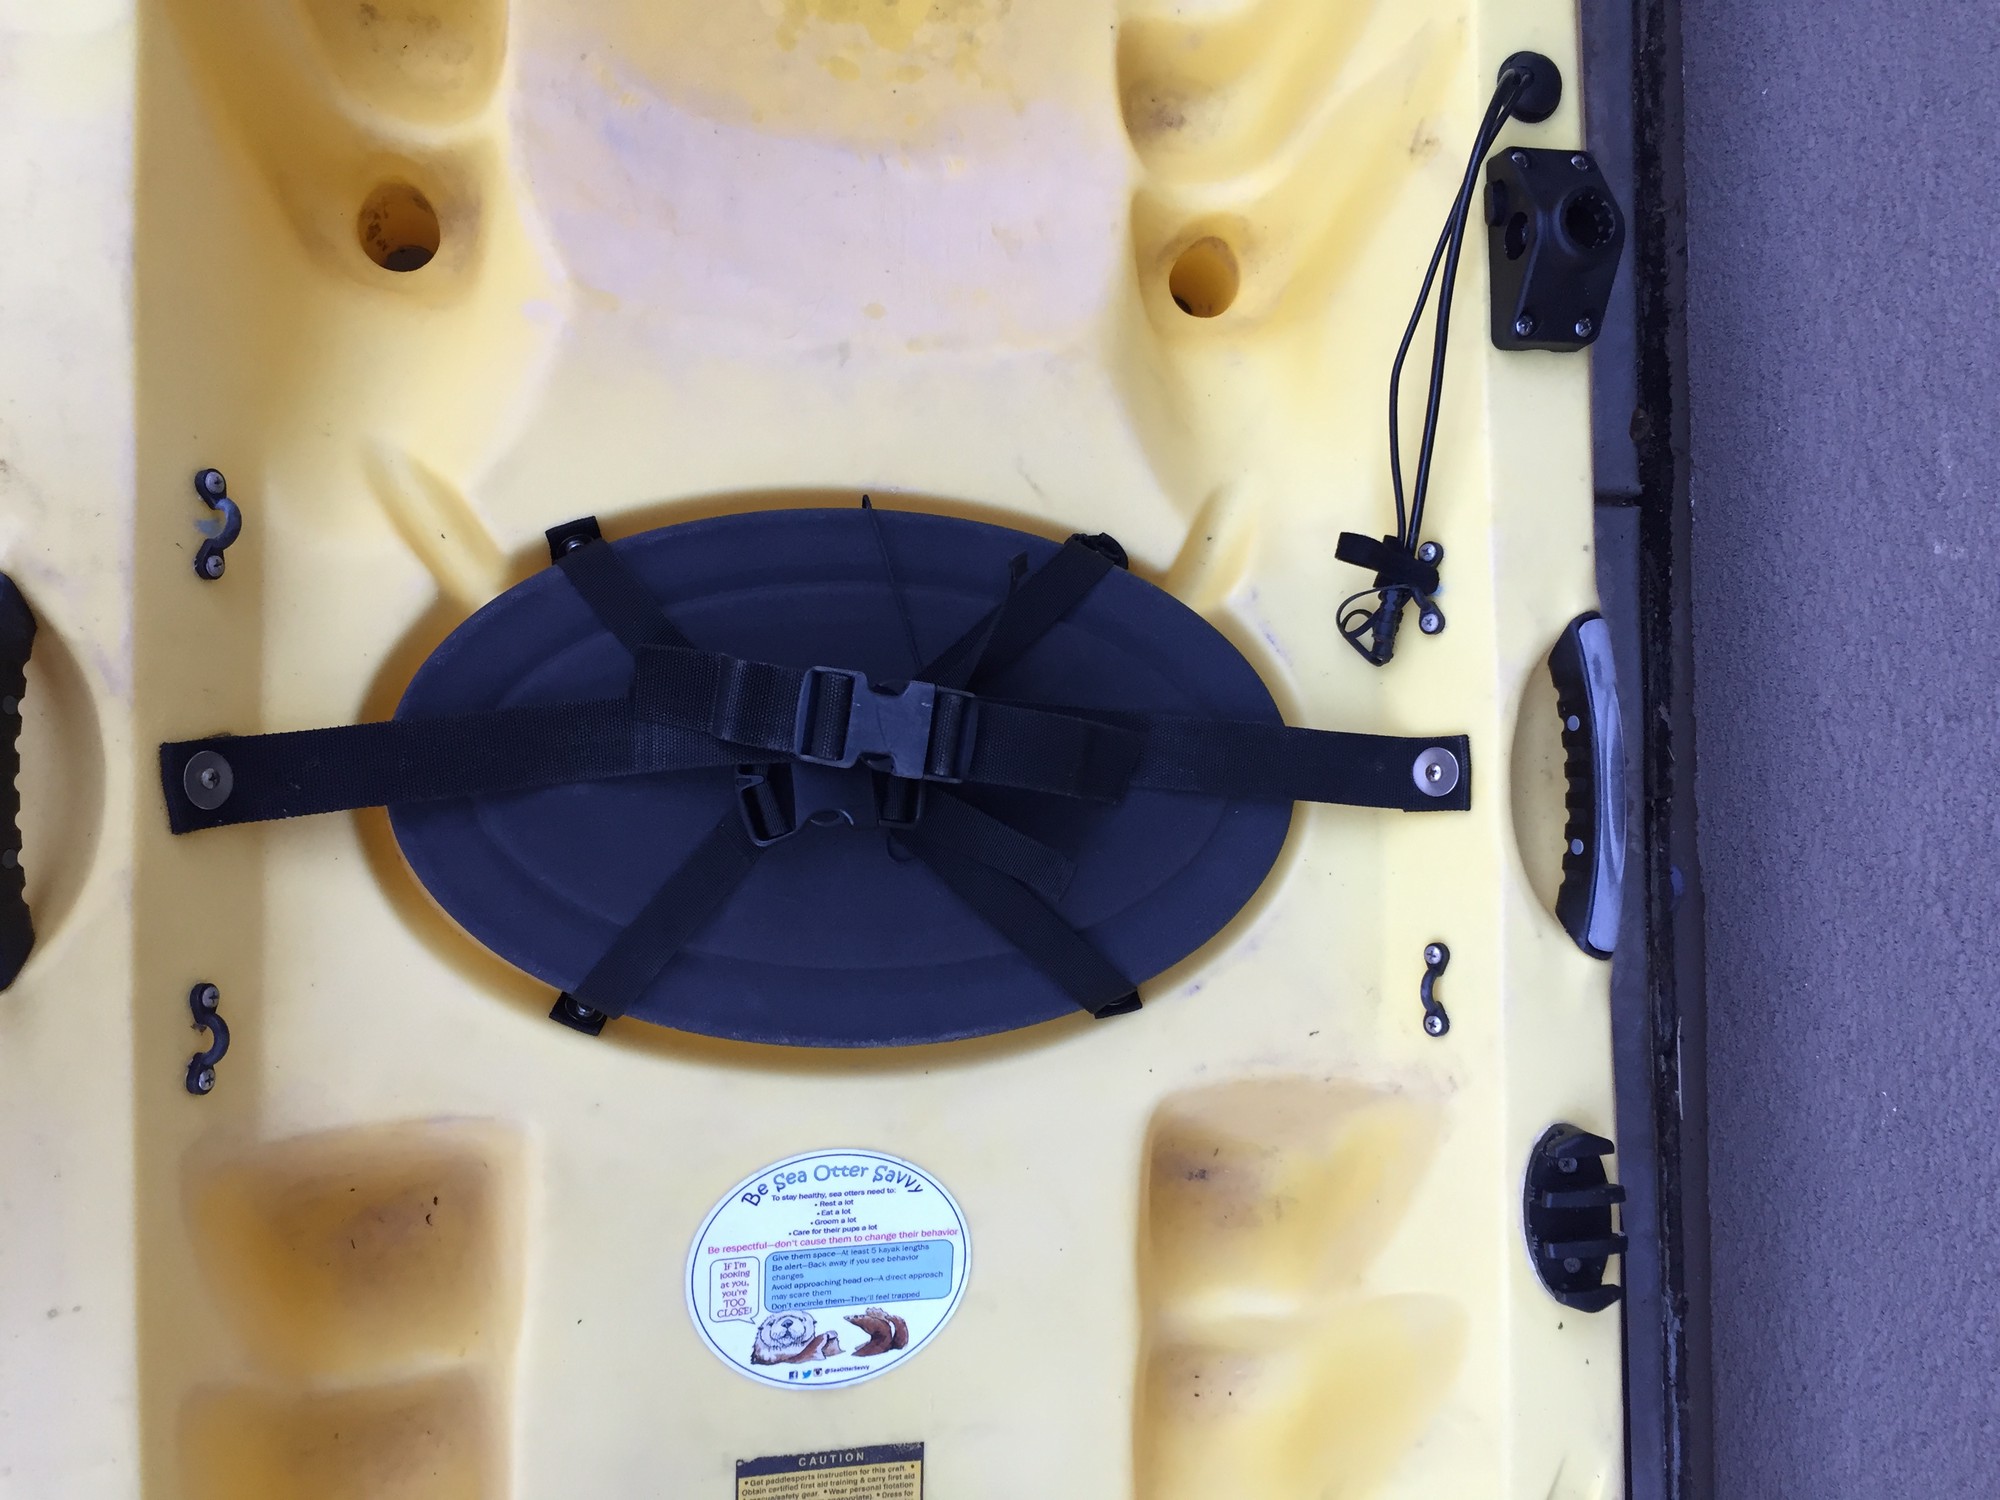
Once, the anchor lock had been installed I mounted a simple zig zag cleat12 next to the seat of the operator at the stern. This would be where the anchor line would tie off to.
Anchor and Rigging
The next part of the anchor system was to assemble the anchor rigging. The basic components are:
- UV resistant anchor line13
- anchor float14
- anchor line reel15
- anchor16
- anchor drag chain17
- stainless steel carabiners18
Once again, if you are unfamiliar with kayak anchor systems, I encourage you to check out the great resources available on the web6 7 8.
For the anchor line, I chose 550 paracord. This choice was made for a couple of reasons:
- The total force of the kayak and its cargo on the line is likely not to exceed a couple hundred pounds of tensile force in even the most challenging swells/waves (anything larger and you shouldn’t be kayaking!).
- The line diameter needed to fit through the scotty anchor lock.
Even though the anchor line reel15 comes with 75' of line, I bought an extra spool13 of 100' to supplement it. This was to fill the reel as much as possible to get as close to the ideal 7:1 ratio6 when anchoring in the deepest waters I might scuba dive in.
I chose to purchase an anchor line reel15 rather than make my own as so many kayakers seem to do19. This was simply because after factoring in fabrication time and costs, a DIY solution was approximately the same price as a commerical solution, but with the added worry of unknown modes of failure. For these same reasons, I chose to purchase an anchor float14 rather than make one20 8.
As is generally recommended to save an anchor from precarious wedges or snags, I attached the drag chain to the top mount point of the anchor using a ziptie. This ziptie can be broken with enough force in the event the anchor is snagged and hopefully allow me to save the anchor.
The anchor itself is a simple 3.5lb folding anchor16. 3.5lb is generally the weight kayakers use6
Decals
Once the anchor system was complete I decided my ship needed some epic decals21 22 23 24.

Paddle Holders
In addition to replacing the bow and stern shock cord serving as storage nets as previously mentioned, I also replaced the shock cord for both paddle holders on either side of the kayak. This step also required replacing two of the line brackets as they were missing.
Paddles
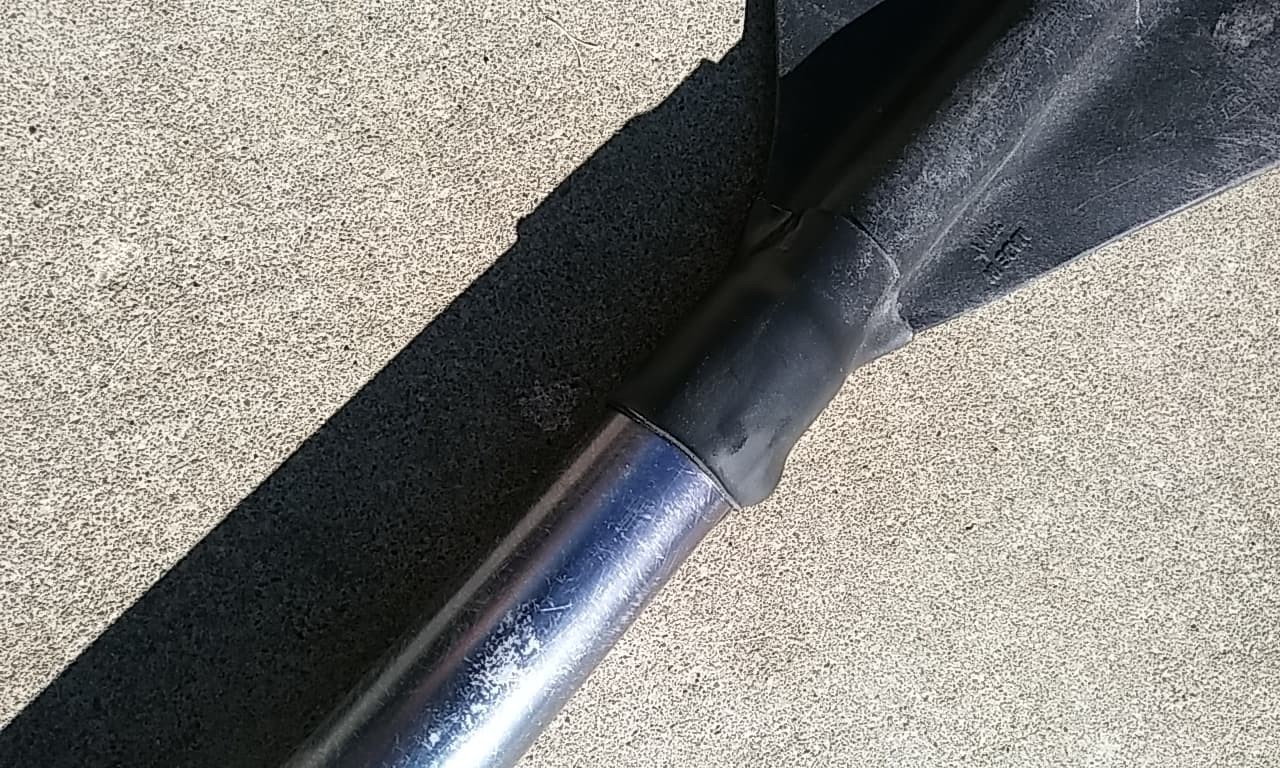
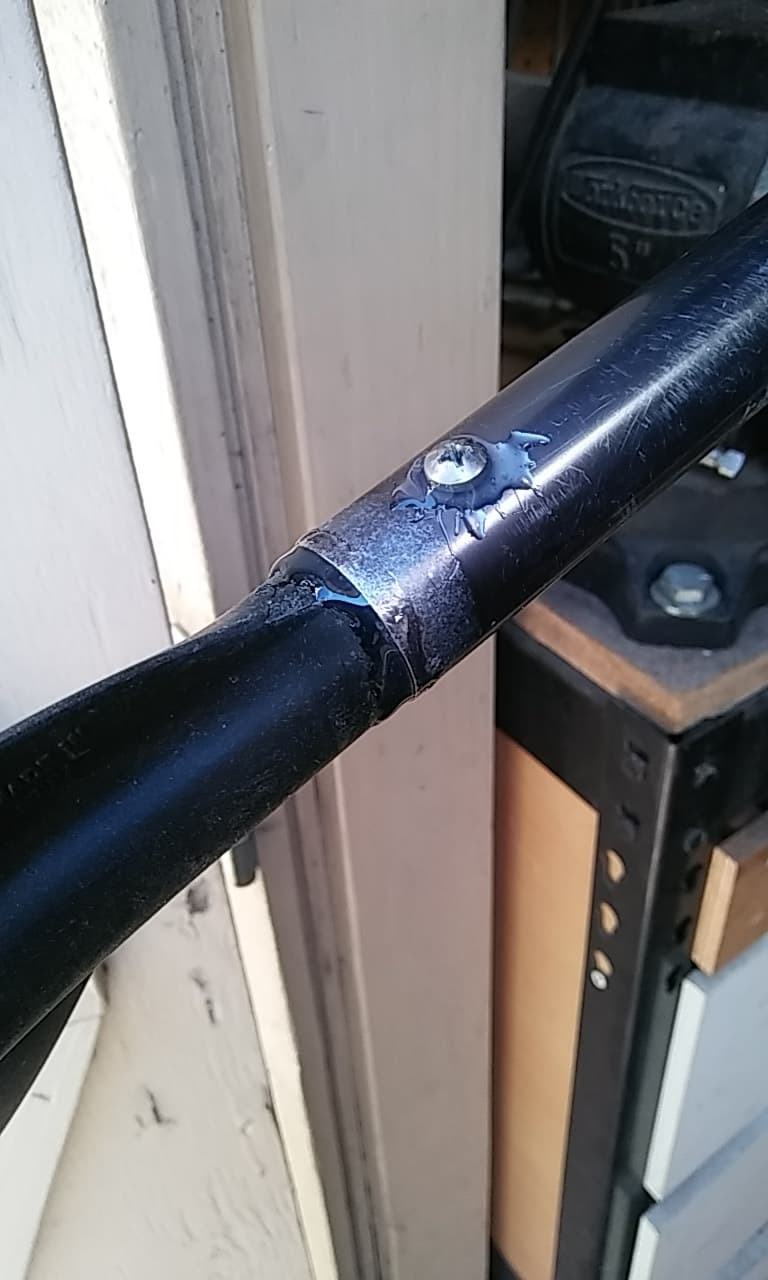
I didn’t need performance paddles so I purchased a used set along with the kayak as a package deal. The only issue with them was that they were one piece paddles and in order to transport them in my compact SUV, I would need to transform them into breakable paddles. Fortunately, the same scuba buddy who introduced me to kayak diving also had the tools necessary to transform the paddles.
This amounted to cutting the paddles in half, fastening aluminium tubing into one of the cut ends for each paddle and then placing spring buttons in the inserted tubing as a locking mechanism.
As an added bonus, my buddy proceeded to also seal the ends of each paddle.
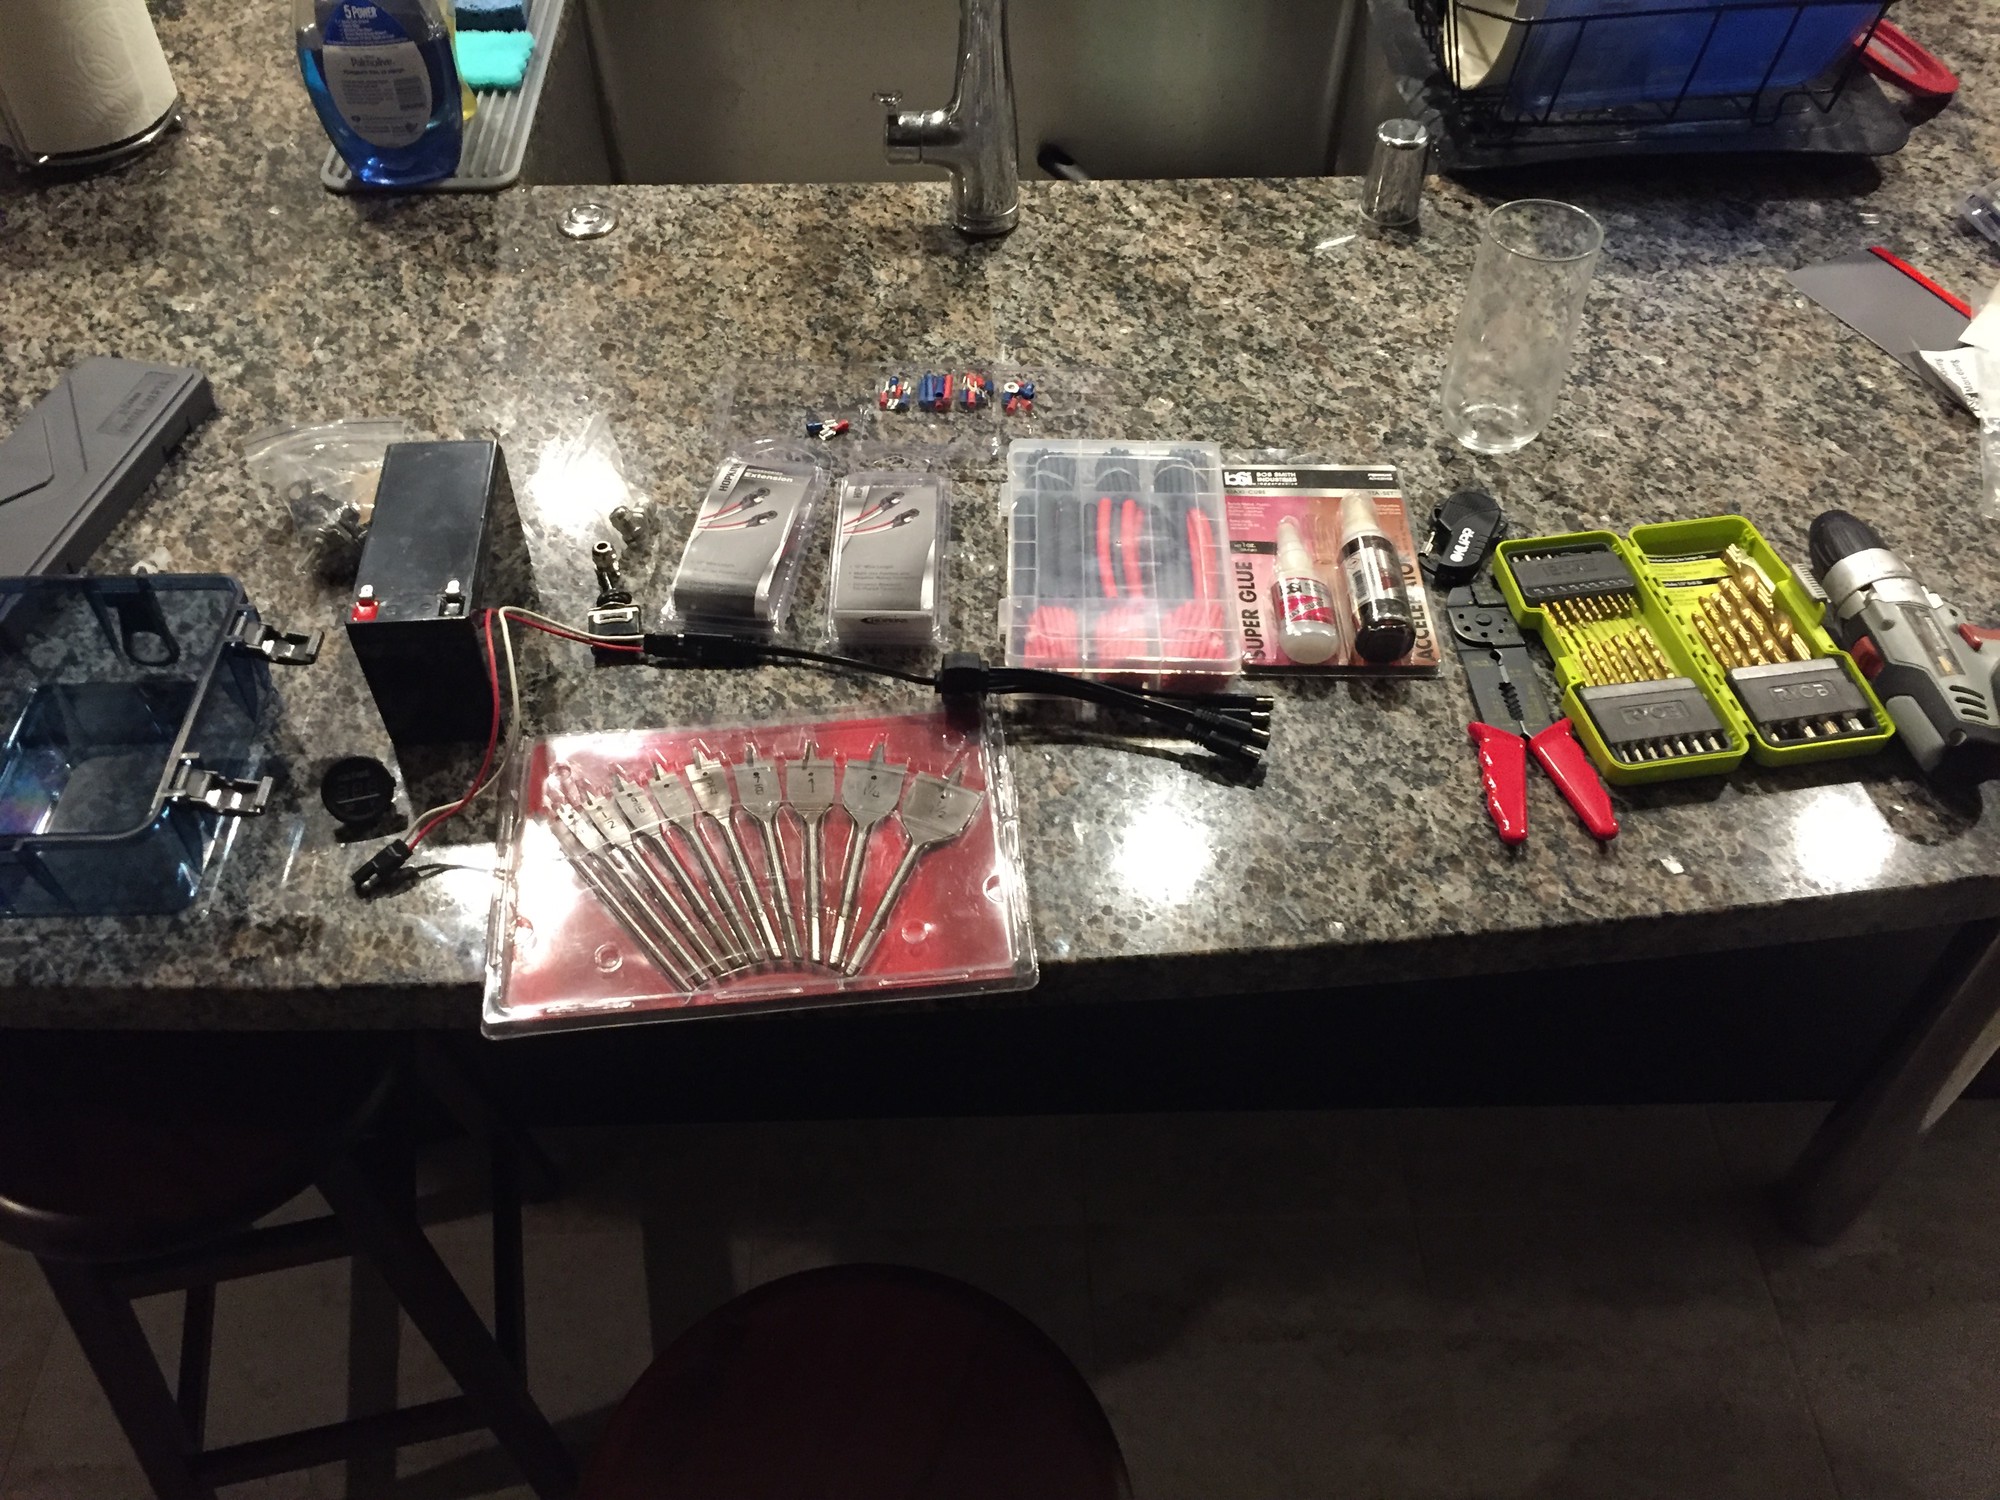
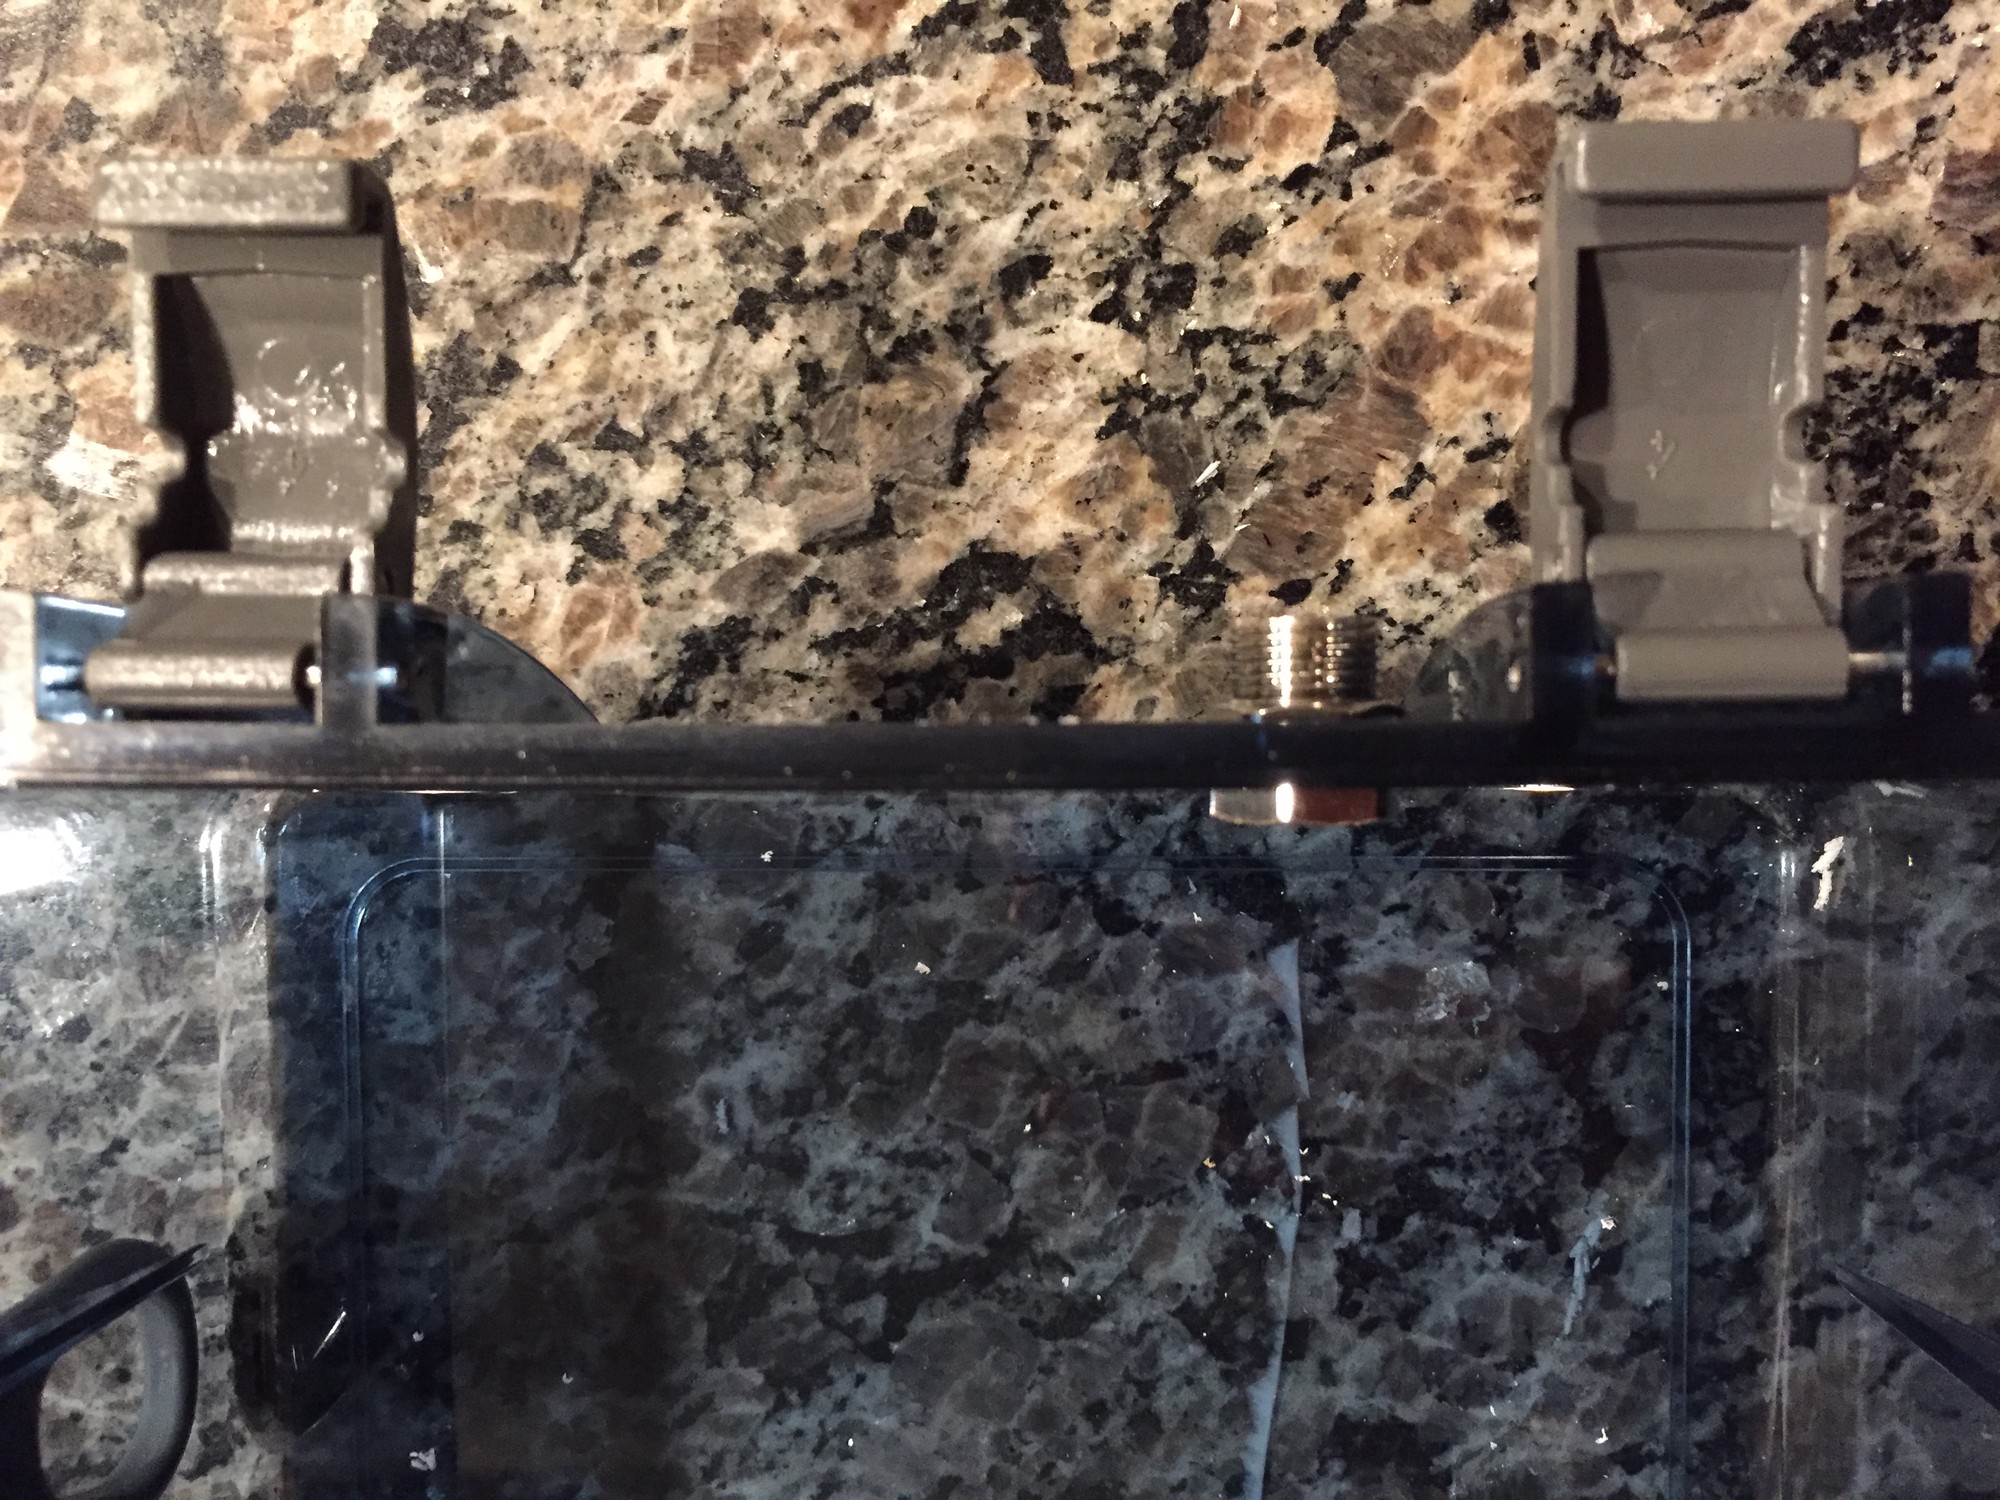
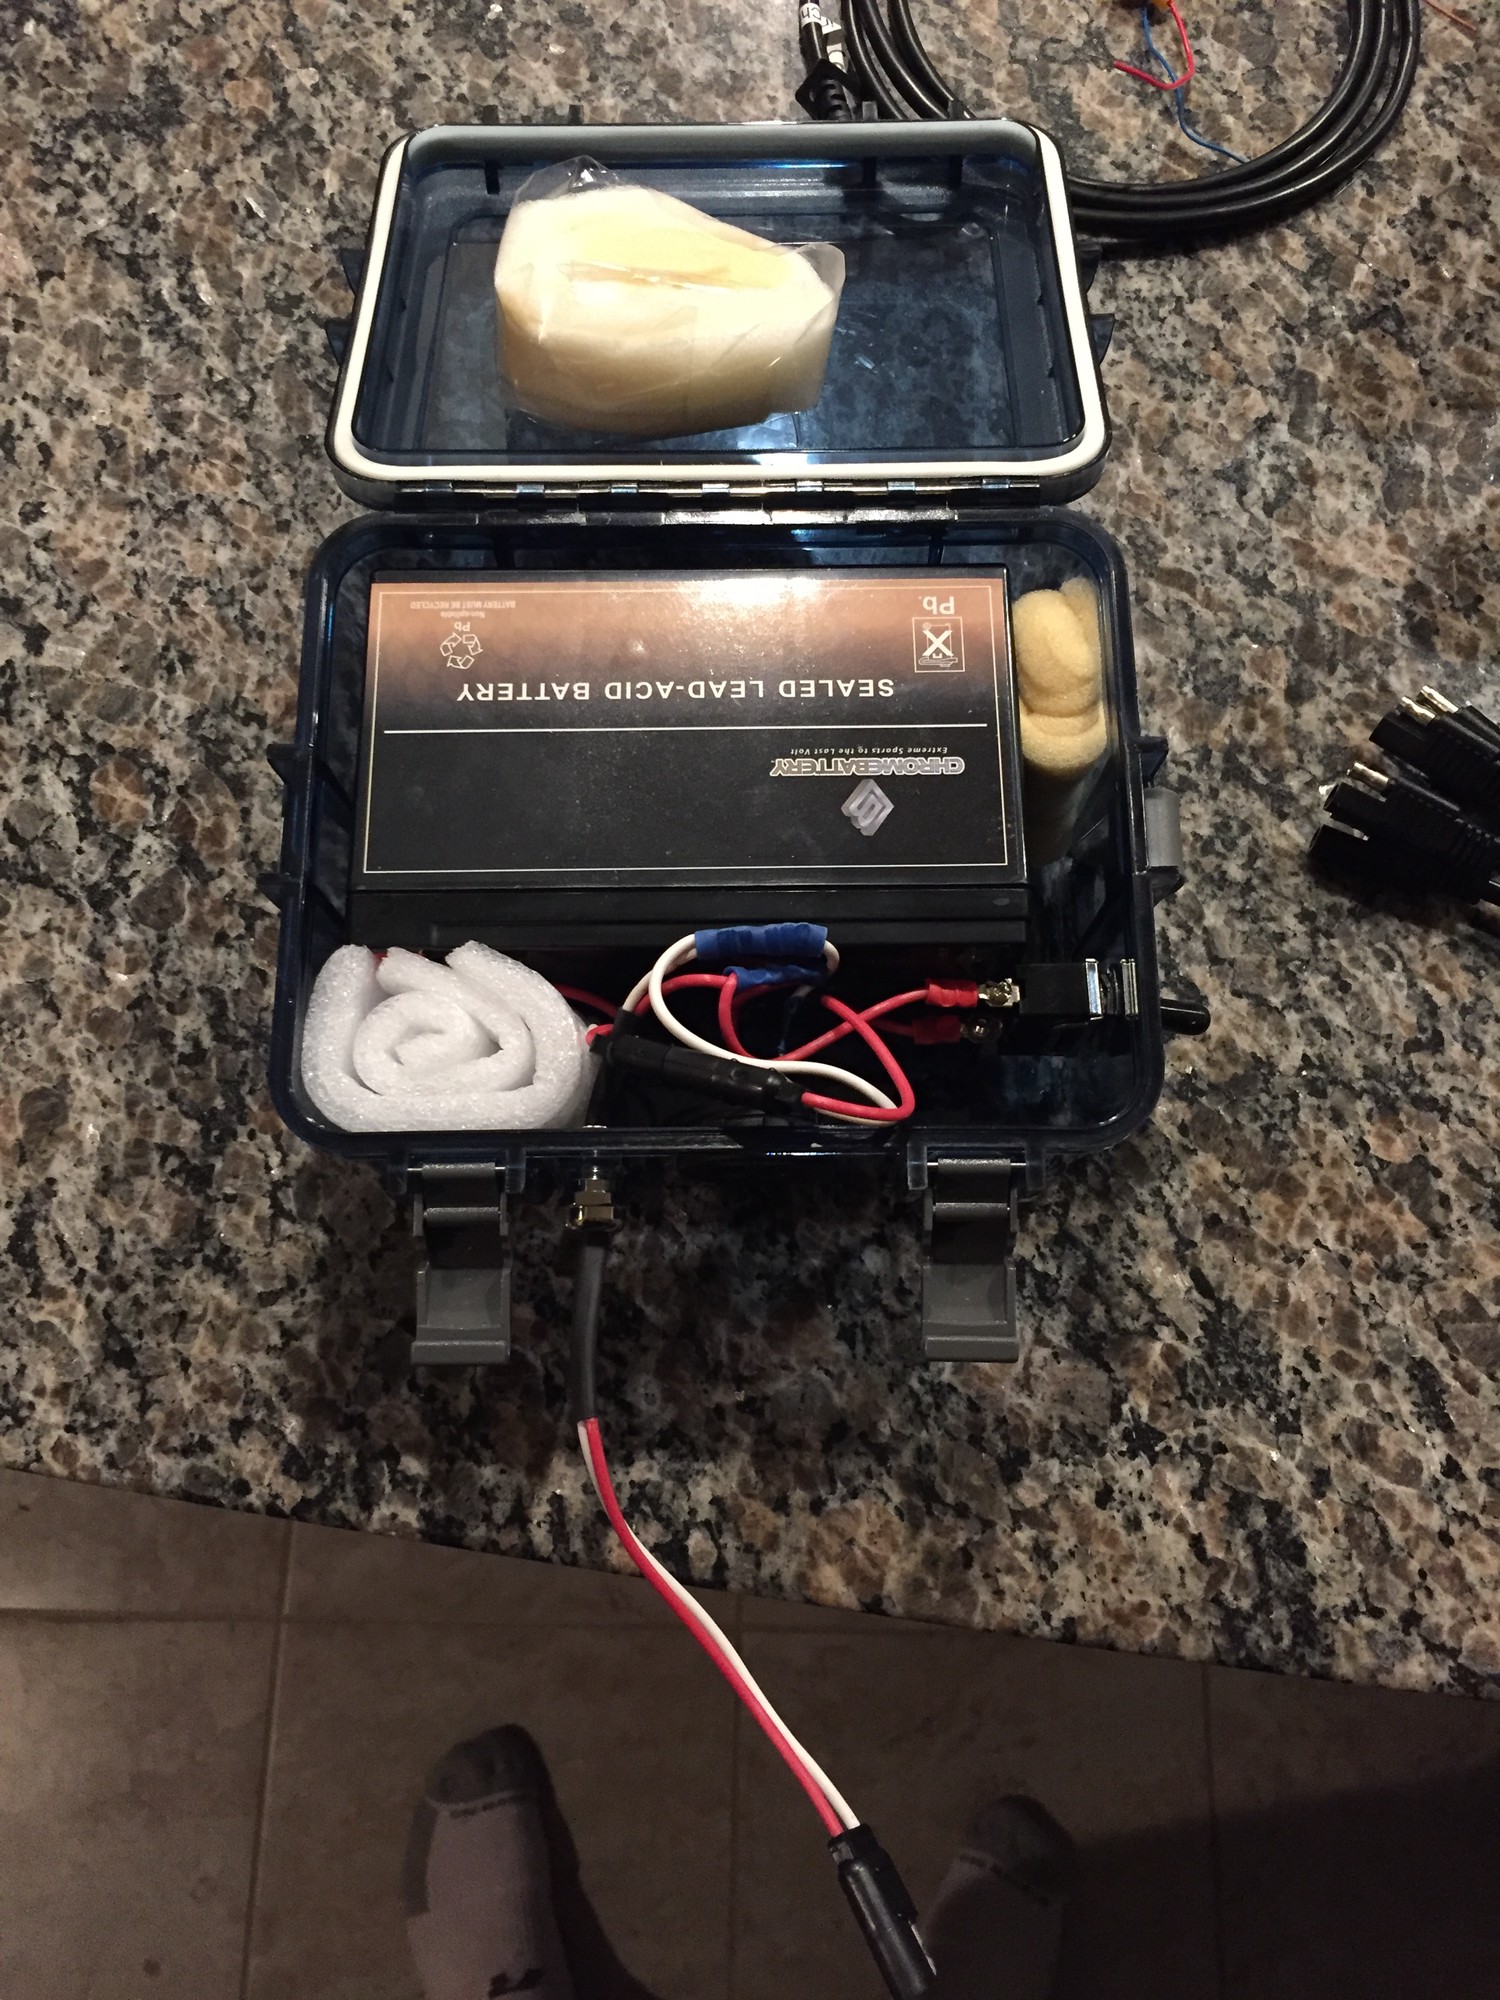
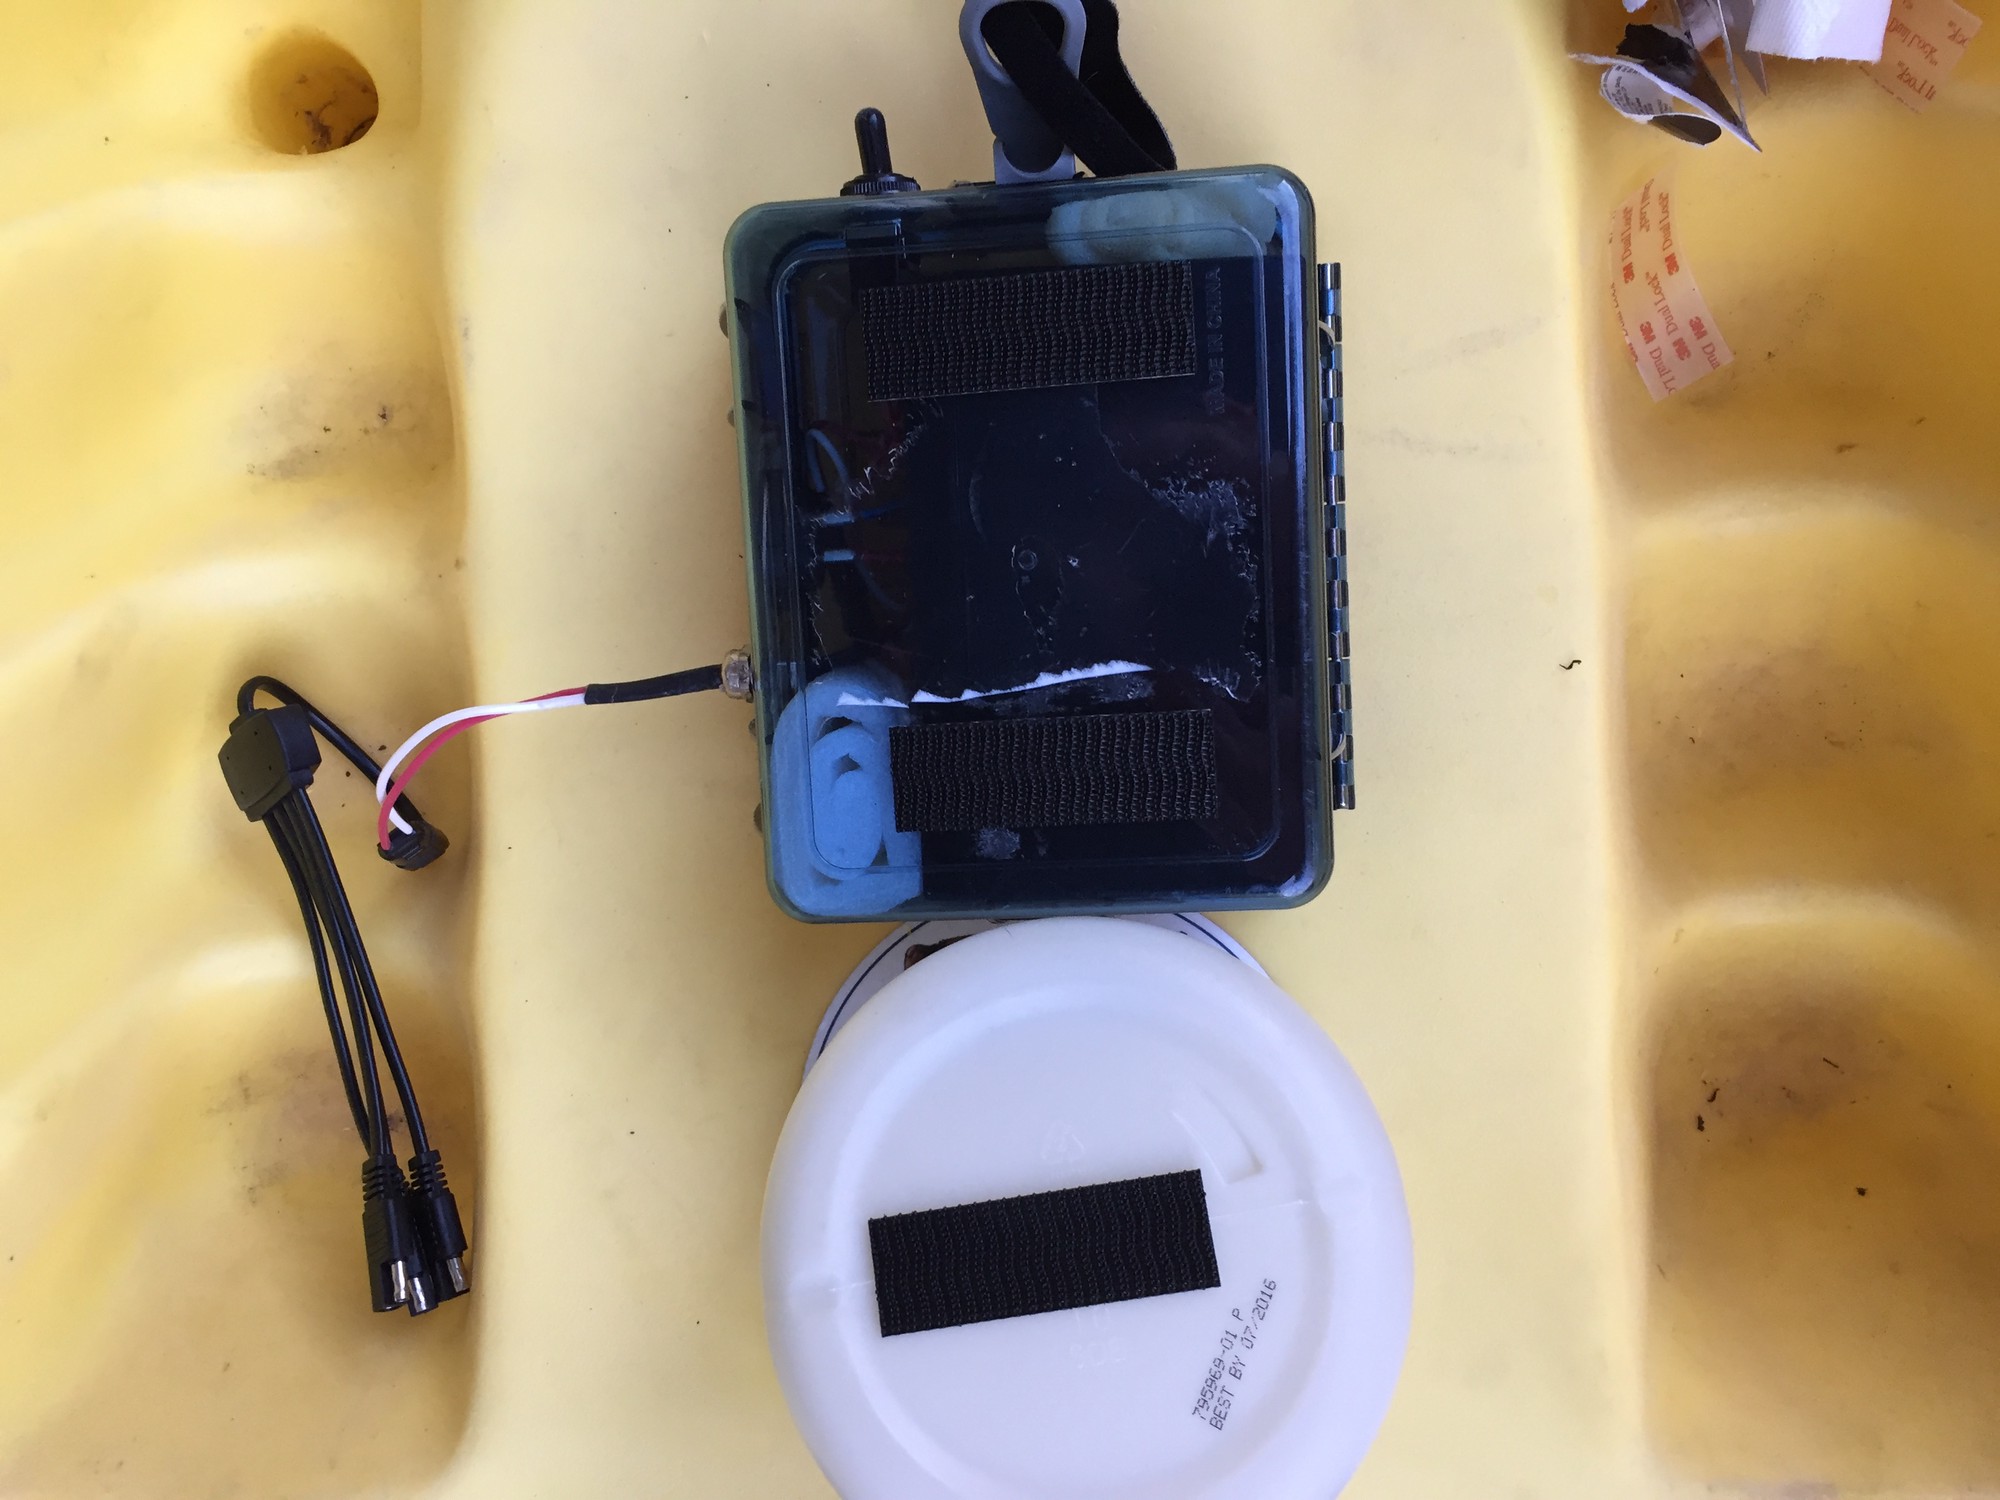
Battery Box
I need a battery box because I will be installing a depth finder. The idea is simple: fabricate a watertight box capable of holding a battery and supplying power to electronics external to the box. I stumbled across a great project25 that I was able to use as a guide.
The parts needed were:
- heat shrink tubing26
- stainless steel waterproof cable gland27
- waterproof switch28
- SAE cable extension29 x3
- 5-way SAE connector30
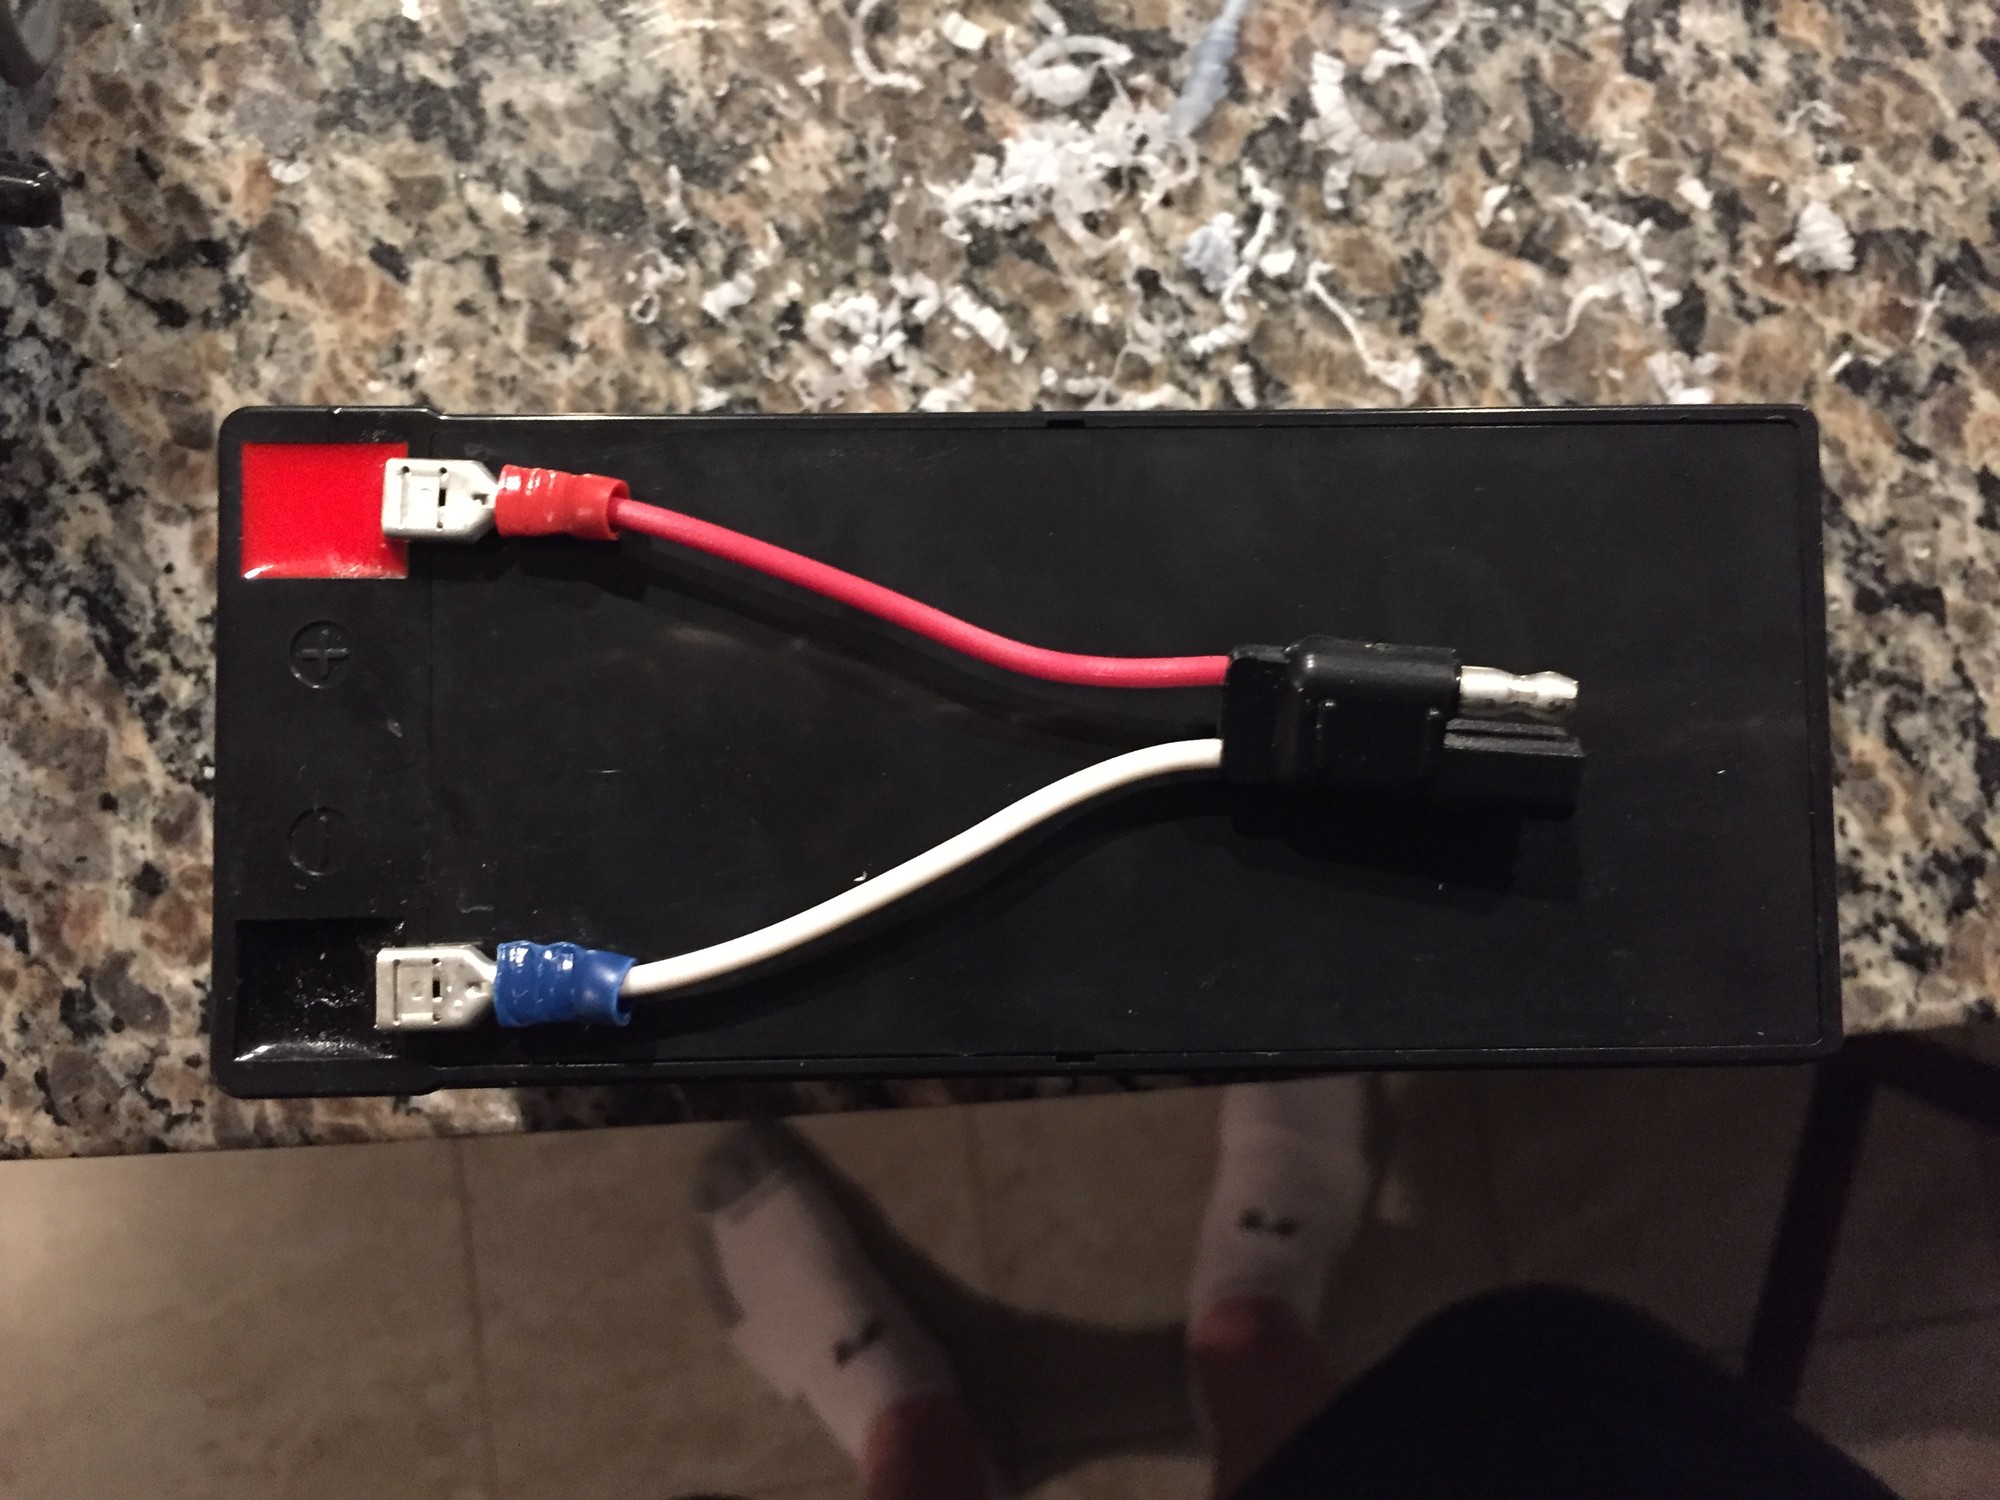
- 12V battery31
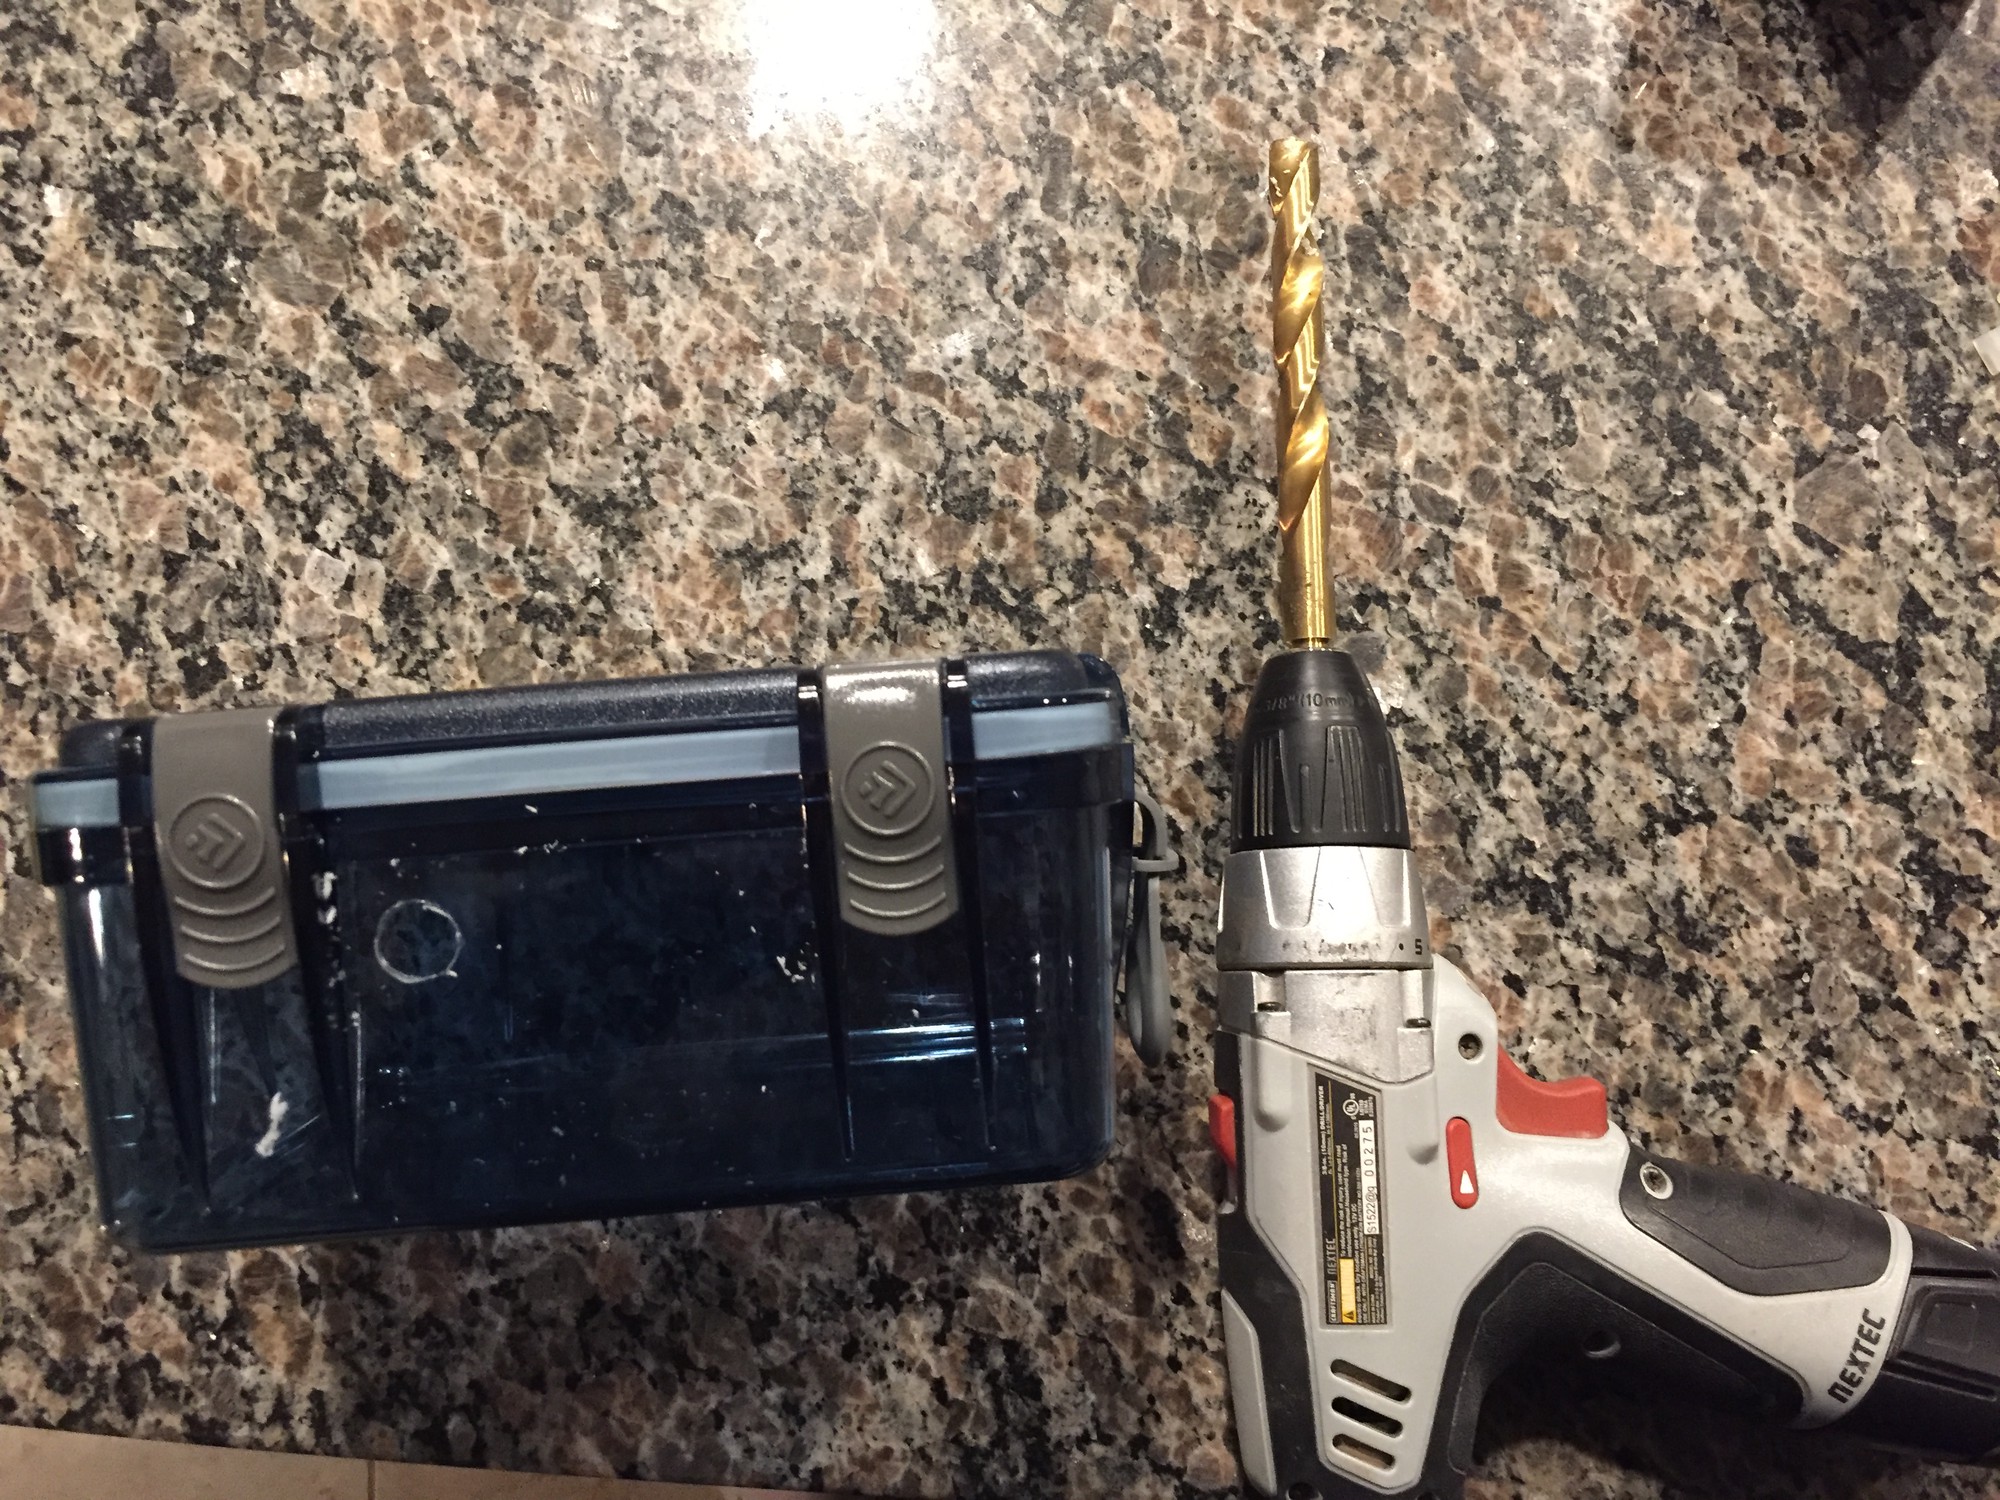
- battery case32
- display voltmeter33
- cyanoacrylate glue34
- marine grade GOOP35
- terminal connectors36
The first step was to install the cable gland.
Next, I installed the SAE cable extension that would pass through the cable gland. I cut and stripped one end of the extension and then placed heat shrink tubing around the portion of it that would come in contact with the cable gland. The heat shrink was added as an extra waterproofing measure. Since I was passing two wires through the gland instead of just two, there was a slight gap between the wires that I assumed water might pass through. The inner gasket of the cable gland that tightens on the wire is flexible rubber. So I assumed that adding rubbery and flexible heat shrink tubing around the two wires would give the inner gasket a “grippy”, deformable yet circular object to seal around. However, this was likely unecessary as I eventually coated the cabled gland with GOOP.

I then intalled the display voltmeter.
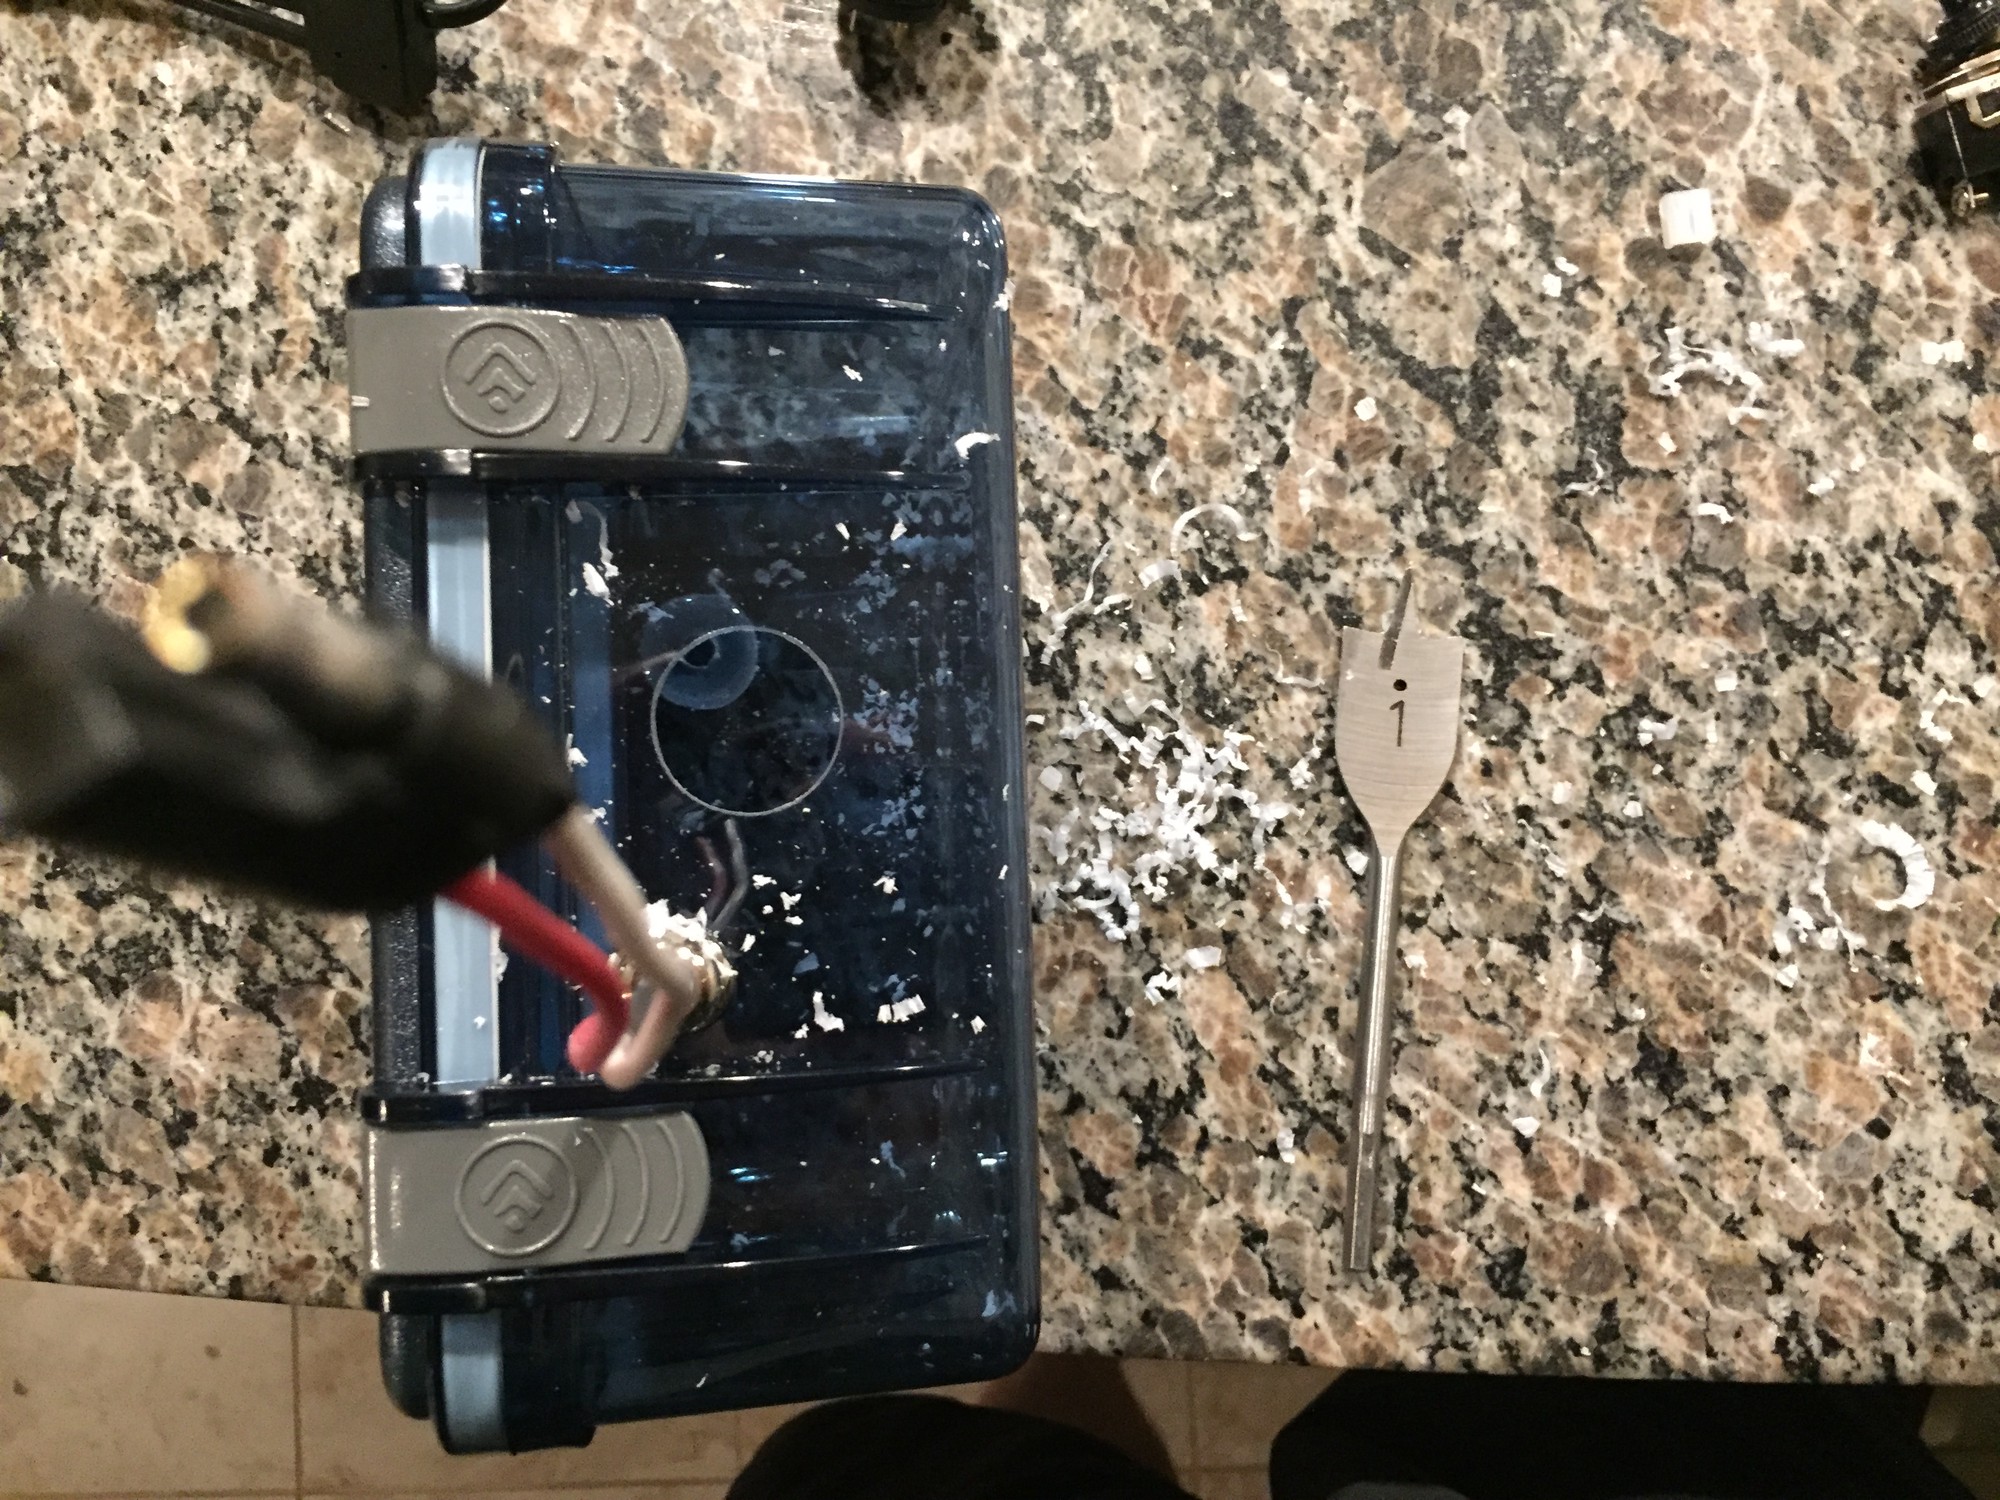
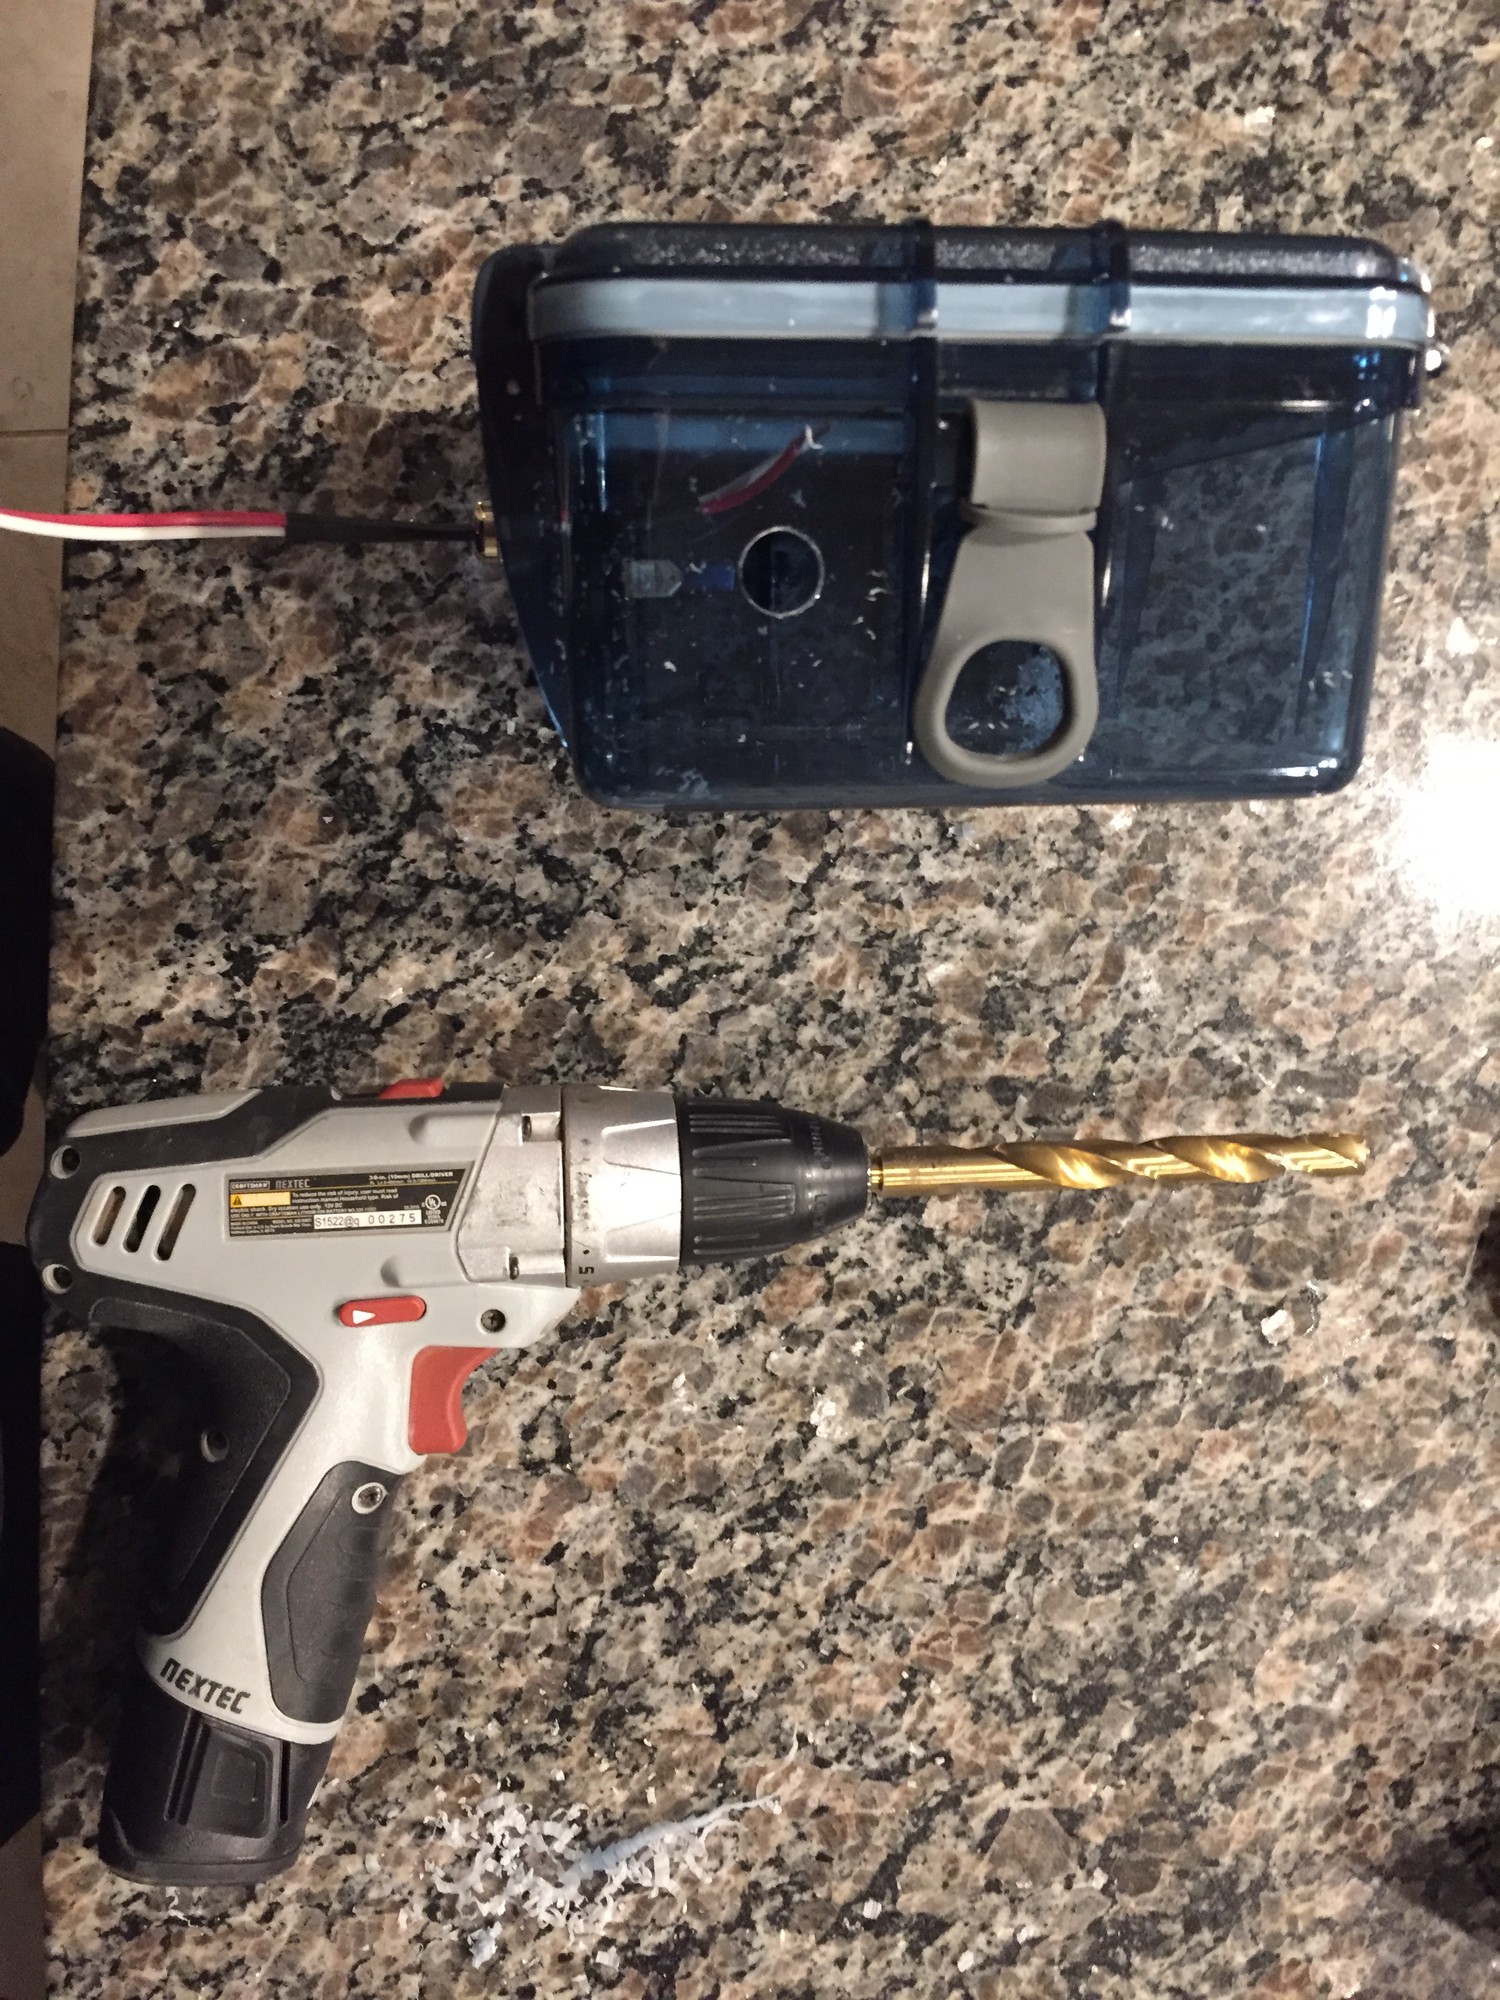
The hole necessary was slightly larger than a 1" drill bit, so I had to widen it using a dremel and carving bit.
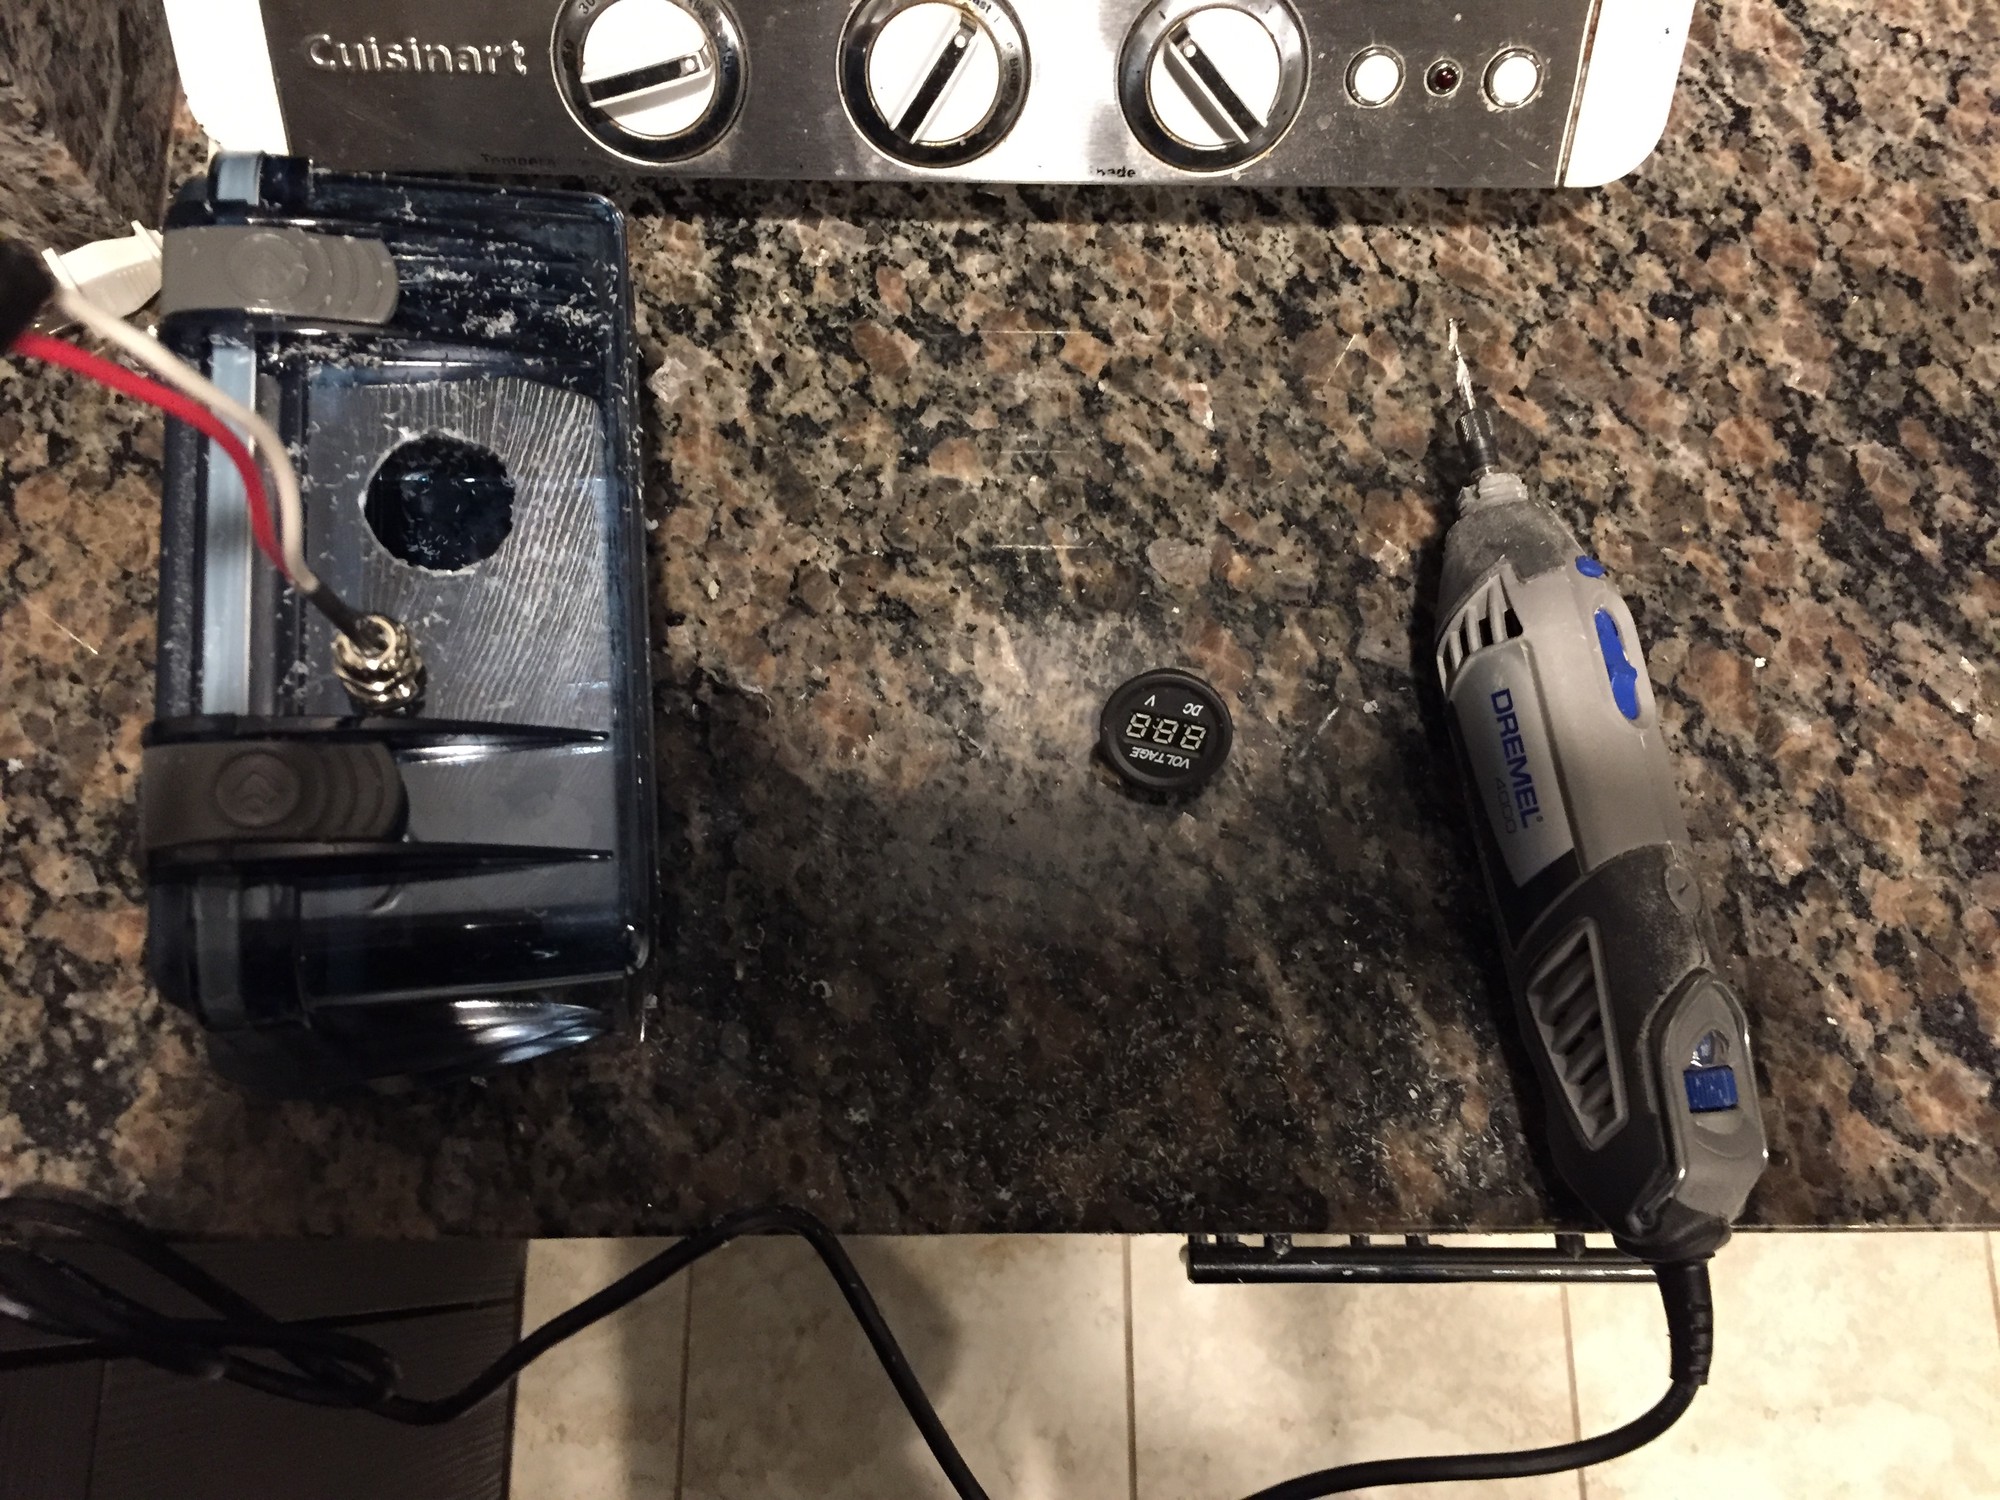

Next, I installed the switch.
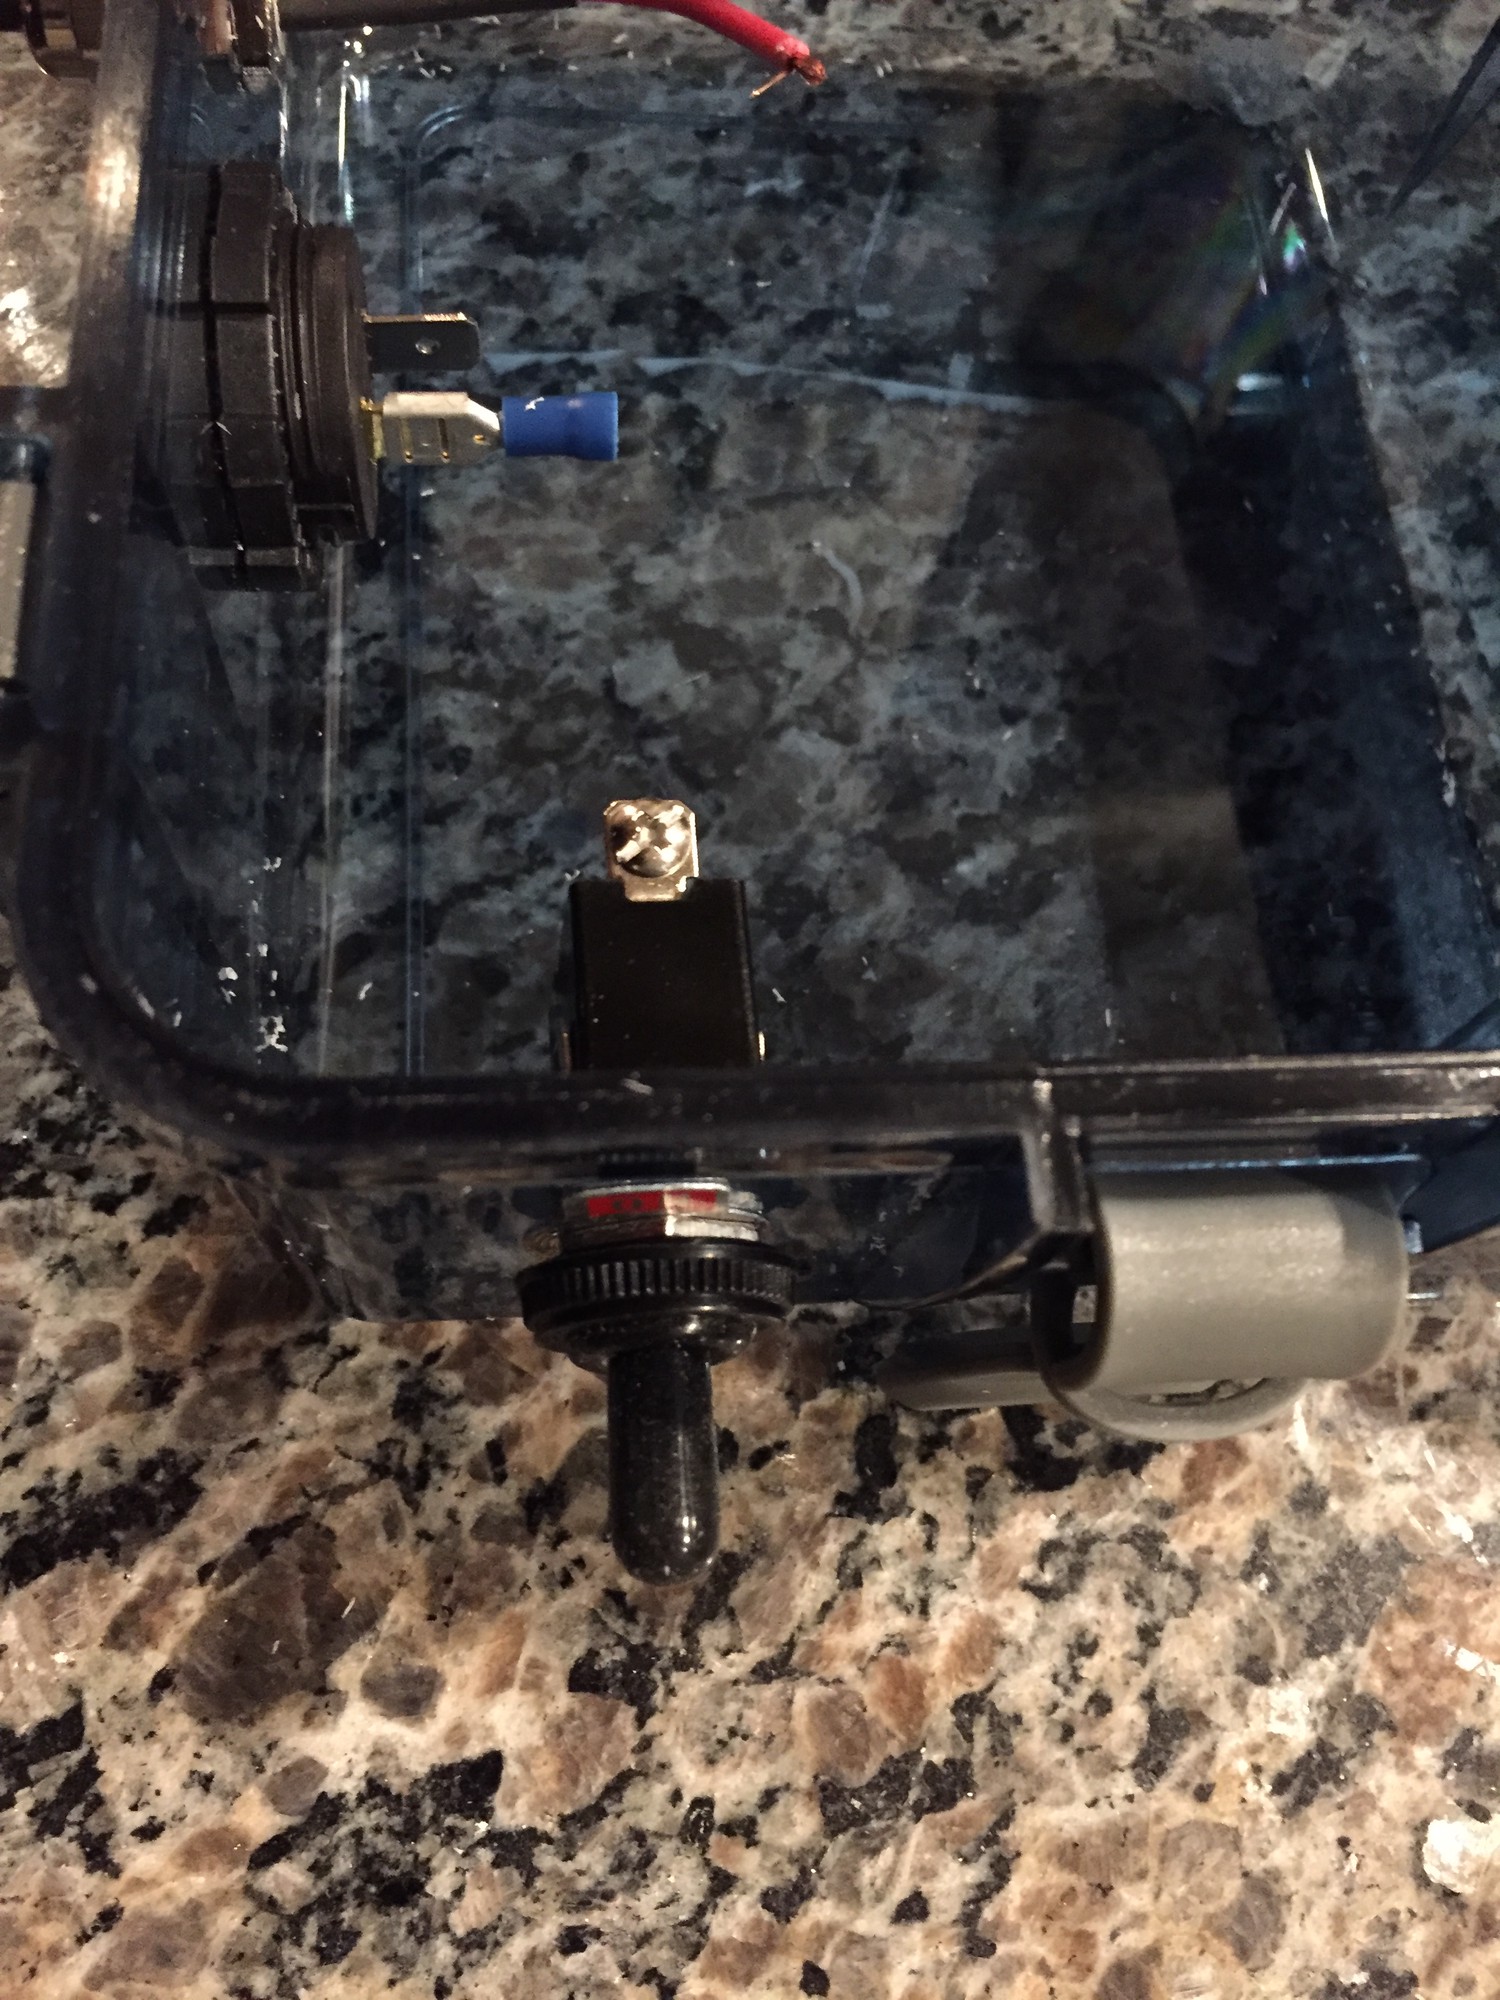
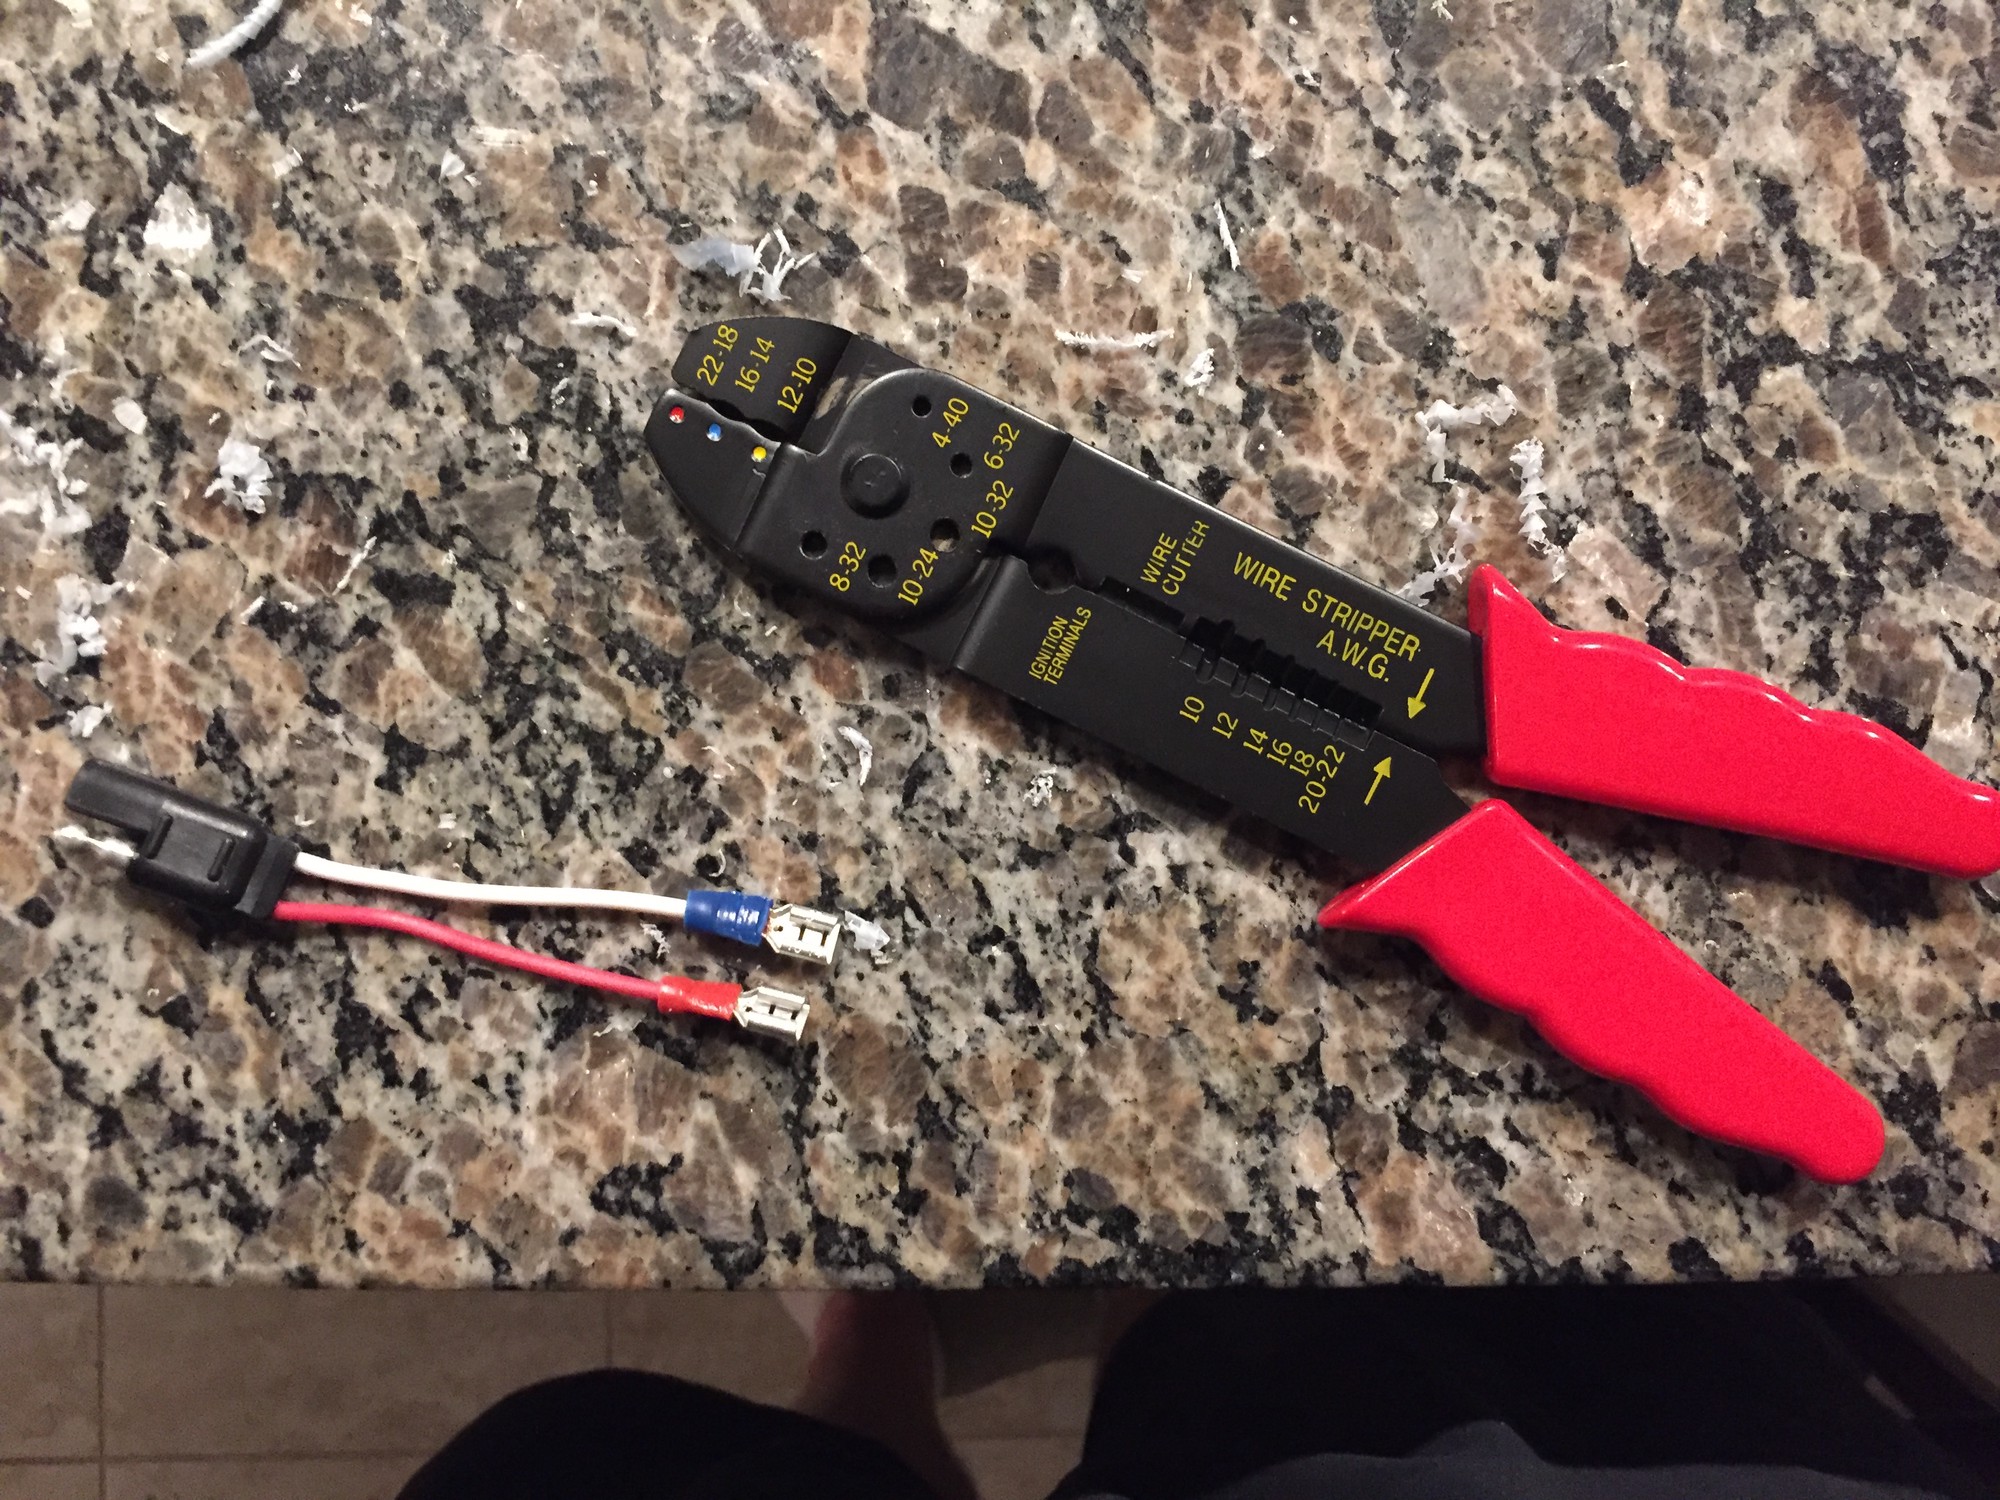
I then installed an SAE extension onto the battery terminals so as to be able to easily disconnect it from inside the box. I cut and stripped one end of the extension and then crimped flat terminal leads onto it.
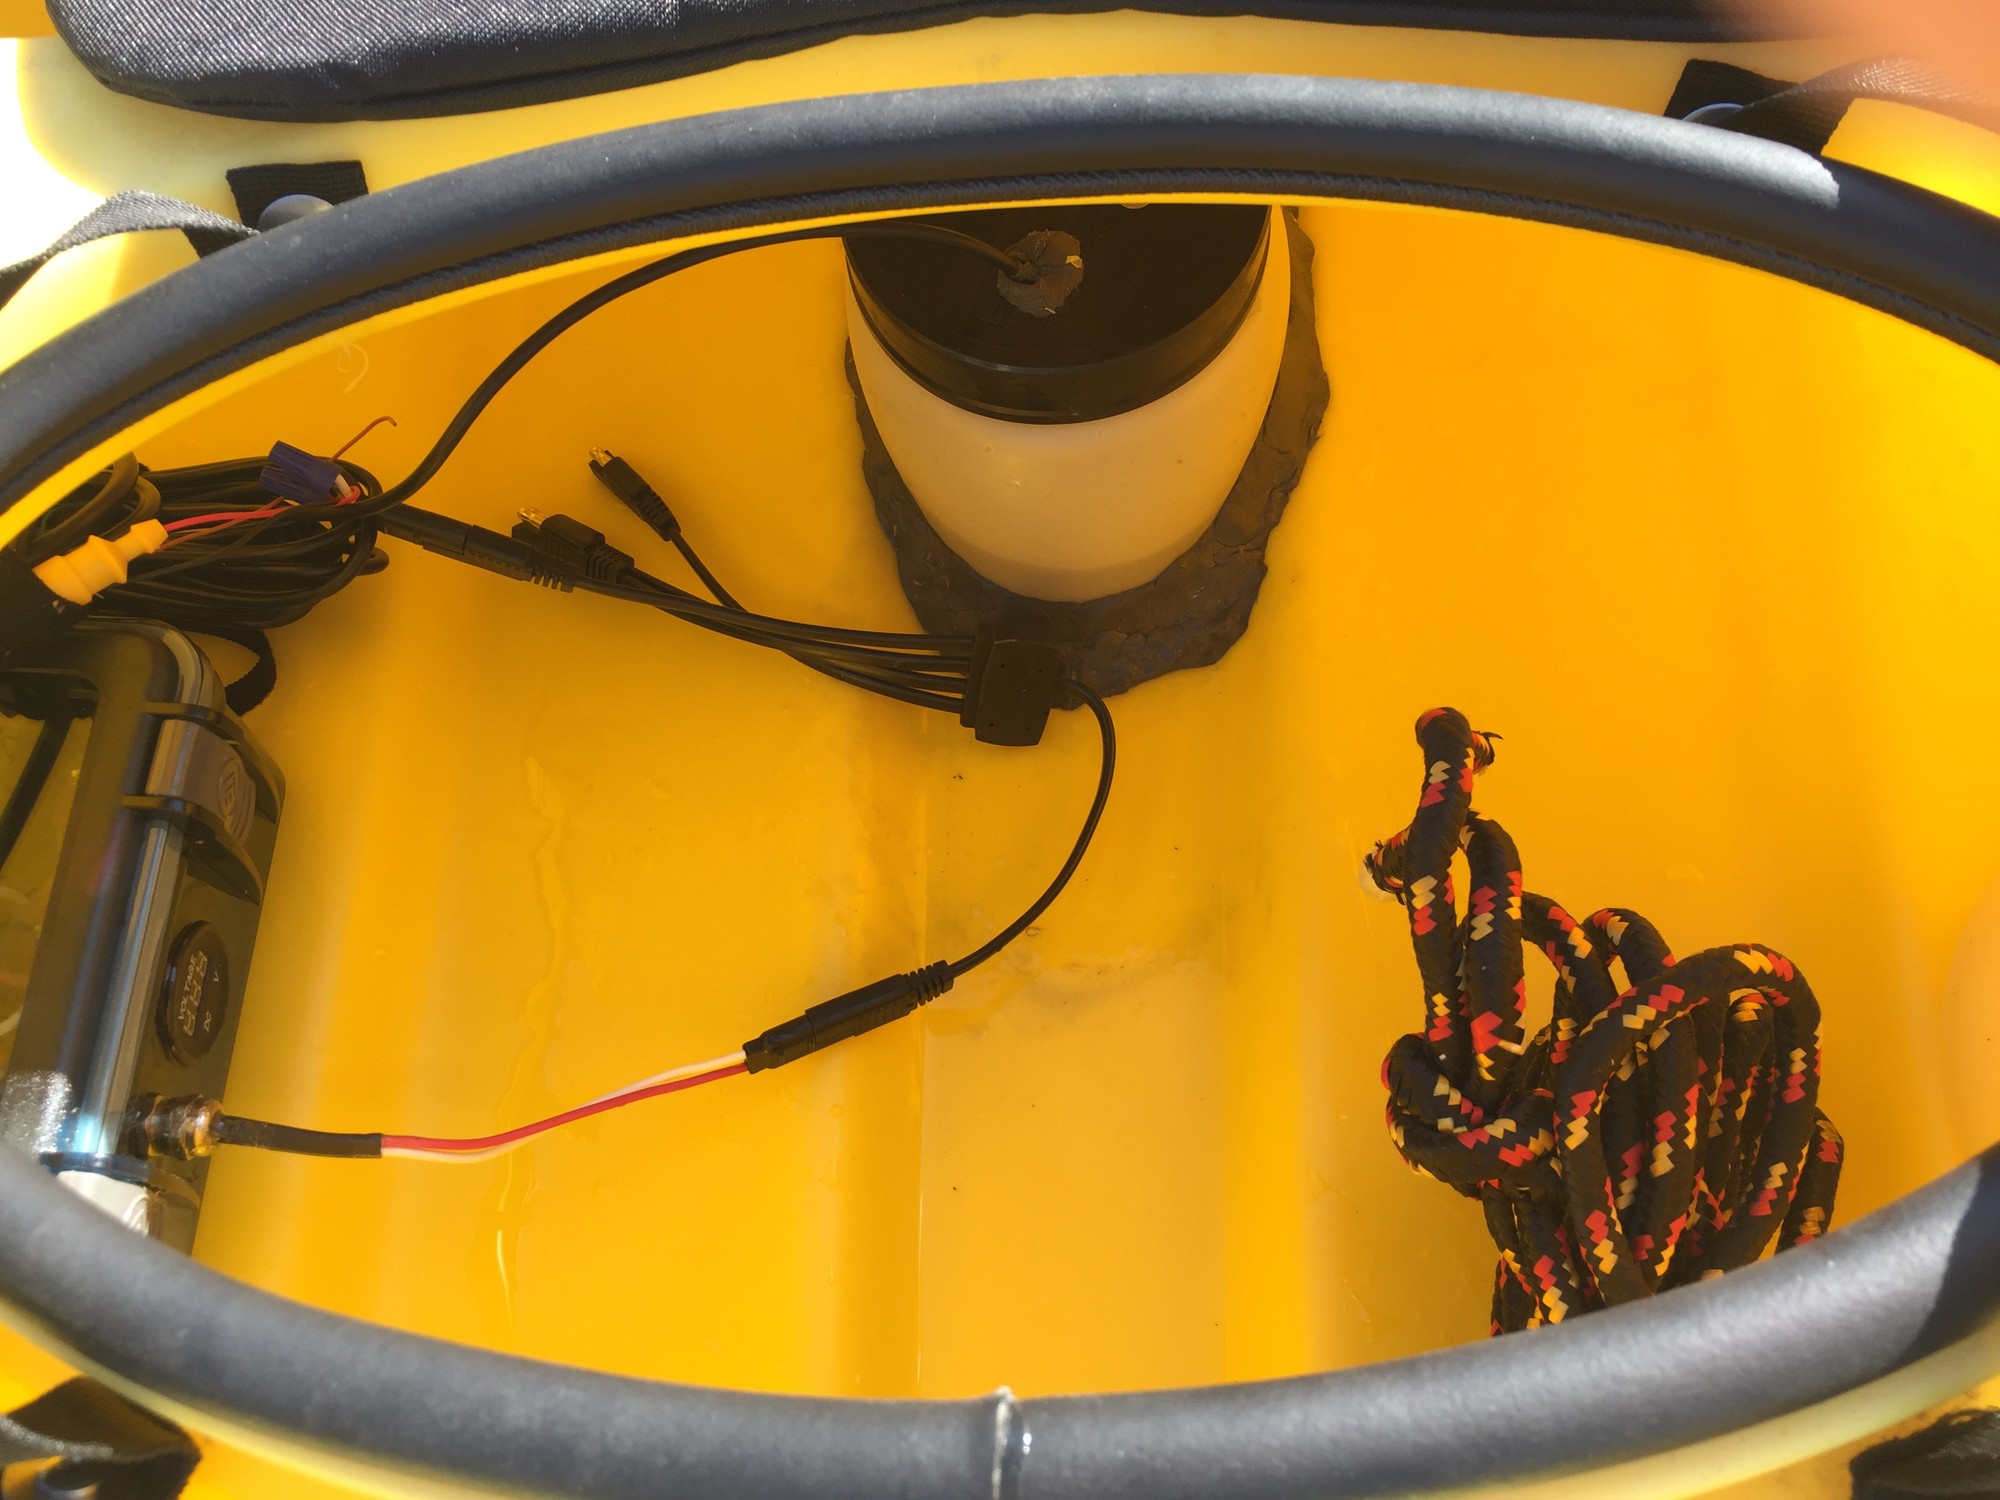
Next, I moved to wiring everything up. The wiring is pretty straighfoward as shown in the picture below. I didn’t bother installing a fuse because my depth finder already has one on it’s power line.
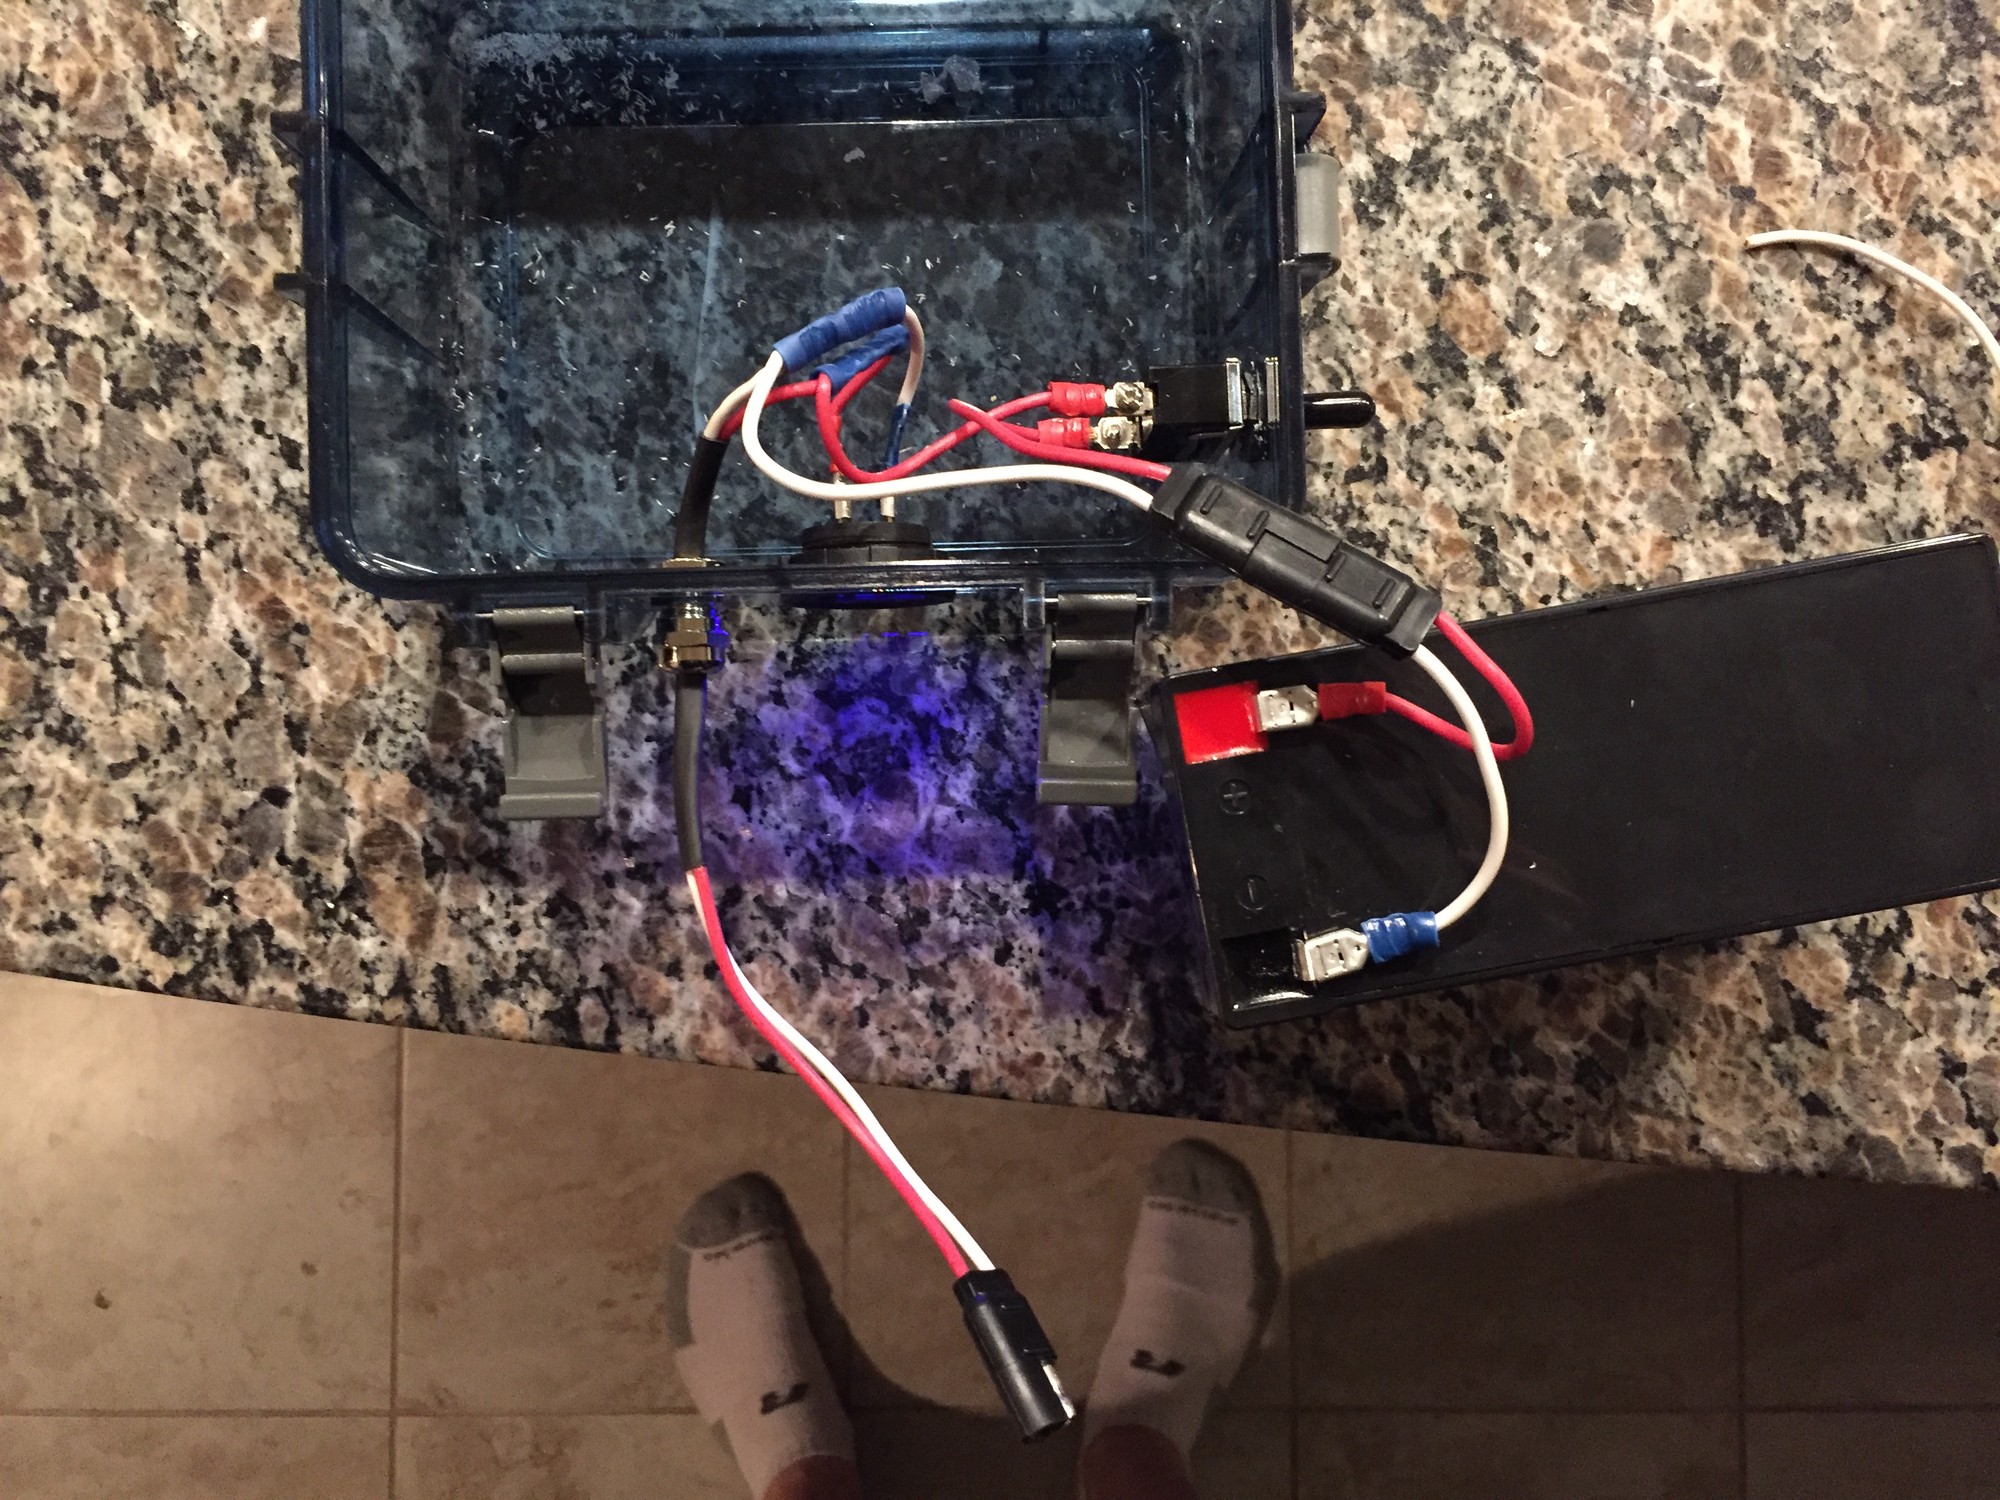
I placed foam padding that I had laying around into the box around the batttery and sensitive electronic parts. This was in order to cushion them from impact as well as to keep the contents of the box from moving too much when in motion.
The last steps were to seal any possible leaks such as the cable gland, switch and drilled holes with GOOP and then perform a trial power cycle with the depth finder.
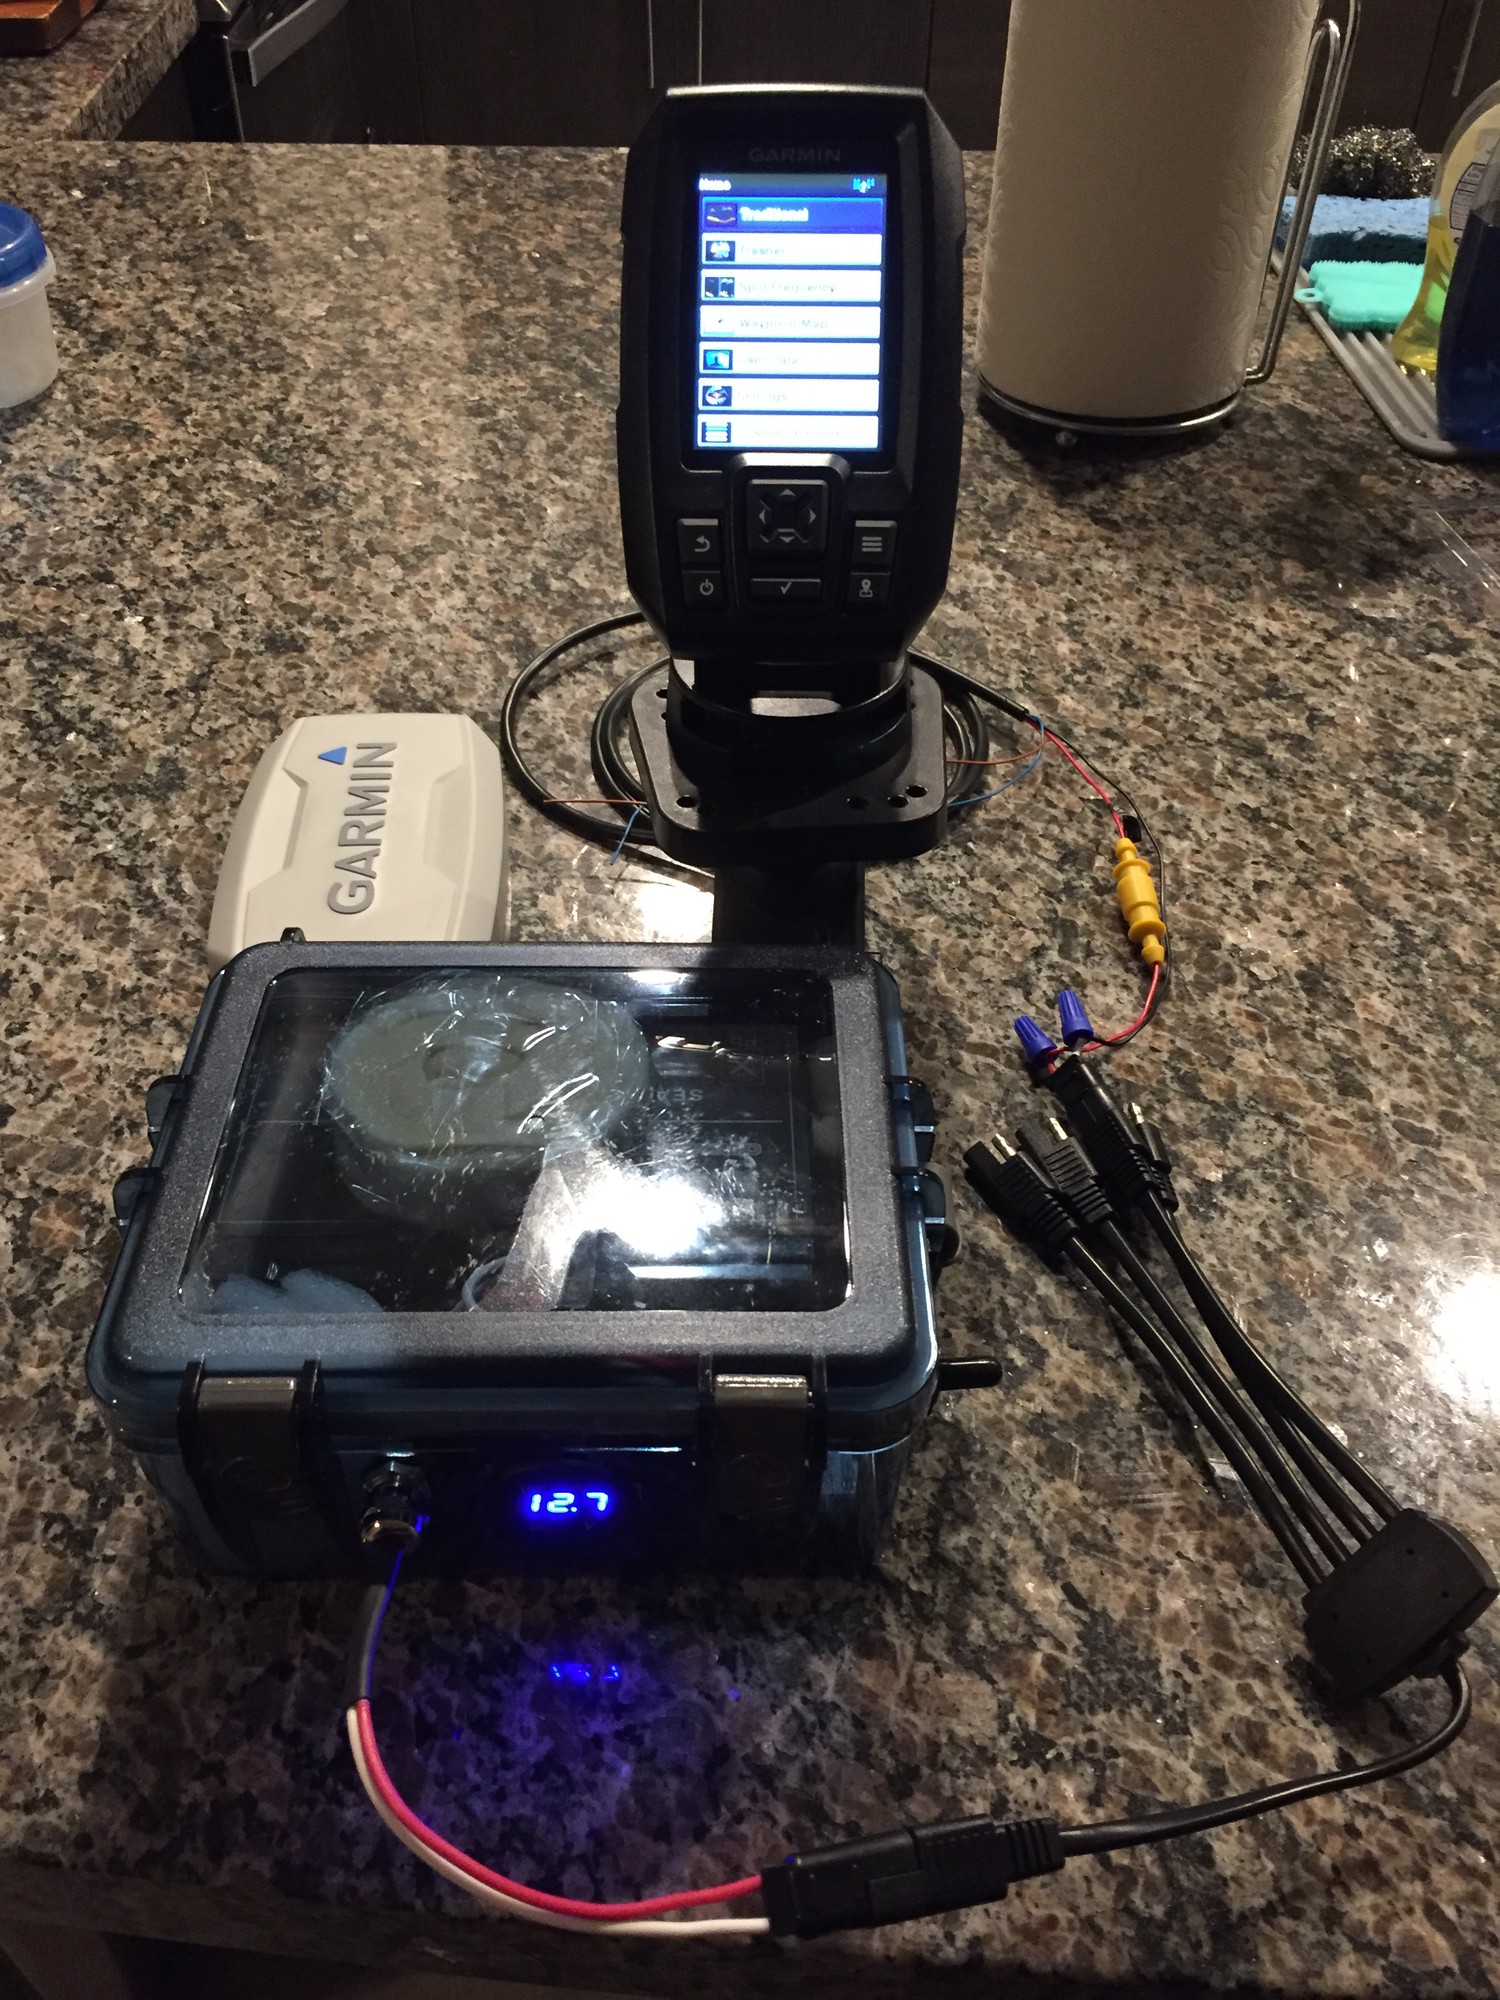
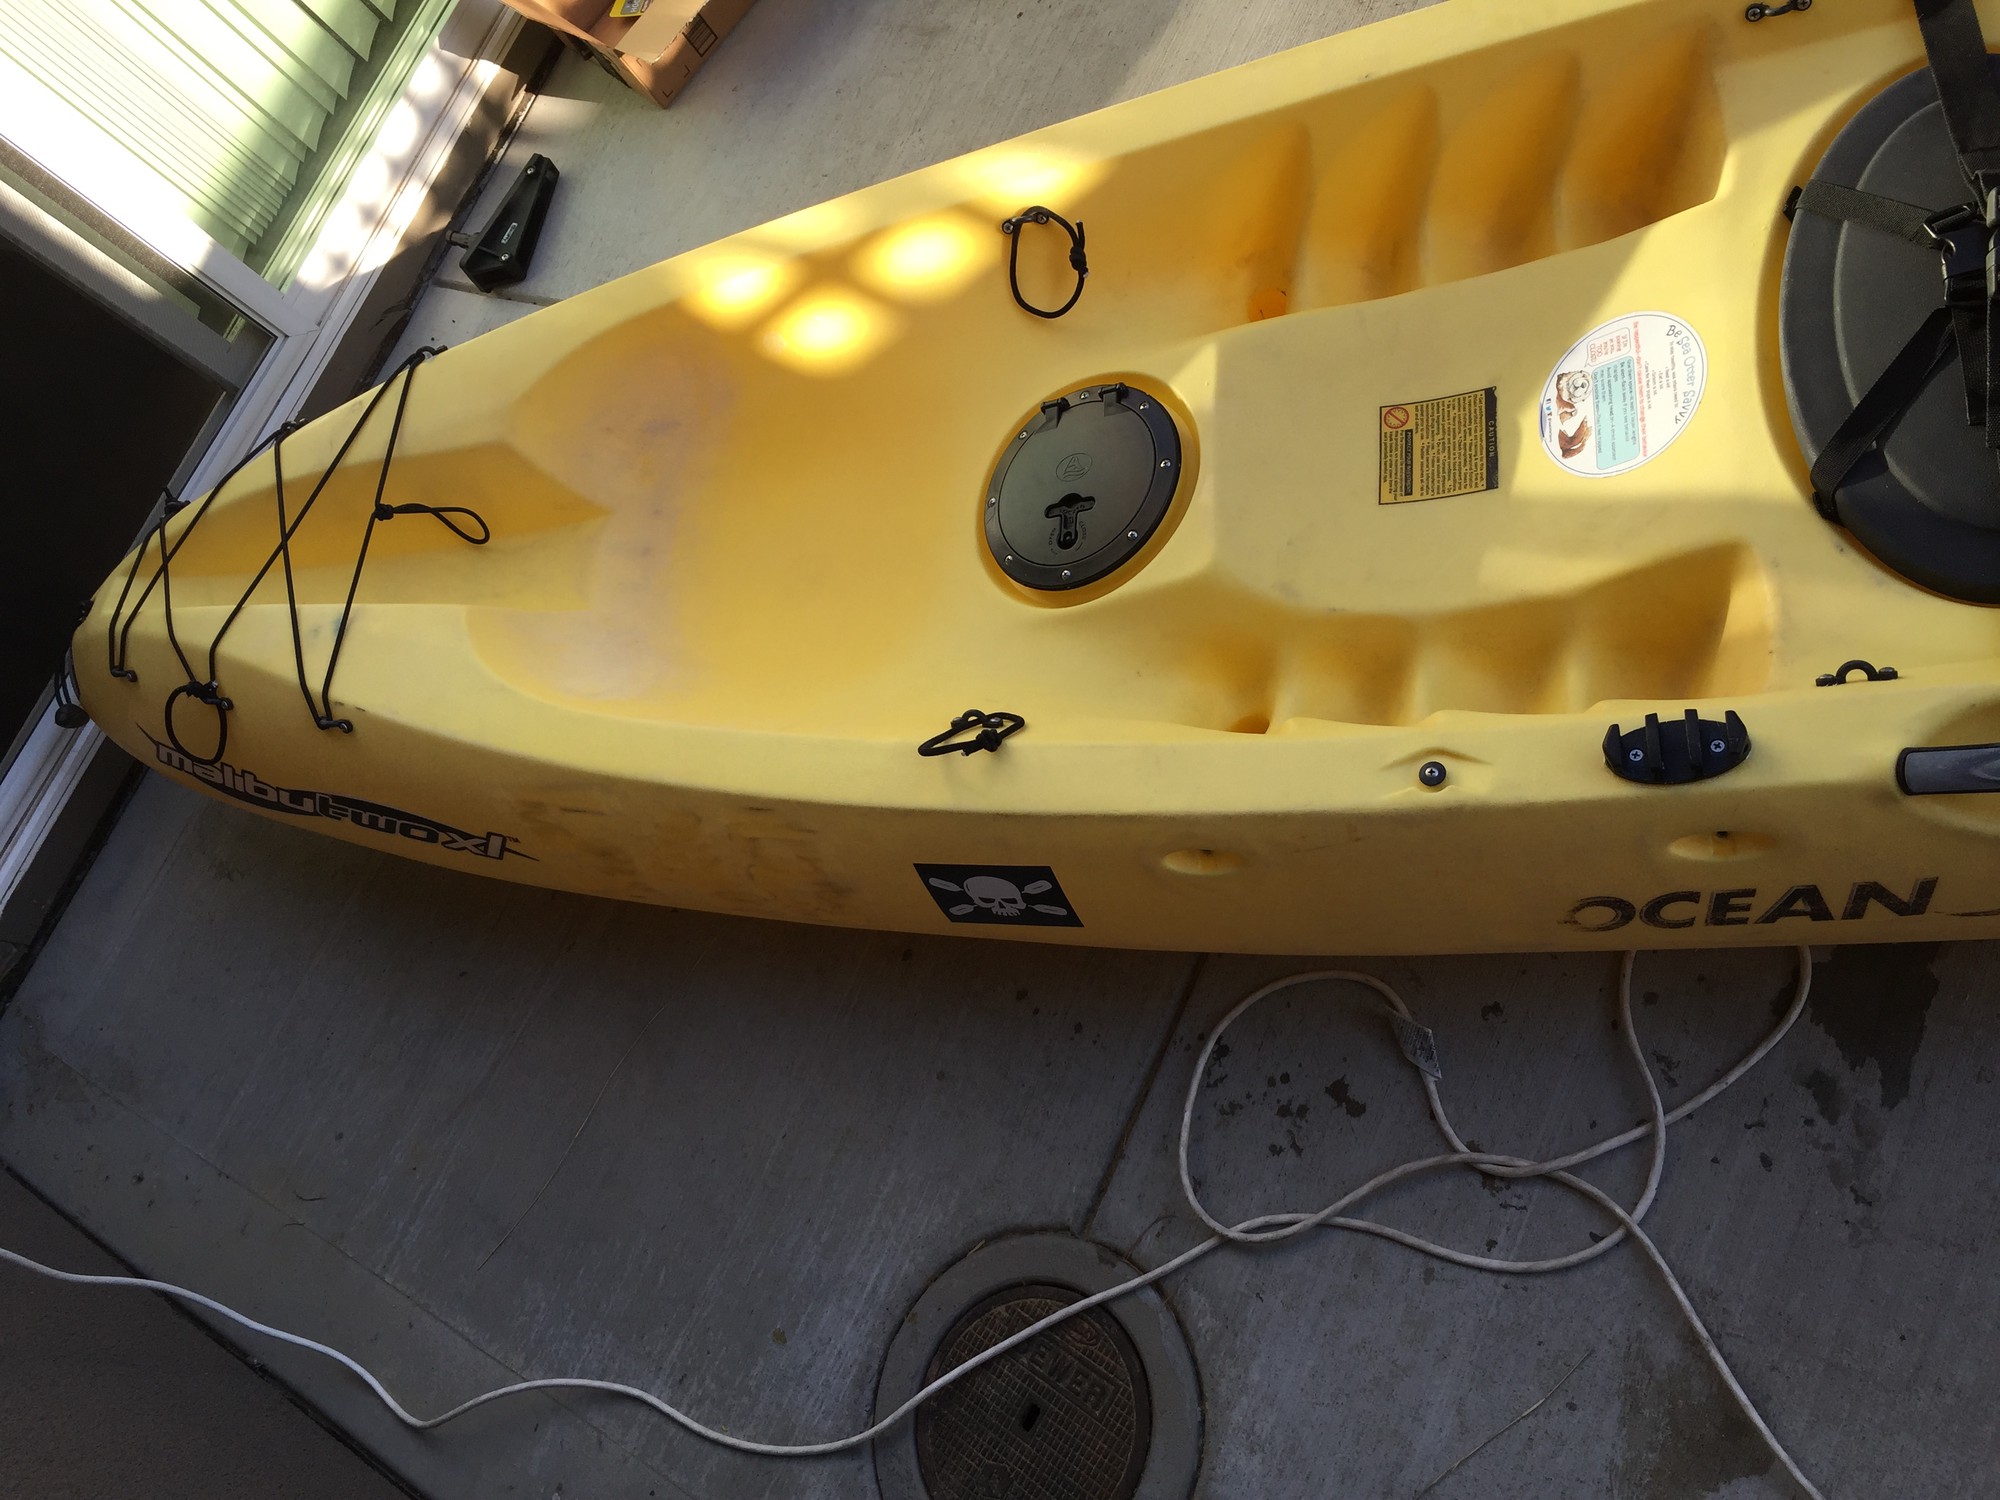
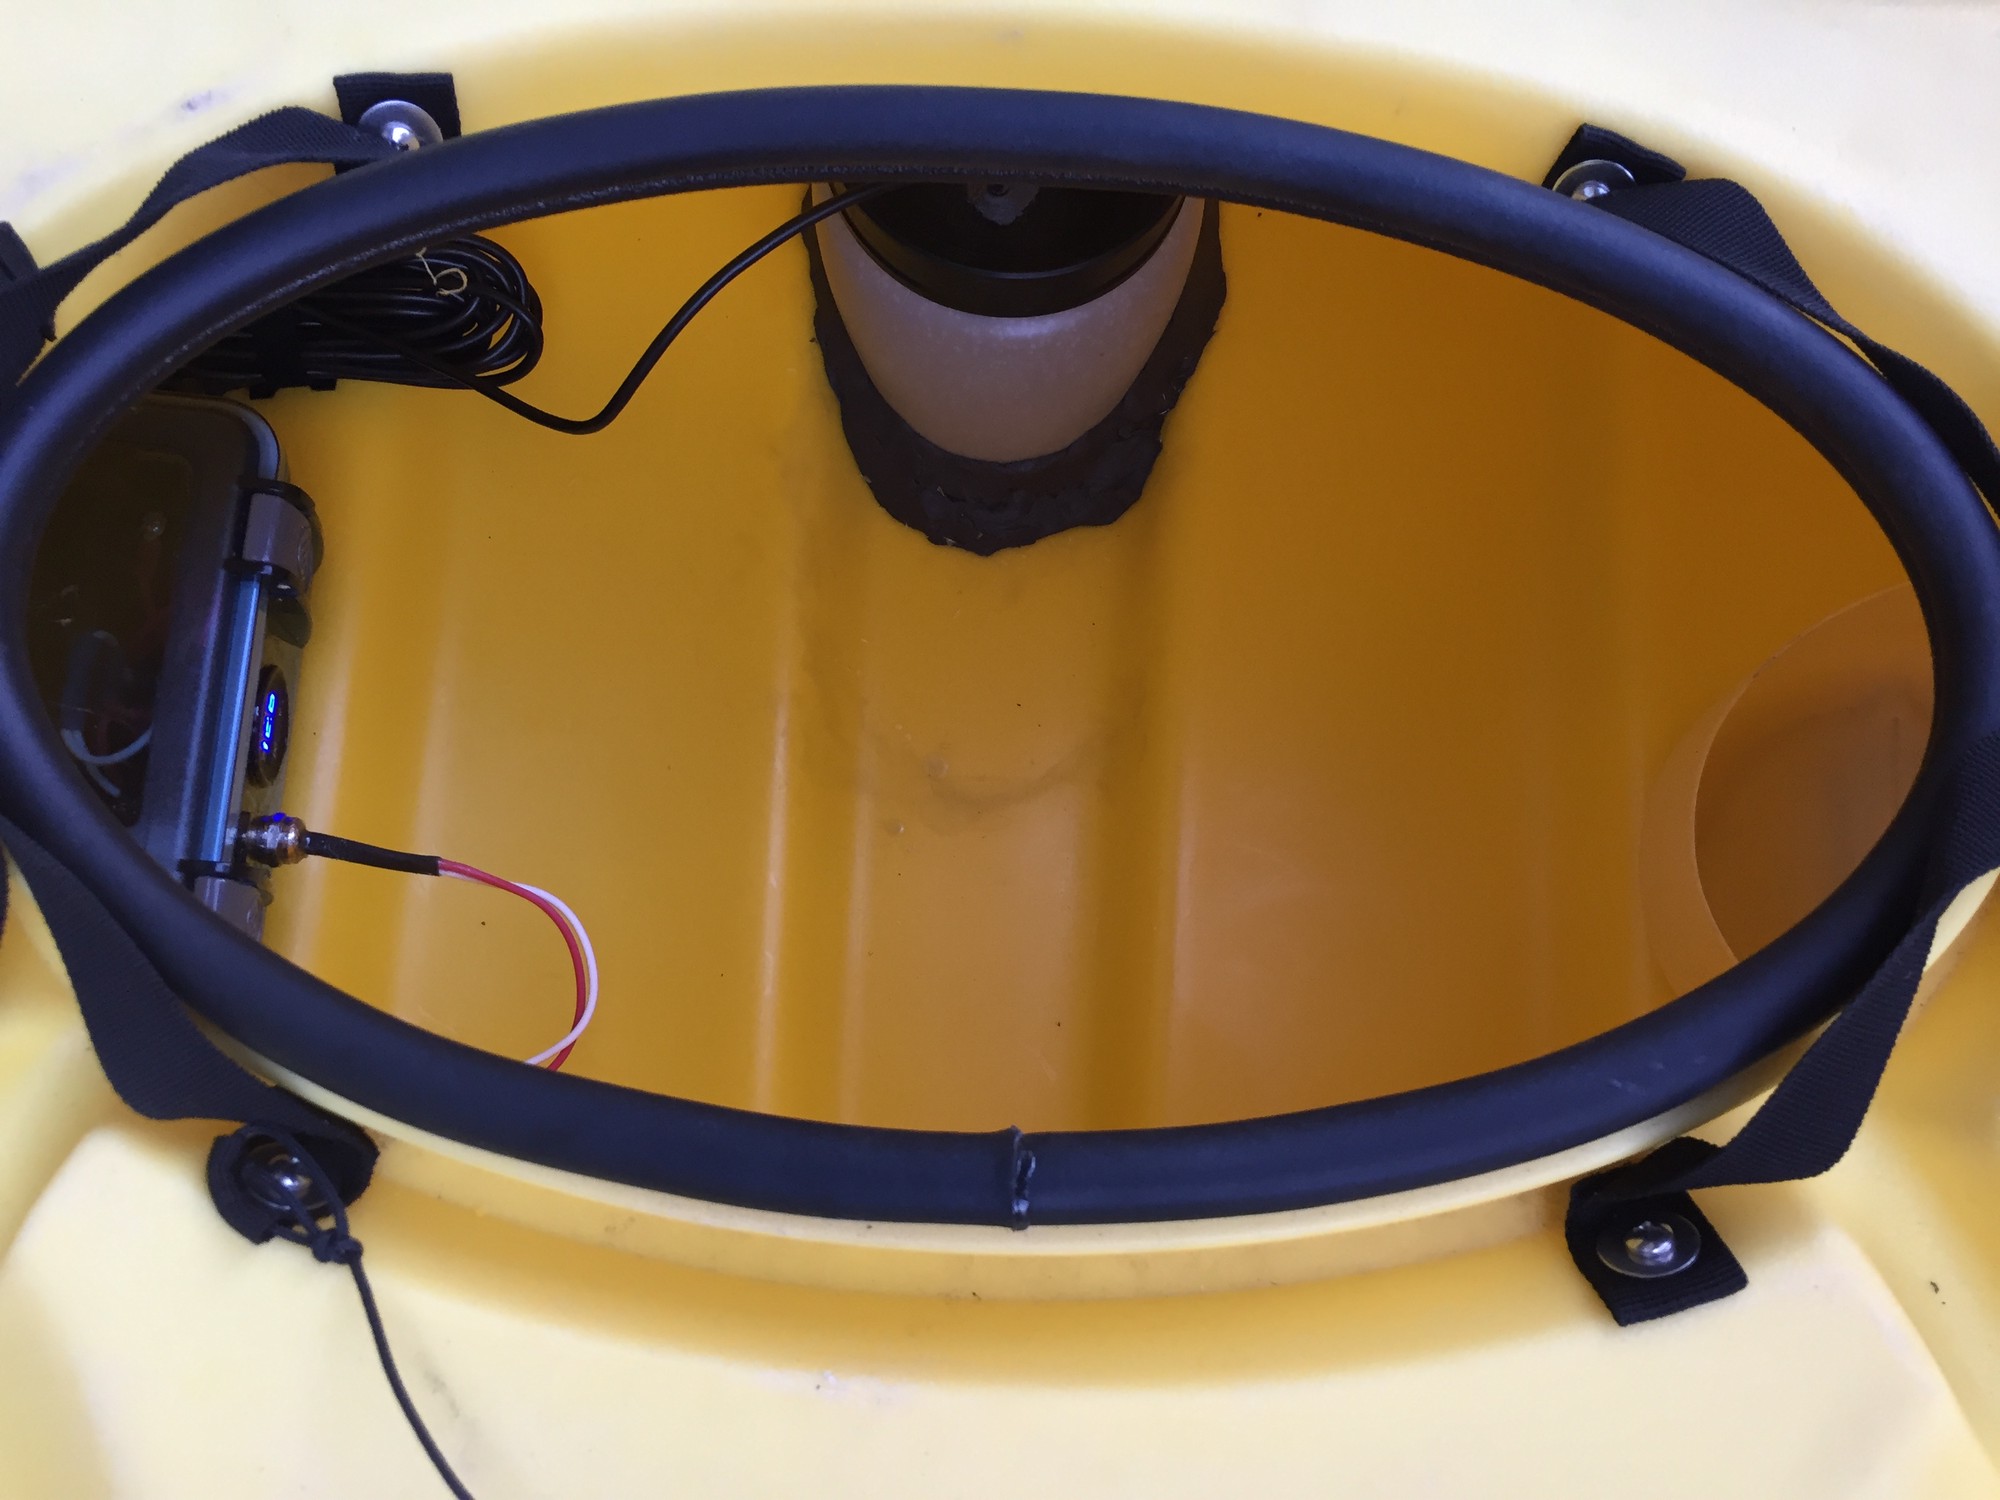
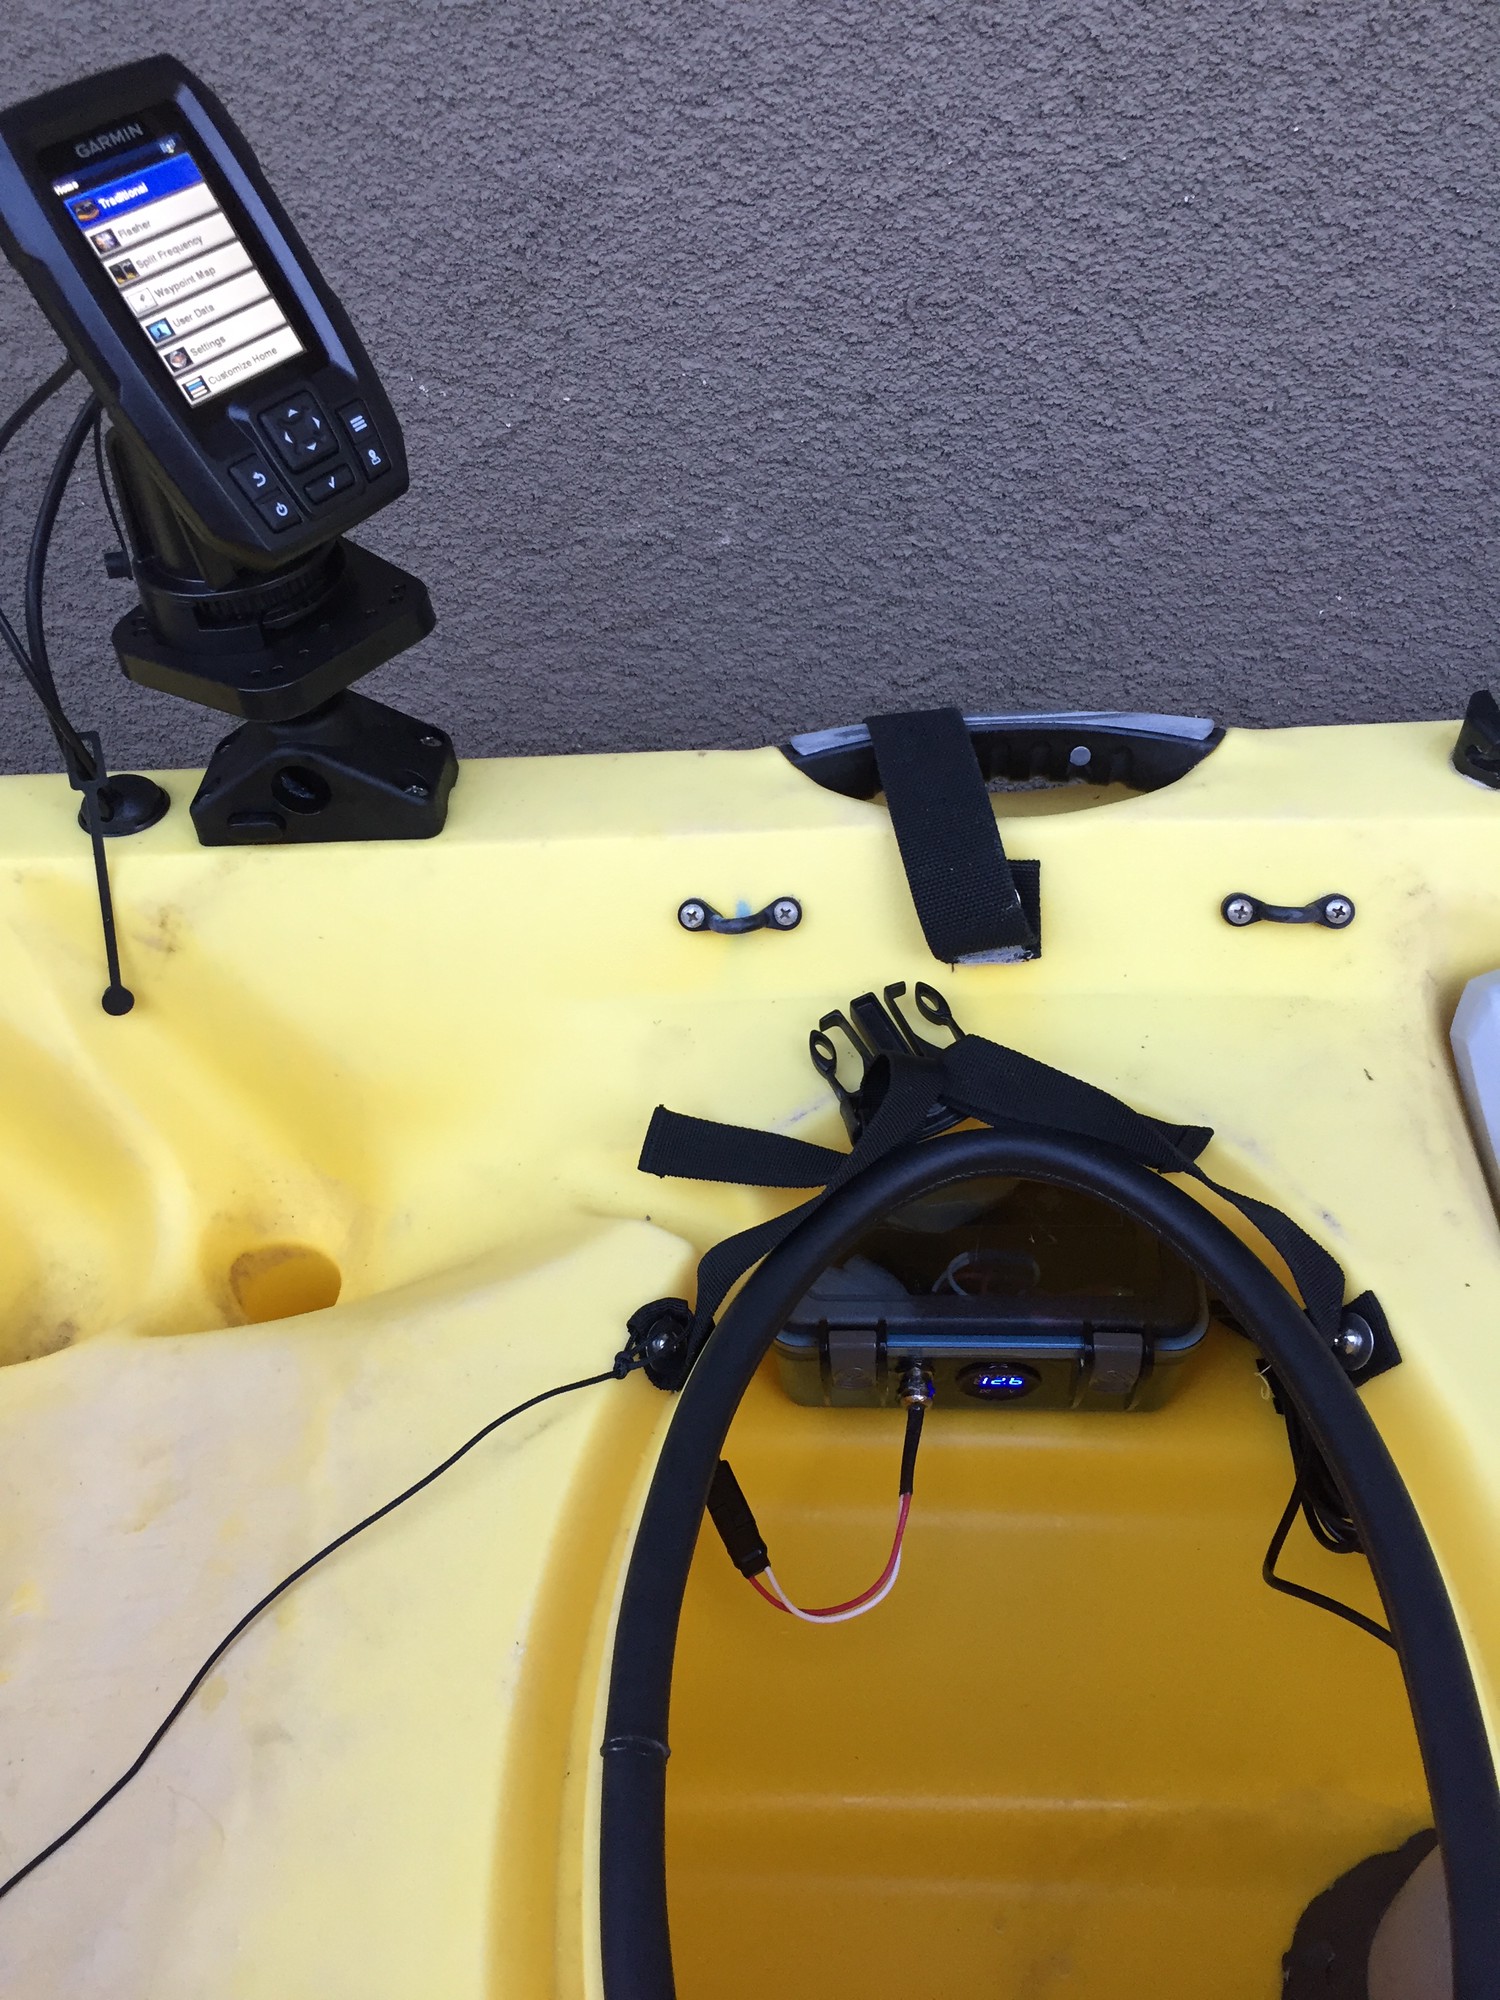
Depth Finder
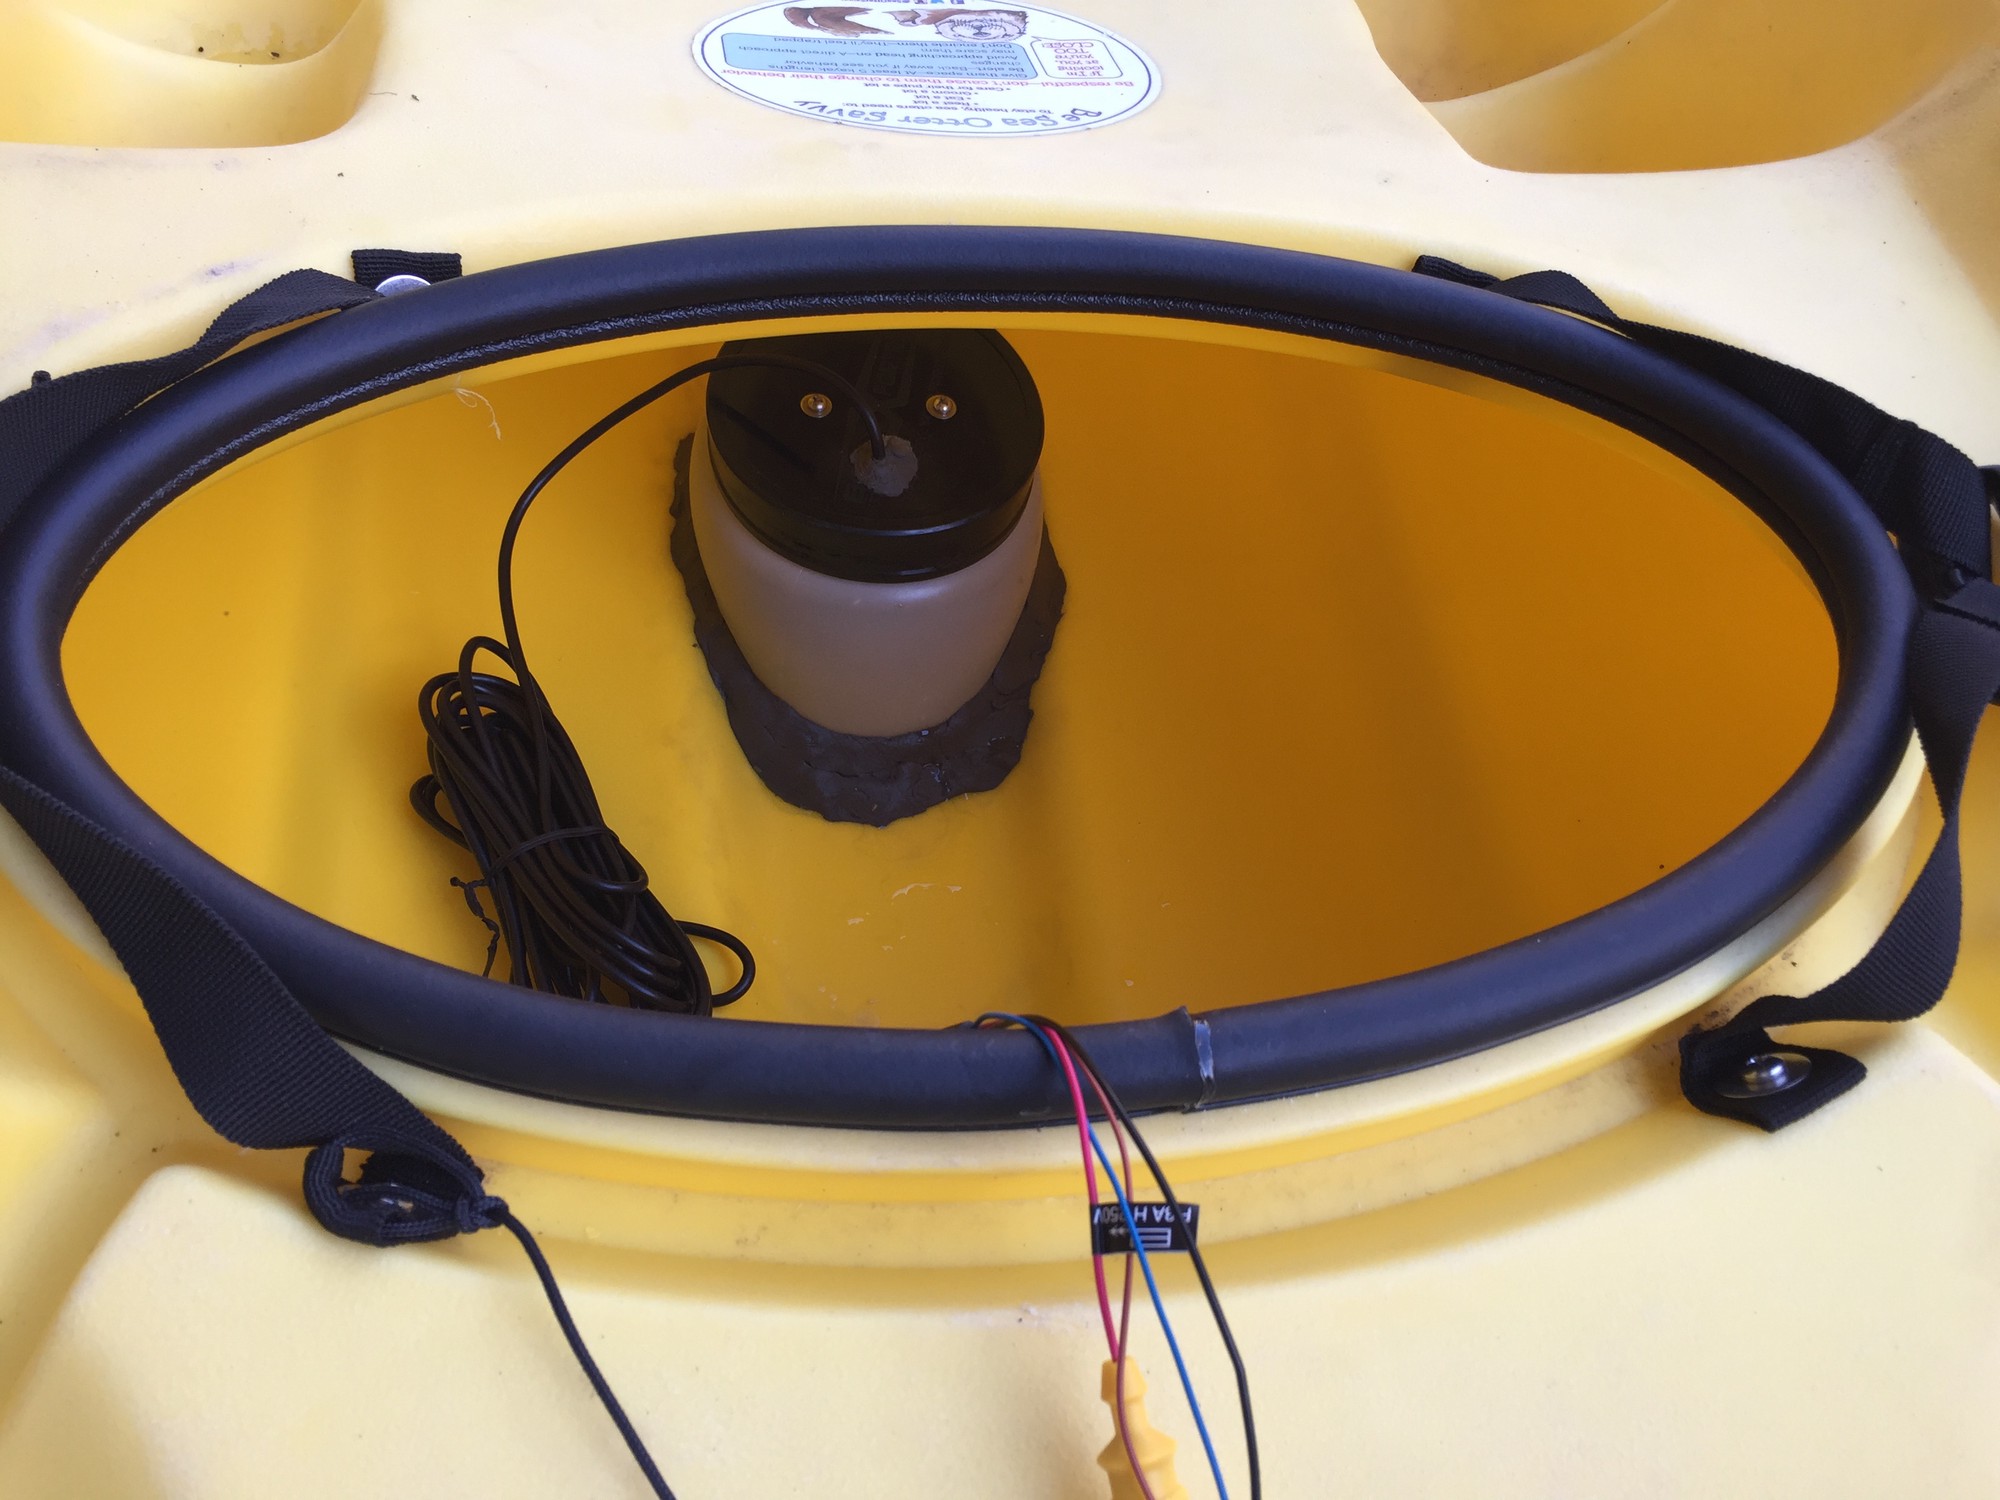
I’d like to know the depth I’m diving at with reasonable accuracy and so decided to install a depth finder. I understood the general premise of its installation from years of experience with small boating craft, however the installation of one on a kayak was new territory. Specifically, I wasn’t sure how to mount the transducer to the kayak so as to both get an accurate signal and remain out of the way so as not to get crushed by other, heavier equipment. Fortunately, I found great tutorials37 38 that posit it’s possible to install a transducer directly onto the lower hull on the INSIDE so as to remain safely out of harm’s way. Here is a great article39 that gives the basic science behind how depth finders work and why these installation tutorials work. As mentioned in that article, the idea is to create a medium surrounding the transducer that allows the signal to propegate cleanly through without interacting with air gaps/bubbles. I decided to follow the first tutorial37 and use a water container sealed with duct seal as the housing for the transducer. This was mainly because water is the target medium anyway for the transducer’s signal (other approaches using a sponge housing use grease as the medium between transducer and hull).
The materials used:
- #8-32 nylock stainless steel nuts40 x2
- #8-32 2 1/2" stainless steel round head screws41 x2
- #8 stainless steel flat washers42 x2
- Garmin Striker 4 with Transducer43
- Scotch 1" x 3" Extreme Fasteners44
- Scotch Medium Foam Bundling Straps45
- 1lb Plug Duct Seal Compound46
- Scotty #441 Backing Plate47
- Hobie Thru Hull Wiring Kit48
- Scotty #241L-BK Locking Side Deck Mounting Bracket49
- Garmin Striker 4 Protective Cover50
The first step was to install the water container that the transducer would sit into. I cut a protein powder container in half and then used the top half. I sealed it to be watertight using the duct seal around the bottom edge that meets the kayak hull. Then I filled it with water from my garden hose. I’m assuming that the change in salinity between the fresh water in the container and saltwater outside the kayak won’t affect the transducer’s signal, but this needs to be tested.
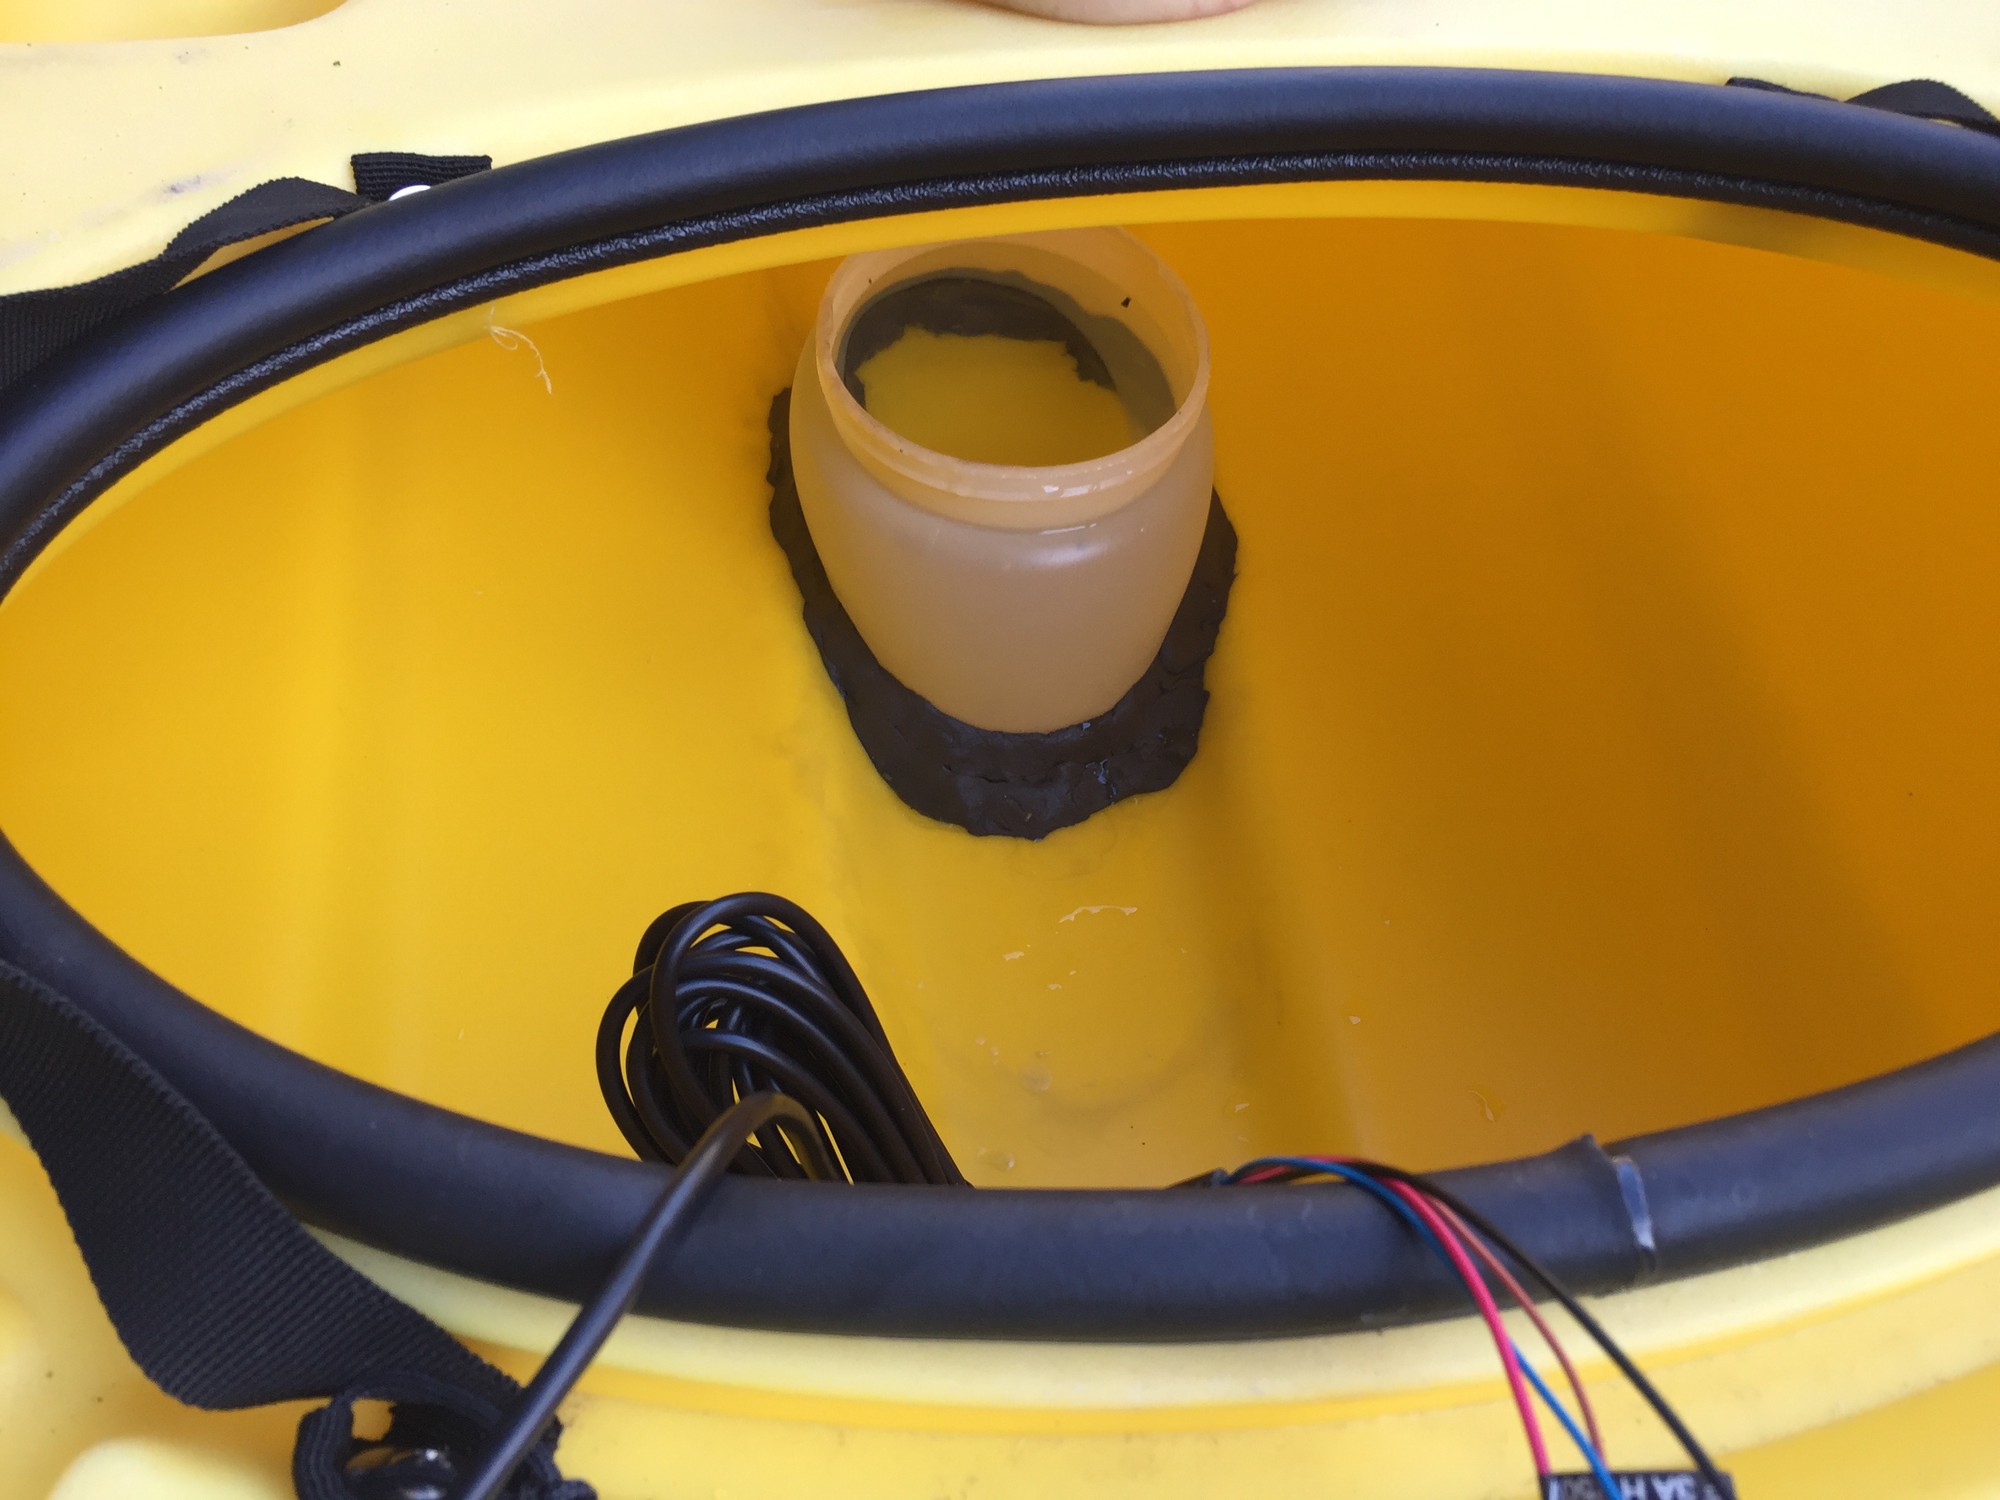
Next, I mounted the transducer to the lid of the water container using two stainless steel screws, nuts and washers. I used a small amount of duct seal around the cable so as to keep it watertight.
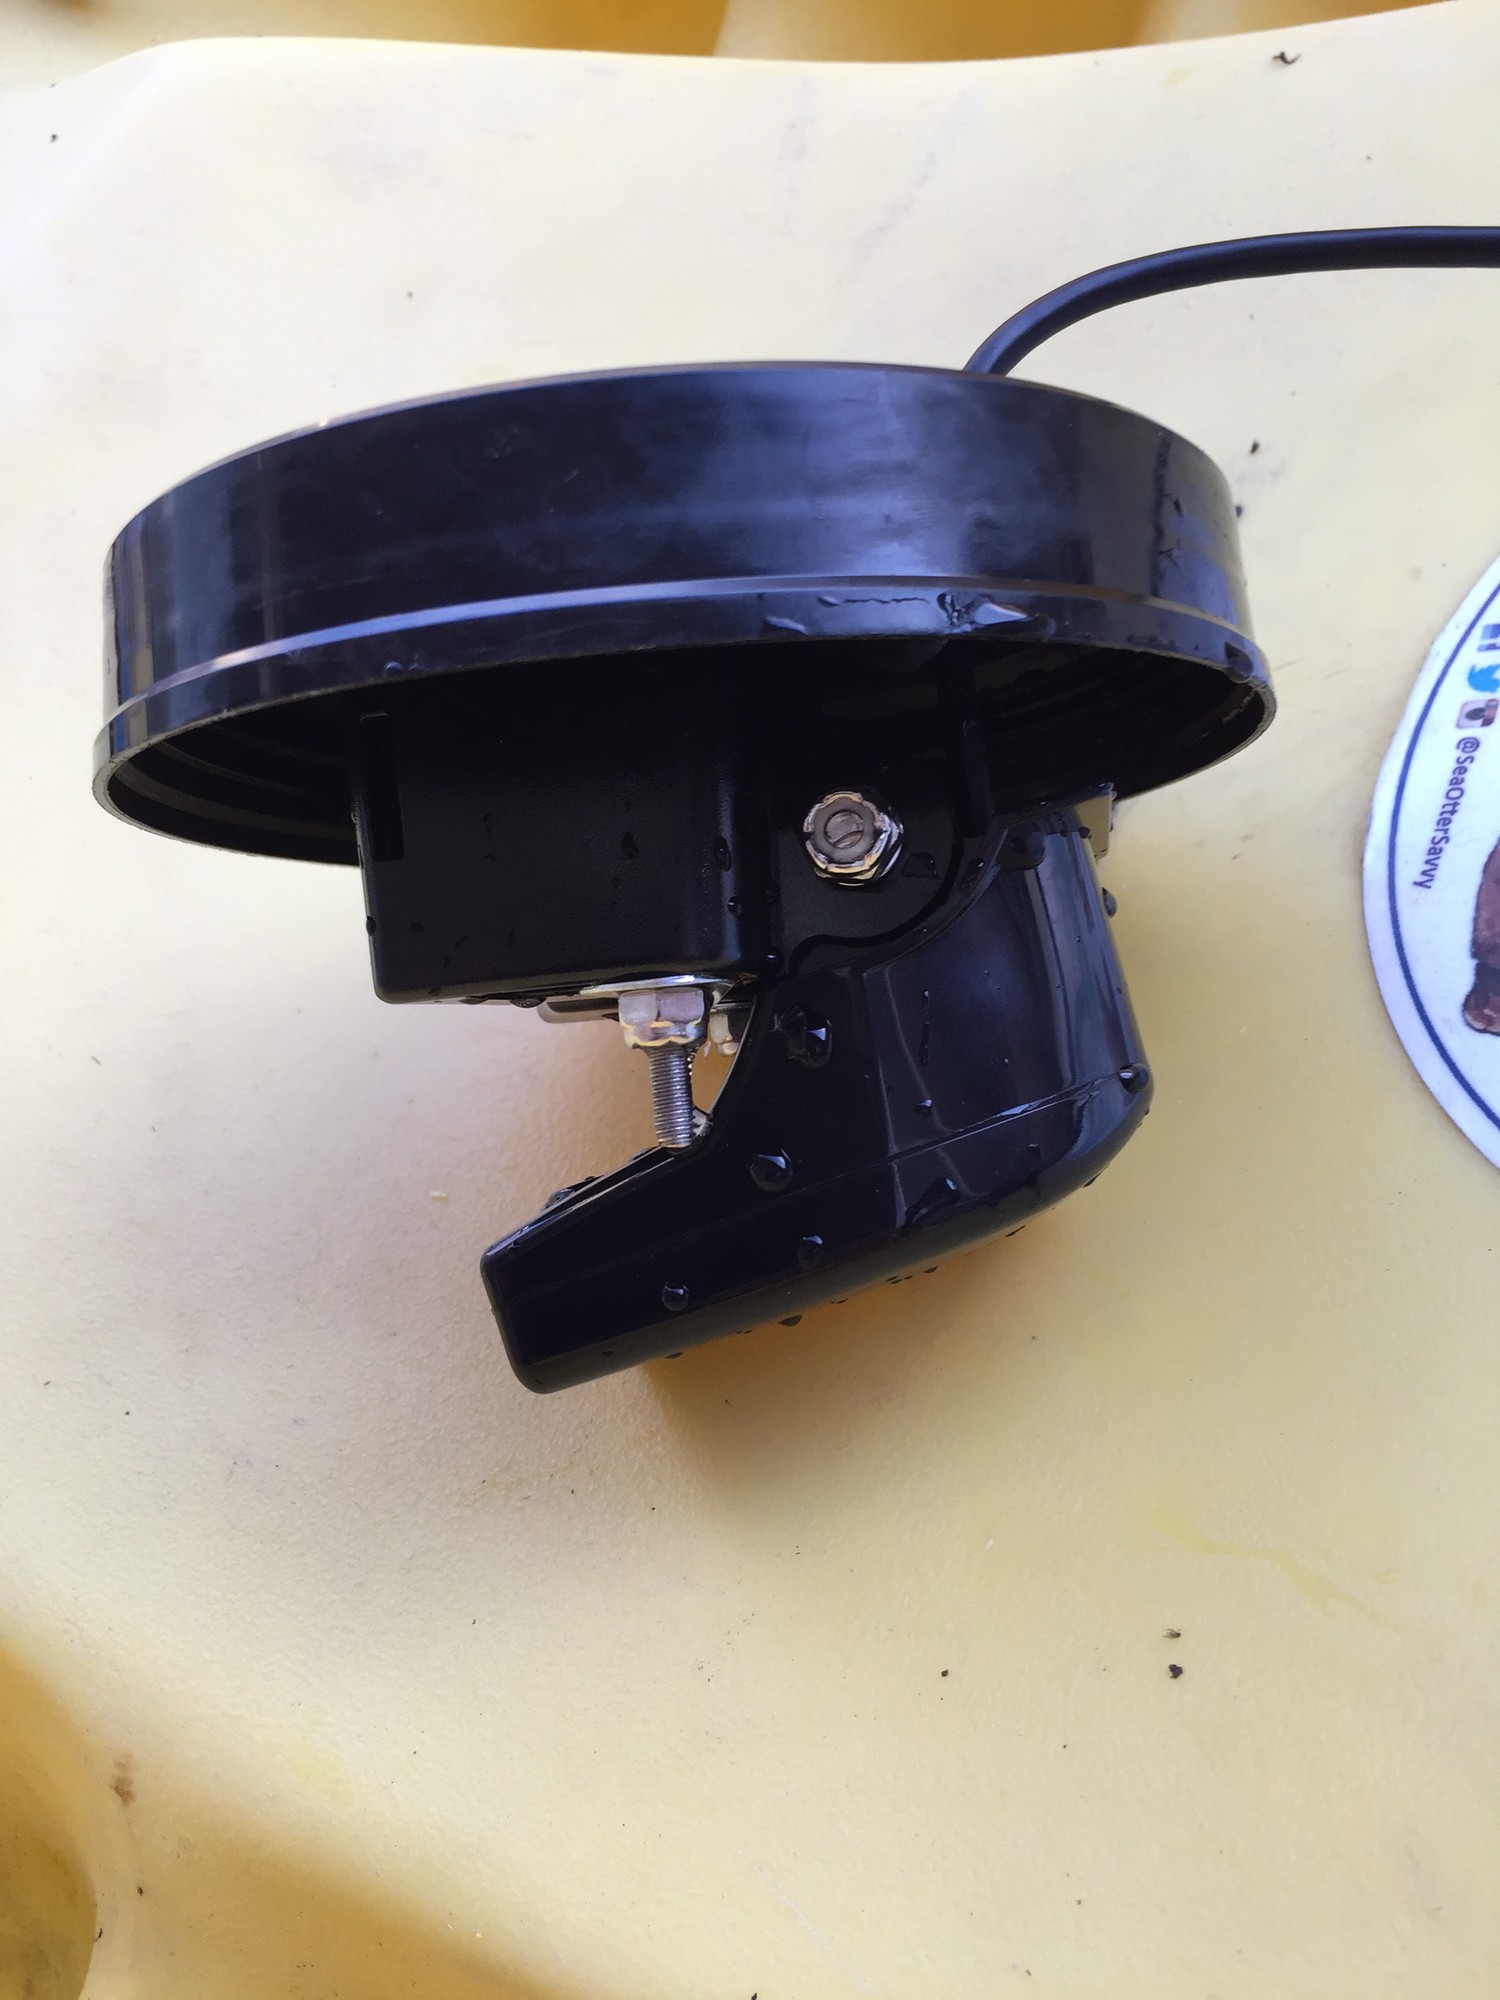

I then installed the Hobie Thru Hull wiring kit and Scotty #241L-BK Locking Side Deck (with Scotty #441 Backing Plate).
Once the wiring was configured, I could screw on the lid/transducer component onto the water container.
I needed to make sure that the battery box and the bottom half of the water container (that I decided to install as a storage tray) were securely mounted to the kayak but removable. So I fixed 1"x3" Scotch Extreme Fasteners (rated up to 10lb) to them and to the location on the hull where they would sit. These fasteners are supposed to work in dirt and wet or dry (ideal for scuba diving and beaches/mud), but Velcro makes a competitor product that may work as well or better.
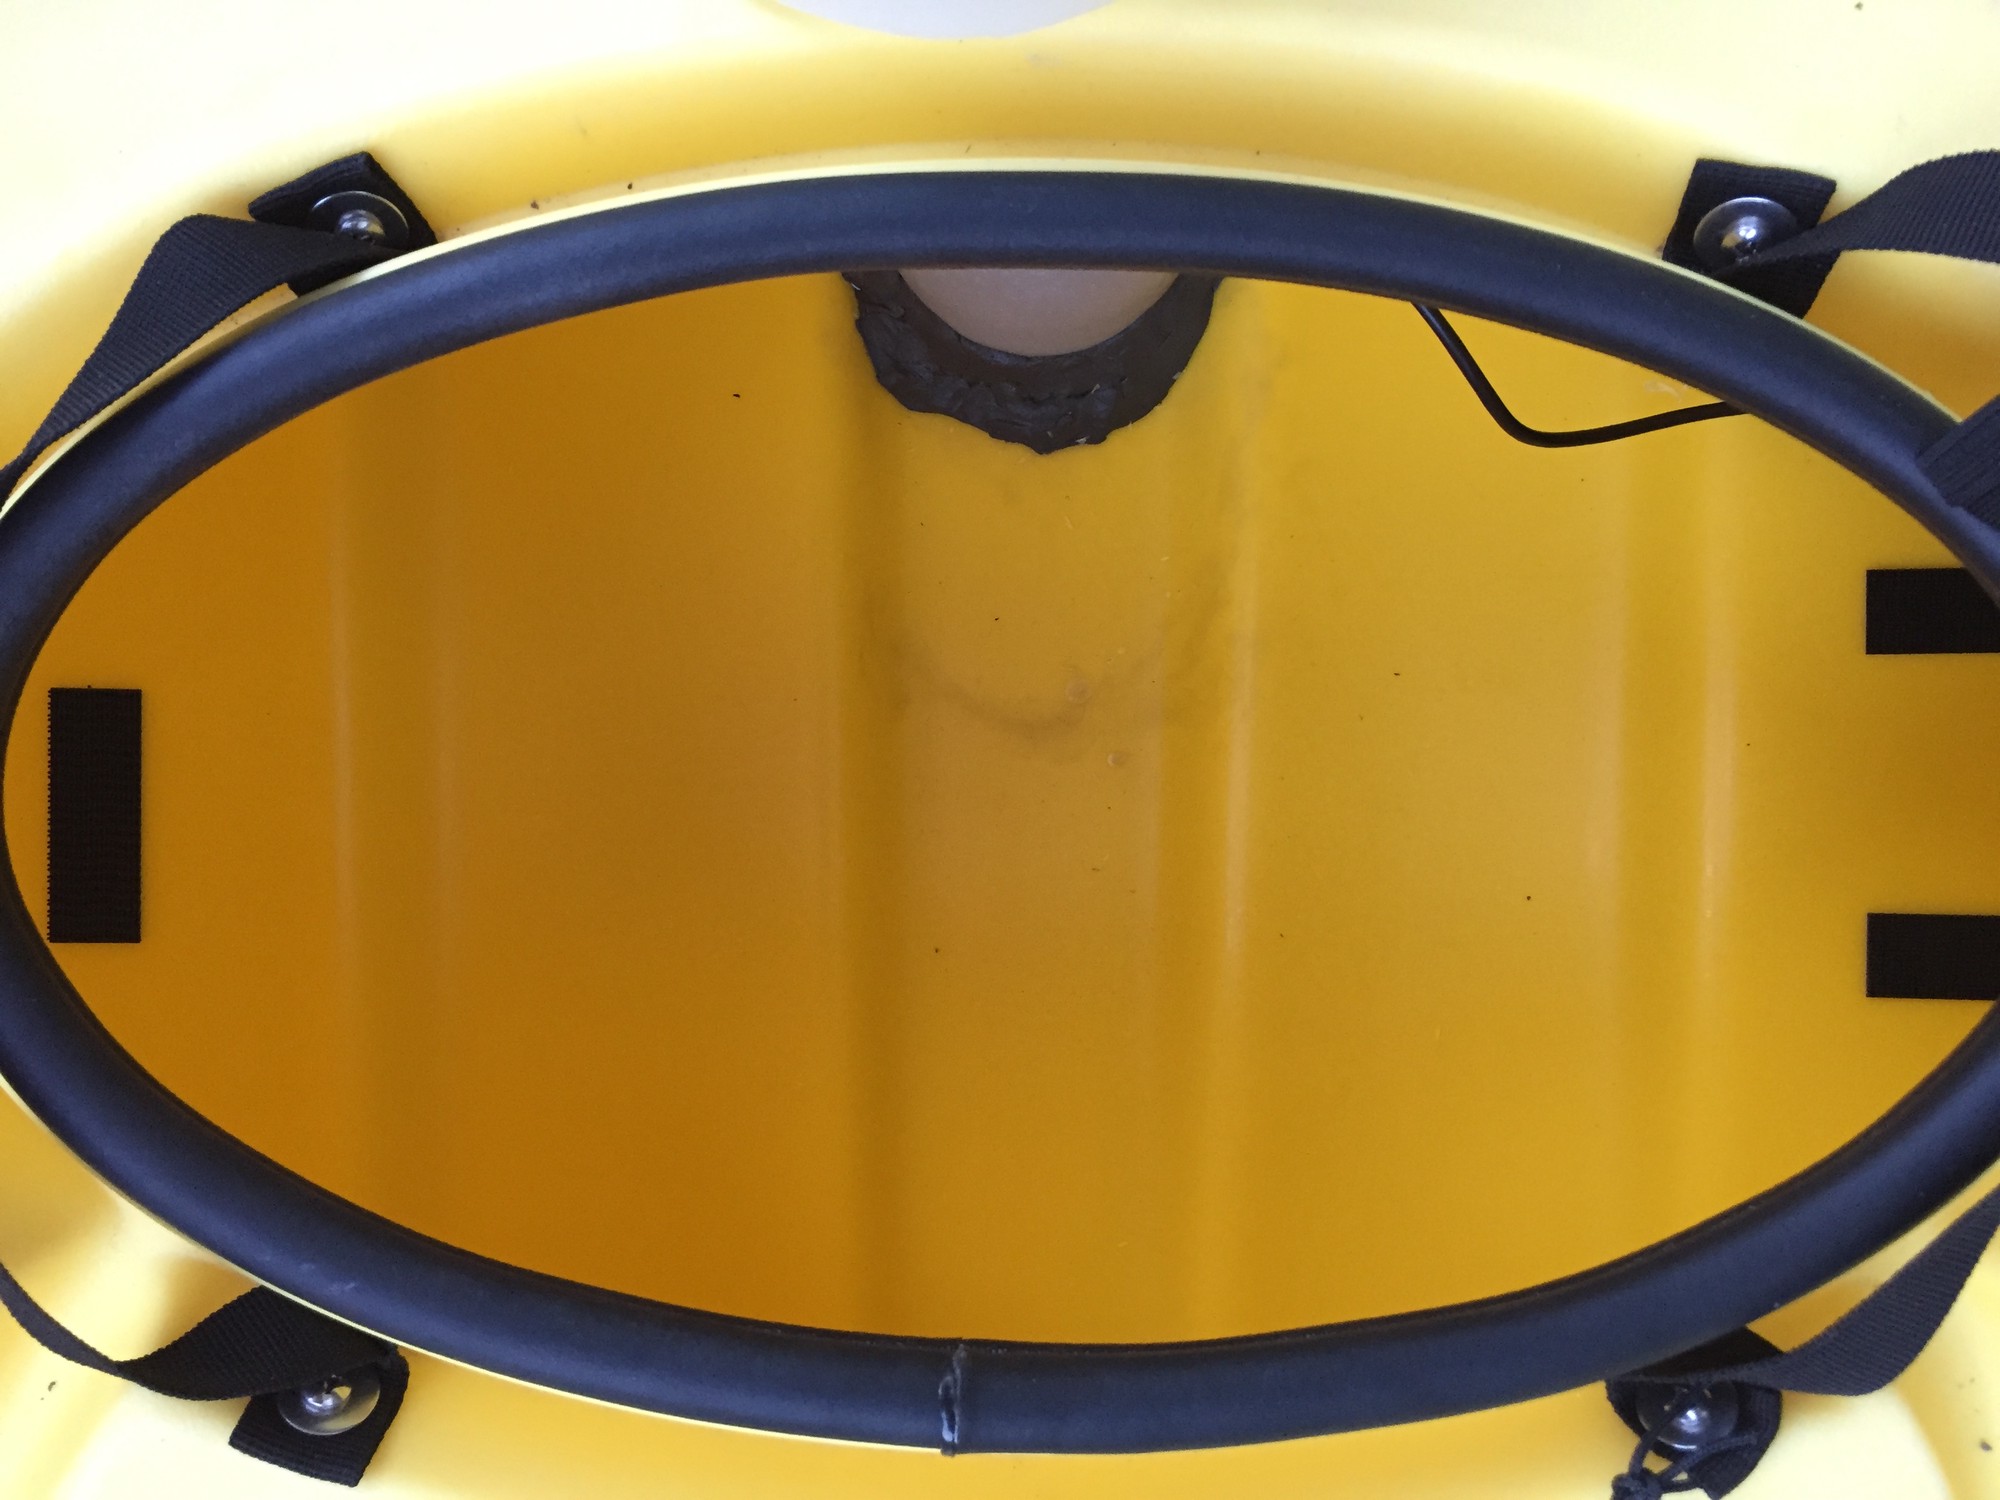
For cable management, I used the Scotch Foam Bundling Straps to keep wiring tidy. This is shown below for the external wire leads for the display to keep the wires out of the way when not in use, but I also used them internally.
The last step was to power cycle the display to test out the wiring.
Float Bags
Because I’ve cut compartment holes in the otherwise (almost) air-tight hull and will be loading my kayak near its capacity with scuba gear, I’ve purchased float bags for the bow and stern in the event the inner hull cavity floods. For the float bags I purchased a pair of NRS Split Kayak Flotation bags51.
They have a solid reputation for their durability and should buy me enough time to keep the kayak from ever completely sinking. Because my kayak model has large bow and stern compartments, I simply bought two stern bags since these are larger than the bow bags soled by NRS.
Scuba Flag
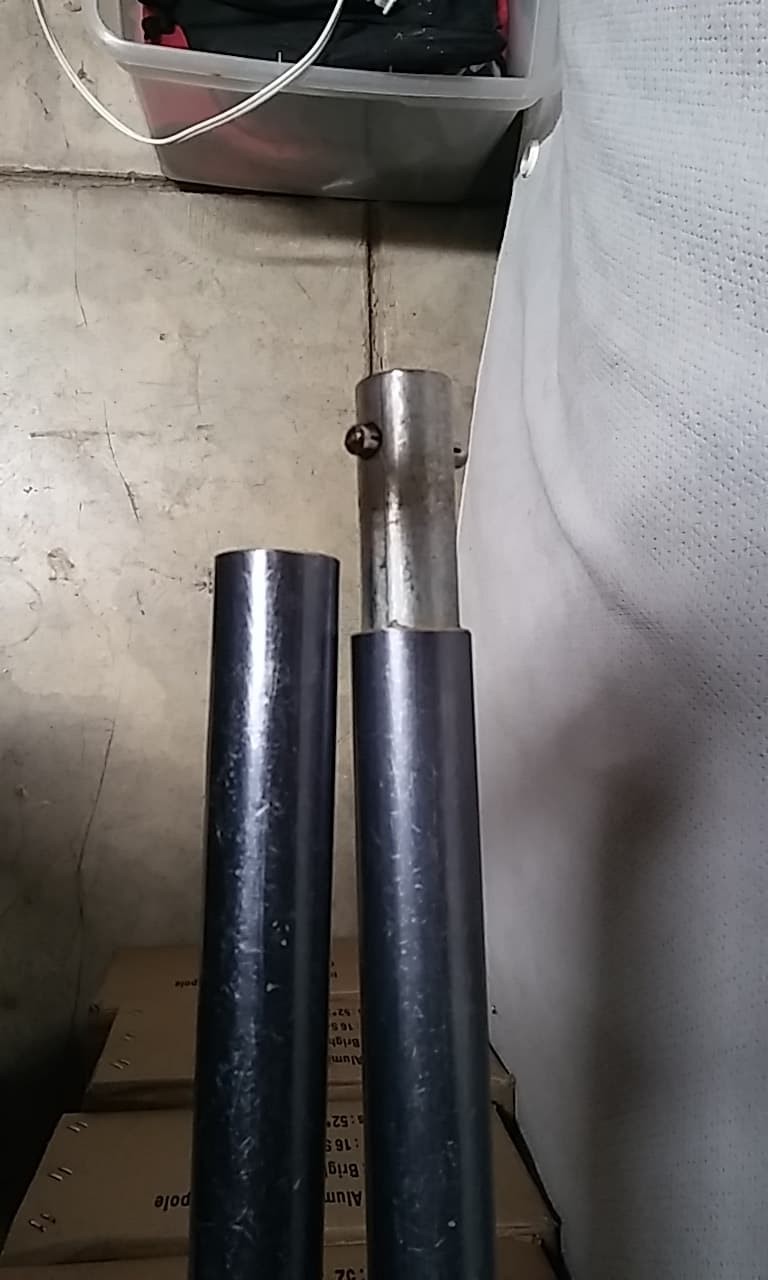
So far I’ve just visibly attached the flag to the hull without a pole. I plan to fabricate a pole for it that may also serve as an anchor retrieval hook.
UPDATE
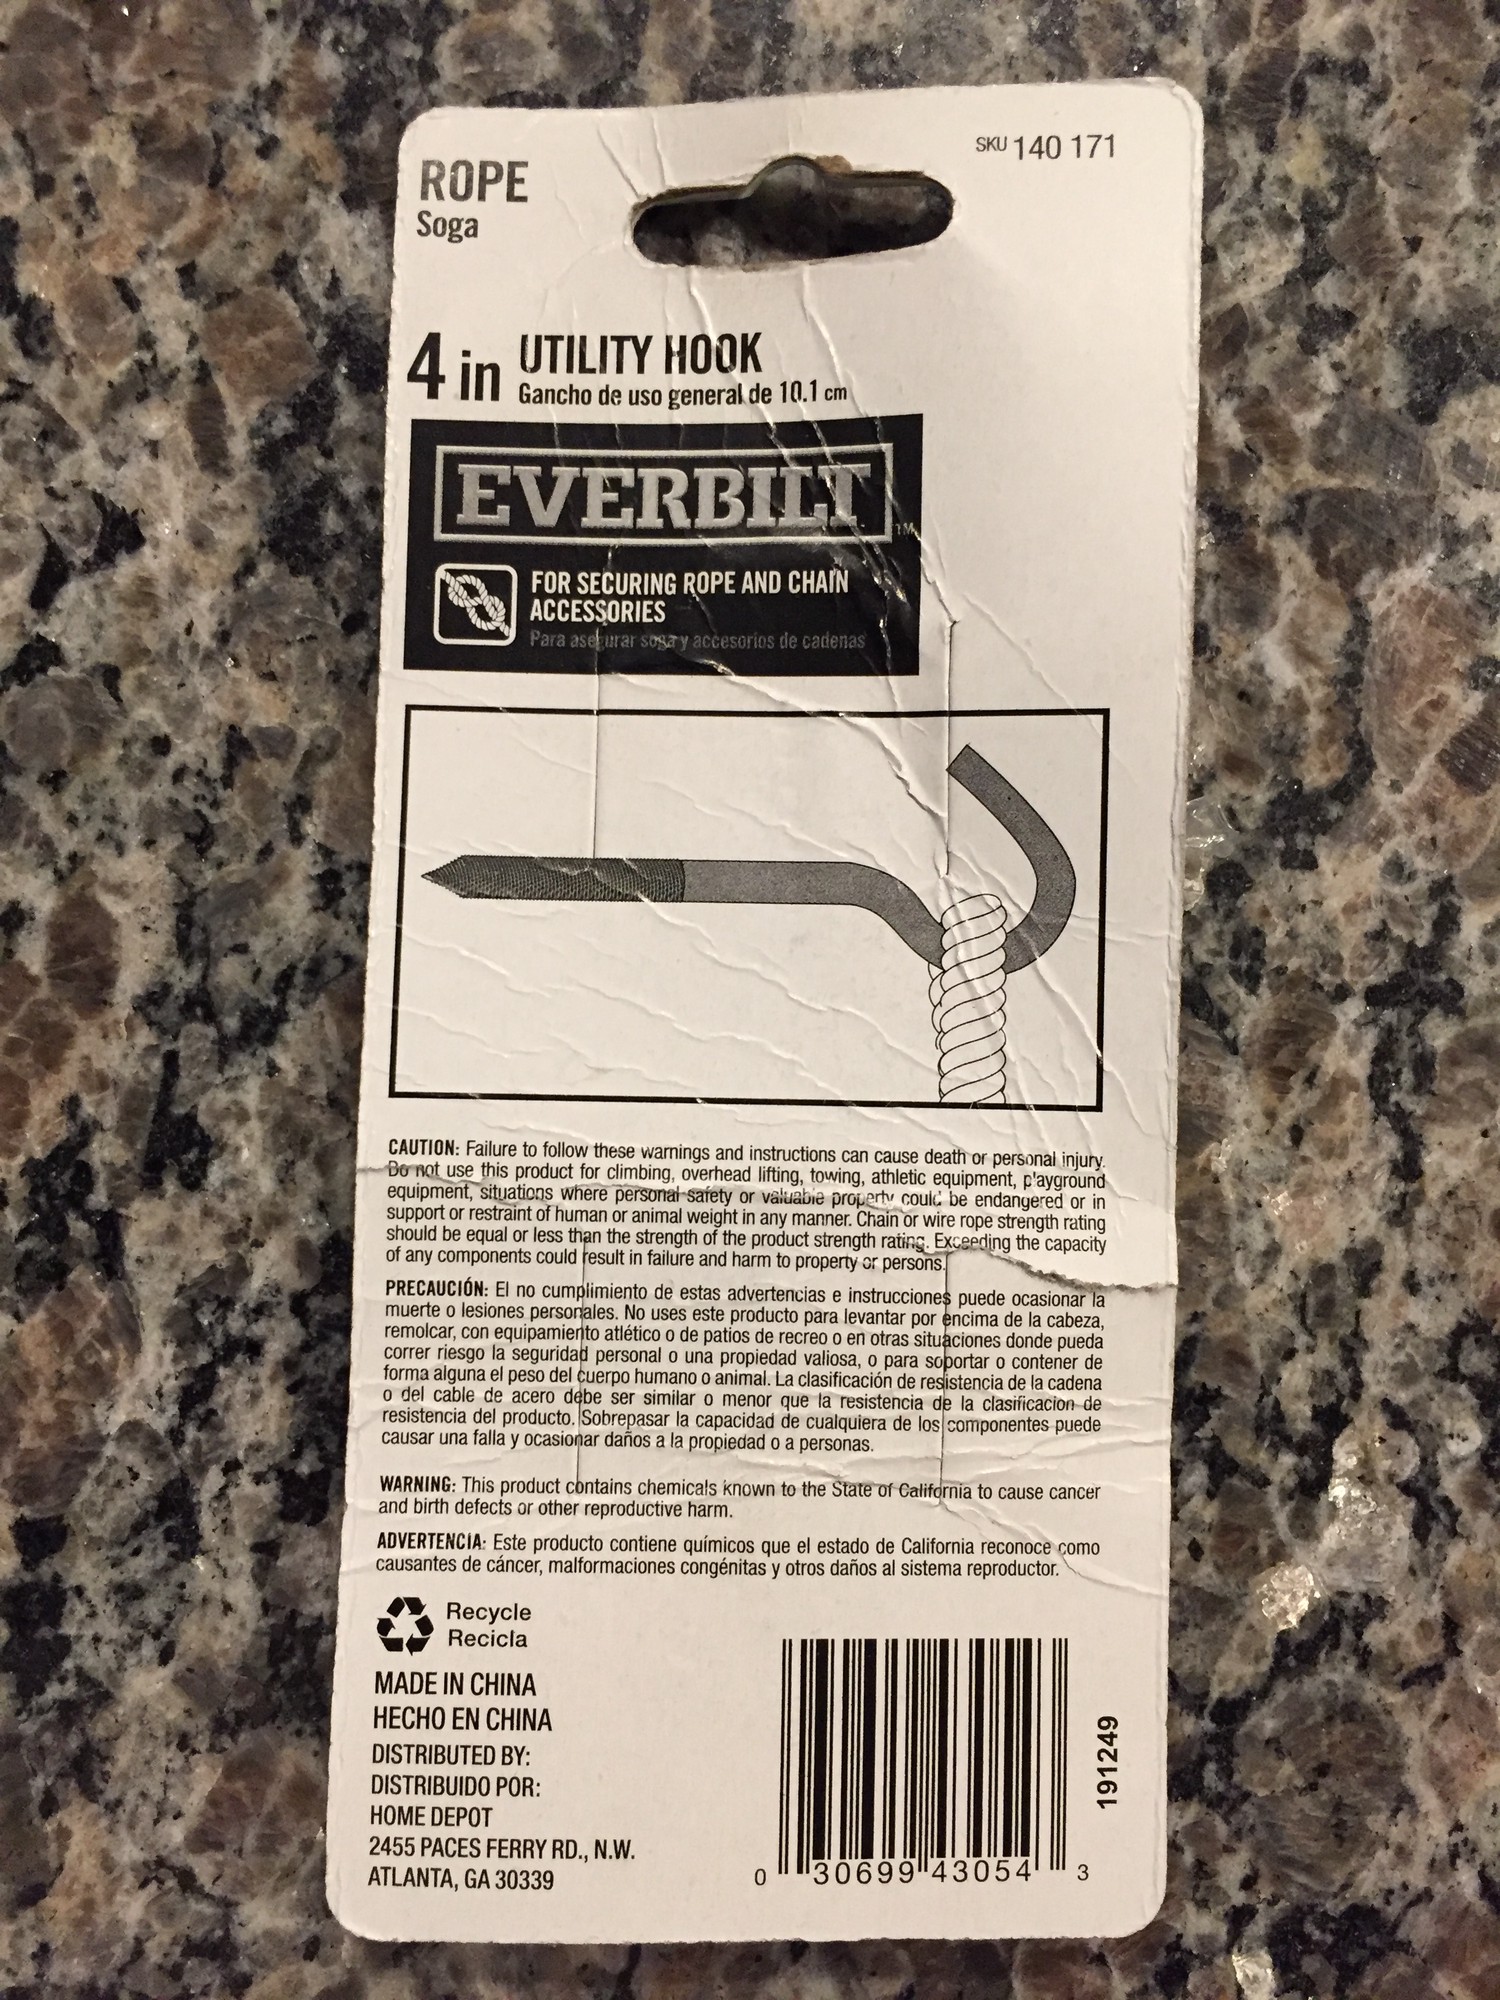
I’ve tested a pole system in my third water test (kayak dive) of this kayak. I aim to have my equipment possess multiple functionality due to the natural volume and weight restrictions of a kayak’s storage spaces. Since the anchor is at the nose of the kayak and I sit towards the rear beyond reach of the nose, I wanted the flag pole to also double as a drag chain grappel. Until this seal trial, I would have to have one of my buddies in another kayak hand me the drag chain. It’s simply a scrap dowel rod with two zinc plated hooks52 on either end (Home Depot didn’t have stainless still versions). I place the pole in any of the scupper holes vertically and it’s prevented from sliding through via an old tennis ball that I wedged onto the pole as a stopper. It serves well as a flag pole, however the bottom hook on the pole that extends below the hull tends to snag kelp and weeds in transit, so I found it best to remove the pole in weedy waters when paddling. It’s length is a little short to serve well as an achor retrieval pole; a pole about 2-3 feet longer would be excellent while its current length is around 5 feet. Considering this last point, I think I will likely swap this pole out for a telescoping boat hook similar to that found at West Marine53. This kind of pole is light weight and provides a collapsible form factor, which is key for meeting the aforementioned storage restrictions in a kayak.


Kayak Cart
TBD
Sea Trials
I’ve conducted two sea trials to date with great success.
First Sea Trial
The first was a simple paddle near the Marina of Redwood Shores.
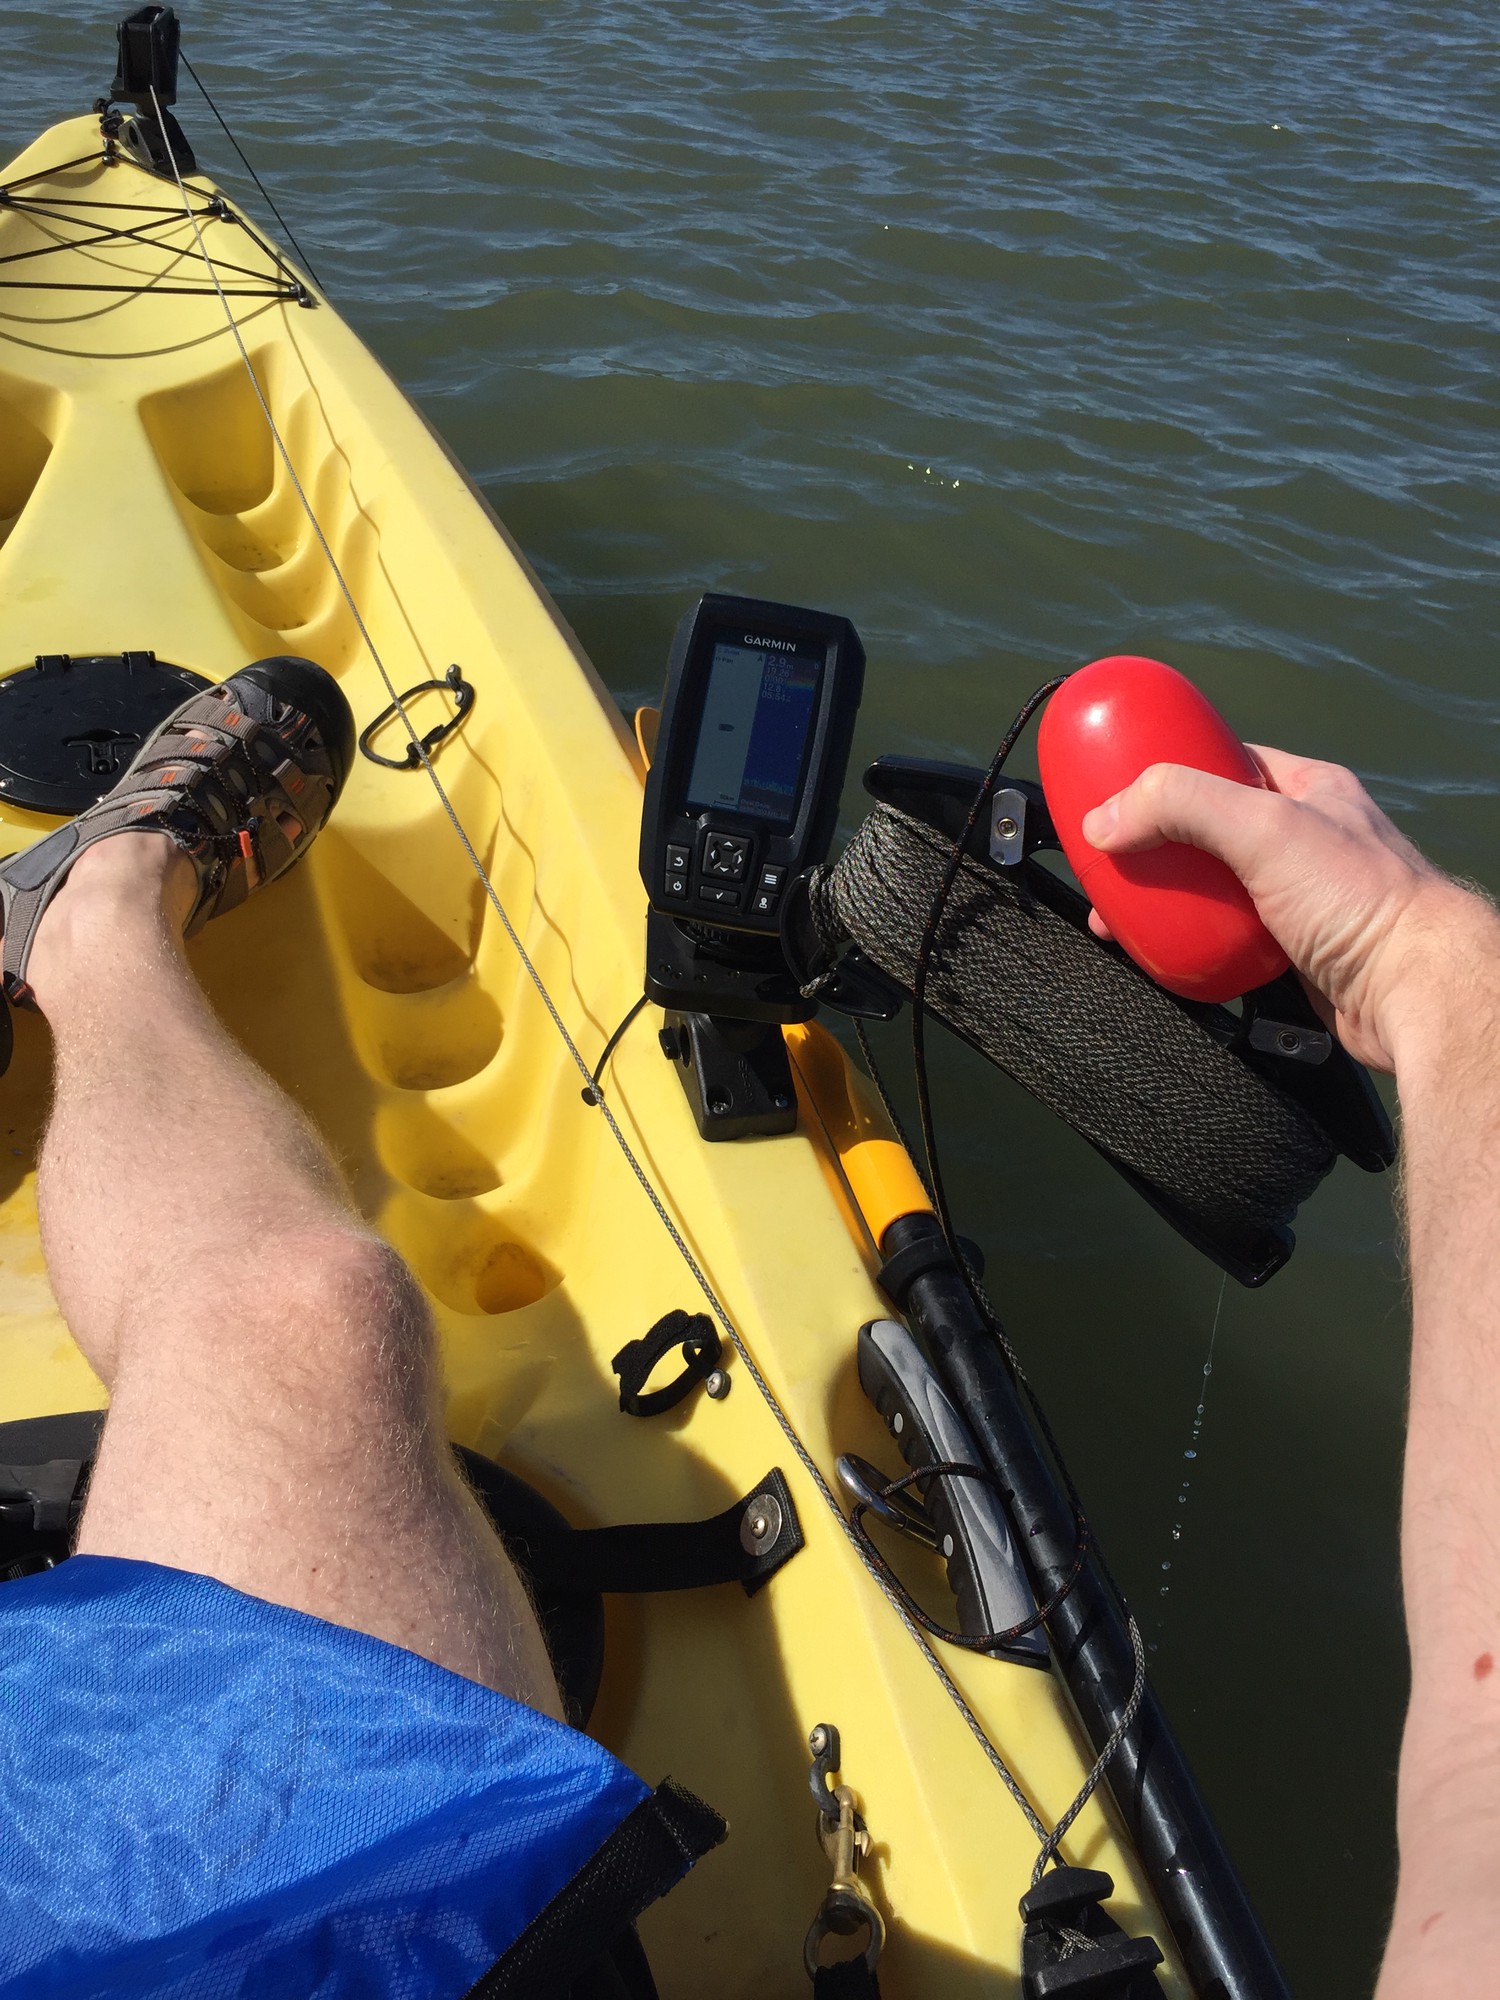
The depth finder worked on first attempt!
However, I did find that I will need a grapple/hook pole (perhaps a secondary purpose of my scuba flag pole?) to pull the anchor back into the kayak.
The stability of the kayak isn’t great enough for me to easily crawl to the bow of the kayak and pull in the lead chain/anchor by hand.
I was pleasantly surpised to find that the depth finder works with a minimal amount of water within its container. I had filled its container before traveling to the boat launch and much of it spilled out. However, this did not seem to affect the depth finder’s performance. It should be noted that its transducer was still (barely) submerged underwater in the container.

Second Sea Trial
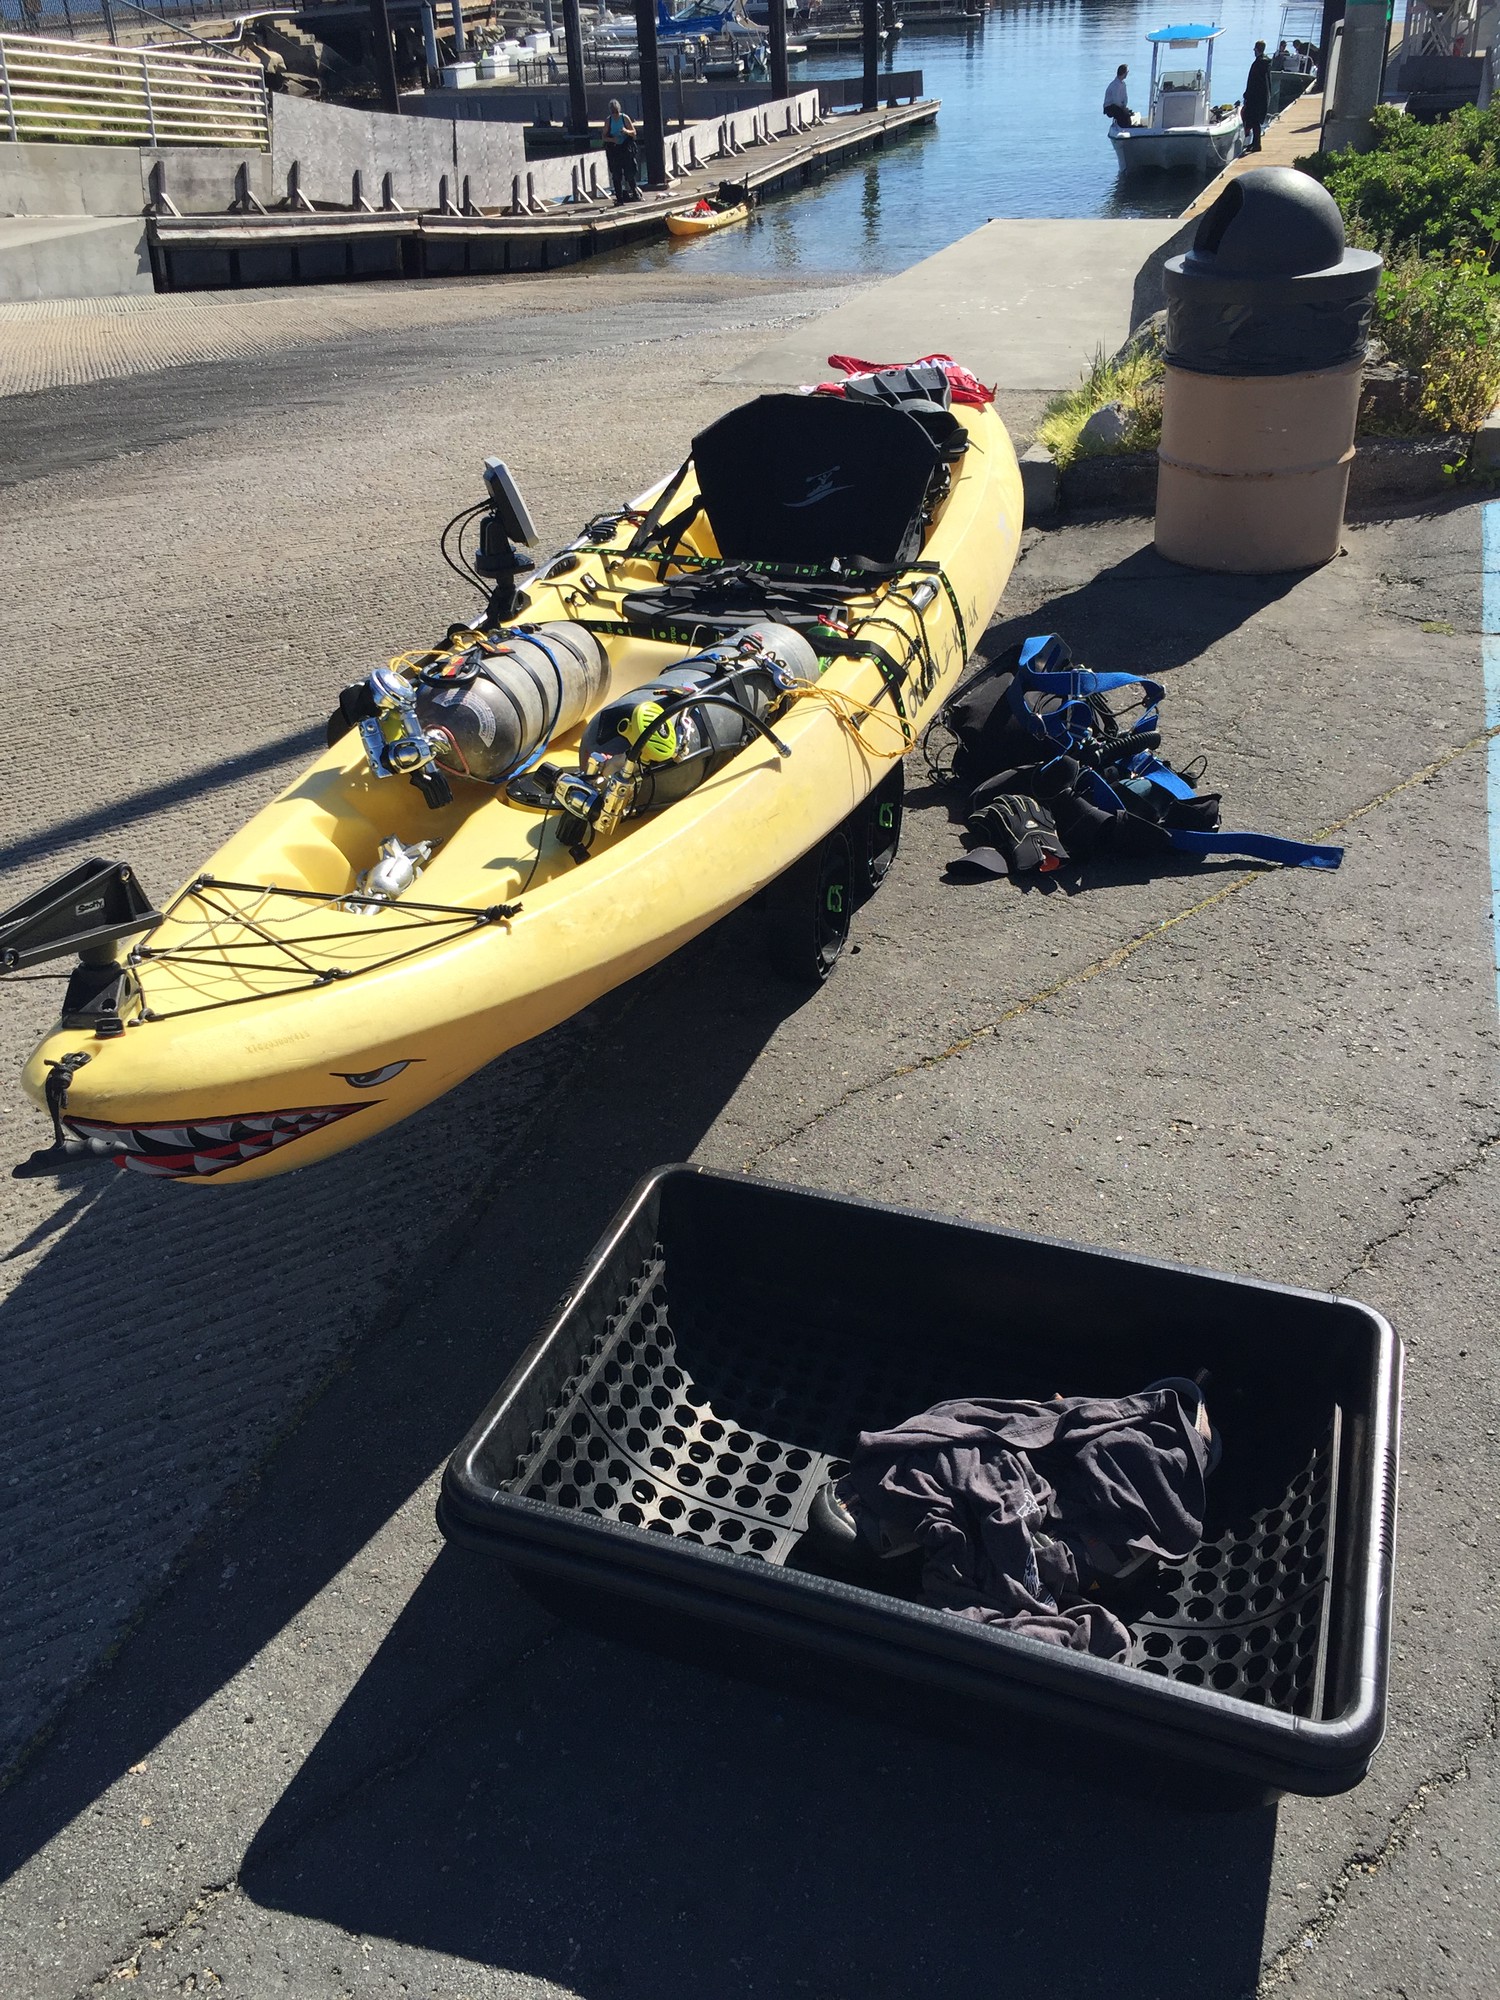
My second sea trial was in Monterey a day after the first sea trial. I performed one scuba dive from it (in sidemount configuration) near the Aquarium.
Once again, everything performed well with only the difficulty of retracting the anchor and its lead chain into the boat proving difficult.

-
https://www.montereybaykayaks.com/store/p495/USED_-_MALIBU_XL_TANDEM_Yellow_OCEAN_KAYAKS.html ↩︎
-
https://www.amazon.com/gp/product/B018V804GW/ref=ppx_yo_dt_b_asin_title_o03__o00_s00?ie=UTF8&psc=1 ↩︎
-
https://www.amazon.com/gp/product/B0752DFSJ3/ref=ppx_yo_dt_b_asin_title_o04__o00_s00?ie=UTF8&psc=1 ↩︎
-
https://www.amazon.com/gp/product/B0039L36VM/ref=ppx_yo_dt_b_asin_title_o07__o00_s00?ie=UTF8&psc=1 ↩︎
-
https://www.amazon.com/Shoreline-Marine-GOOP-3-7-Ounce-Clear/dp/B0098PNZLO/ref=asc_df_B0098PNZLO/?tag=hyprod-20&linkCode=df0&hvadid=312174029912&hvpos=1o1&hvnetw=g&hvrand=10086651288614281081&hvpone=&hvptwo=&hvqmt=&hvdev=c&hvdvcmdl=&hvlocint=&hvlocphy=9031968&hvtargid=pla-569861758050&psc=1&tag=&ref=&adgrpid=60913153863&hvpone=&hvptwo=&hvadid=312174029912&hvpos=1o1&hvnetw=g&hvrand=10086651288614281081&hvqmt=&hvdev=c&hvdvcmdl=&hvlocint=&hvlocphy=9031968&hvtargid=pla-569861758050 ↩︎
-
https://www.kayakerguide.com/the-essential-kayak-anchor-guide-be-still/ ↩︎
-
https://www.amazon.com/gp/product/B001M4HTNY/ref=ppx_yo_dt_b_asin_title_o00__o00_s00?ie=UTF8&psc=1 ↩︎
-
https://www.amazon.com/gp/product/B00PCIA5CS/ref=ppx_yo_dt_b_asin_title_o02__o00_s00?ie=UTF8&psc=1 ↩︎
-
https://www.amazon.com/gp/product/B01AA8Y8X6/ref=ppx_yo_dt_b_asin_title_o04__o00_s01?ie=UTF8&psc=1 ↩︎
-
https://www.amazon.com/gp/product/B00CF15AFC/ref=ppx_yo_dt_b_asin_title_o01__o00_s00?ie=UTF8&psc=1 ↩︎
-
https://www.amazon.com/gp/product/B0000AXTID/ref=ppx_yo_dt_b_asin_title_o01__o00_s01?ie=UTF8&psc=1 ↩︎
-
https://www.amazon.com/gp/product/B01MRTIWNJ/ref=ppx_yo_dt_b_asin_title_o01__o00_s01?ie=UTF8&psc=1 ↩︎
-
https://www.amazon.com/gp/product/B01MTDKGML/ref=ppx_yo_dt_b_asin_title_o00__o00_s00?ie=UTF8&psc=1 ↩︎
-
https://www.amazon.com/gp/product/B000N9T7JI/ref=ppx_yo_dt_b_asin_title_o00__o00_s00?ie=UTF8&psc=1 ↩︎
-
https://www.amazon.com/gp/product/B01H1SK1SO/ref=ppx_yo_dt_b_asin_title_o00__o00_s00?ie=UTF8&psc=1 ↩︎
-
https://www.amazon.com/gp/product/B072QBZDQS/ref=ppx_yo_dt_b_asin_title_o00__o00_s00?ie=UTF8&psc=1 ↩︎
-
https://www.amazon.com/gp/product/B01AQ5ZJZ4/ref=ppx_yo_dt_b_asin_title_o01__o00_s00?ie=UTF8&psc=1 ↩︎
-
https://www.amazon.com/gp/product/B00GA9CNUA/ref=ppx_yo_dt_b_asin_title_o06__o00_s00?ie=UTF8&psc=1 ↩︎
-
https://www.amazon.com/gp/product/B017WKL5J0/ref=ppx_yo_dt_b_asin_title_o09__o00_s00?ie=UTF8&psc=1 ↩︎
-
https://www.amazon.com/gp/product/B0771K1Z7Q/ref=ppx_yo_dt_b_asin_title_o03_s00?ie=UTF8&psc=1 ↩︎
-
https://www.amazon.com/gp/product/B00AOBGQ26/ref=ppx_yo_dt_b_asin_title_o03_s00?ie=UTF8&psc=1 ↩︎
-
https://www.amazon.com/gp/product/B078KBC5VH/ref=ppx_yo_dt_b_asin_title_o03_s01?ie=UTF8&psc=1 ↩︎
-
https://www.amazon.com/gp/product/B0002Q80RW/ref=ppx_yo_dt_b_asin_title_o03_s01?ie=UTF8&psc=1 ↩︎
-
https://www.amazon.com/gp/product/B003L643KS/ref=ppx_yo_dt_b_asin_title_o03_s01?ie=UTF8&psc=1 ↩︎
-
https://www.amazon.com/gp/product/B006LO9XHA/ref=ppx_yo_dt_b_asin_title_o06_s00?ie=UTF8&psc=1 ↩︎
-
https://www.amazon.com/gp/product/B00CJIBBJU/ref=ppx_yo_dt_b_asin_title_o07_s02?ie=UTF8&psc=1 ↩︎
-
https://www.amazon.com/gp/product/B078LVLHNF/ref=ppx_yo_dt_b_asin_title_o07_s03?ie=UTF8&psc=1 ↩︎
-
https://www.amazon.com/gp/product/B0166FFCHS/ref=oh_aui_search_asin_title?ie=UTF8&psc=1 ↩︎
-
https://www.amazon.com/Amazing-GOOP-170011-Marine-Adhesive/dp/B000BQUI7S/ref=sr_1_2?keywords=marine+grade+goop&qid=1553040406&s=gateway&sr=8-2 ↩︎
-
https://www.homedepot.com/p/Gardner-Bender-100-Piece-Terminal-Kit-TK-806/202518736 ↩︎
-
https://www.homedepot.com/p/Everbilt-8-32-Coarse-Stainless-Steel-Nylon-Lock-Nut-4-per-Pack-800101/204274164 ↩︎
-
https://www.homedepot.com/p/Everbilt-8-32-x-2-1-2-in-Coarse-Stainless-Steel-Round-Head-Combination-Machine-Screw-2-per-Pack-814271/204274793 ↩︎
-
https://www.homedepot.com/p/Everbilt-8-Stainless-Steel-Flat-Washer-12-Pack-800321/204276460 ↩︎
-
https://www.amazon.com/Garmin-Striker-Transducer-Fishfinder-Traditional/dp/B017NI17HQ ↩︎
-
https://www.homedepot.com/p/Scotch-1-in-x-3-in-Black-Extreme-Fasteners-2-Sets-per-Pack-RF6731/204465390 ↩︎
-
https://www.acehardware.com/departments/hardware/hanging-and-mounting/temporary-mounting/5636634?x429=true&utm_source=google&utm_medium=cpc&gclid=CjwKCAjwycfkBRAFEiwAnLX5IciuyvJyQ-gMFOlkEbxXKVDrD4waGN2hDkzDXS9vG5jWsE57iGuDpxoC024QAvD_BwE ↩︎
-
https://www.homedepot.com/p/Gardner-Bender-1-lb-Plug-Duct-Seal-Compound-DS-110/100212441 ↩︎
-
https://www.amazon.com/gp/product/B00PCIA5CS/ref=ppx_yo_dt_b_asin_title_o03_s01?ie=UTF8&psc=1 ↩︎
-
https://www.amazon.com/gp/product/B00CJ8KY3E/ref=ppx_yo_dt_b_asin_title_o04_s00?ie=UTF8&psc=1 ↩︎
-
https://www.amazon.com/gp/product/B001M4HT2K/ref=ppx_yo_dt_b_asin_title_o05_s00?ie=UTF8&psc=1 ↩︎
-
https://www.amazon.com/gp/product/B017N313B6/ref=ppx_yo_dt_b_asin_title_o07_s00?ie=UTF8&psc=1 ↩︎
-
https://www.amazon.com/gp/product/B00KVQQ3XG/ref=ppx_yo_dt_b_asin_title_o02_s00?ie=UTF8&psc=1 ↩︎
-
https://www.homedepot.com/p/Everbilt-3-9-in-Zinc-Plated-Utility-Screw-Hook-2-Pack-43054/205883114 ↩︎
-
https://www.westmarine.com/buy/west-marine--heavy-duty-floating-telescoping-boat-hook-6-to-14--7784267?mrkgcl=481&mrkgadid=3337277358&cm_mmc=PS-_-Google-_-GSC%3EBrand-_-7784267&product_id=7784267&adpos=1o1&creative=343879478152&device=c&matchtype=&network=g&gclid=CjwKCAjw8qjnBRA-EiwAaNvhwP7X4csFIIUFCD0wiYHYCdWUmJQFWSxTXhOZBZ45kaeH4UKmoJRT5hoCIY0QAvD_BwE ↩︎